
Welcome to this series of tutorials, which teaches you the basic tools and techniques of StudioCraft for InDesign.
To prepare InDesign files for use with CreateTOTALLY, you need to install our StudioCraft app. This can be downloaded here.
Document set-up
Before you start to tag your artwork for automation, make sure:
- Document is set-up as single pages - the size of the document determines how it will re-size. Having your document set-up as a single page, will make sure it re-sizes from the centre of the document. If your document is set-up as spreads, go to document set-up and uncheck facing pages, then delete the 1st parent page.
- There are no hidden characters in your copy - if you are testing your artwork or don't plan on changing the copy, always go to Type > Show hidden characters and check to make sure there aren't any hidden characters in your text. This can make automation behave unexpectedly
- Your layers are in the correct order - the order of your layers determines the order the variable elements appear in the platform. So if you want users to customise the headline and then the sub-heading, make sure the sub-heading appears after the headline layer
- Color profiles - all images have the same colour profile applied and this is also applied to the document
- Images are optimised - to improve the performance of automation, ensure images are optimised for the quality you require. For example, don’t use large tiff files for small digital outputs.
- Outline fonts in linked Illustrator files - any fonts in linked images should be outlined to ensure they render as expected
Font usage
All fonts need to be installed before creating adaptations so that your artwork is created as expected. Any new fonts should be supplied to your Account Manager to install. Please note - Adobe fonts are not compatible with InDesign server. A licenced copy of the font must be provided for installation.
Special features
There are certain layer names that will result in a special command being automatically applied:
- qrcode - if your artwork includes a QR code, naming the layer qrcode will automatically convert a URL entered into a scannable QR code
- Character styles - if you would like users to be able to apply specified character styles to customisable text, simply set-up named character styles within your InDesign document
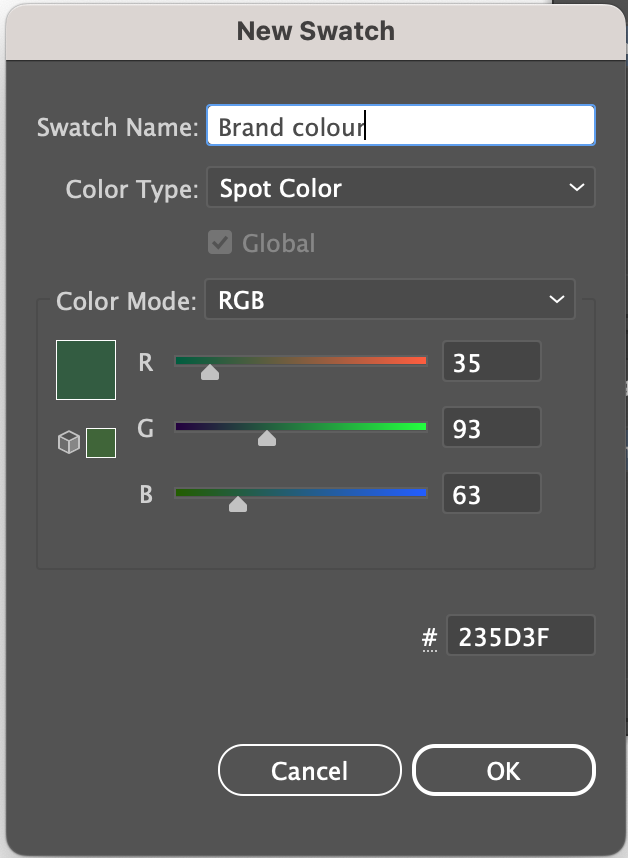
- Updating spot colours - You can change a named swatch colour within your InDesign file to a different colour during customisation. This is achieved by using a variable Illustrator file, that contains the colour you want to apply. To set this up:
- Add a spot colour swatch to your InDesign project
- Set the colour type to spot colour, not process
- Ensure the colour mode matches the intended output (e.g. RGB or CMYK)
- Apply the swatch colour to all the elements that it should control
- Add a linked image containing a swatch of the SAME name (also set to be a spot colour and the same colour mode).
- Update the name of this layer, as this will be an image variable
- Add a colour swatch of the SAME name to all of your variable images. Note - these need to be Illustrator files
- Add a spot colour swatch to your InDesign project
Introduction to tagging your document
Tagging is a term that we use to describe setting up the rules around how an element should behave when its content is updated and/ or the project is re-sized.
Each object (image or text frame) can have an individual tag applied. These can be set-up either by going:
- CreateTOTALLY > Add/ edit tag (while selecting the object you want to tag)
- CreateTOTALLY > Tagged items Panel > New/ Edit (selecting an existing tag if it is there)
The name of the tag will come from the name of the object in the layers palette. We recommend naming all your layers and not leaving in the default values.
In general there are 3 things you can control
- Resize and scale - how your image/ text box will scale and from what direction
- Behaviour - how the object will move in relation to other elements on the page.
- Content - how the content within the frame will re-size. For text this allows you to set minimum and maximum font sizes. For images this lets you set an alpha channel and determine how the image scales.
The guide below will take you through in detail what the effect of each of these controls are on your document.
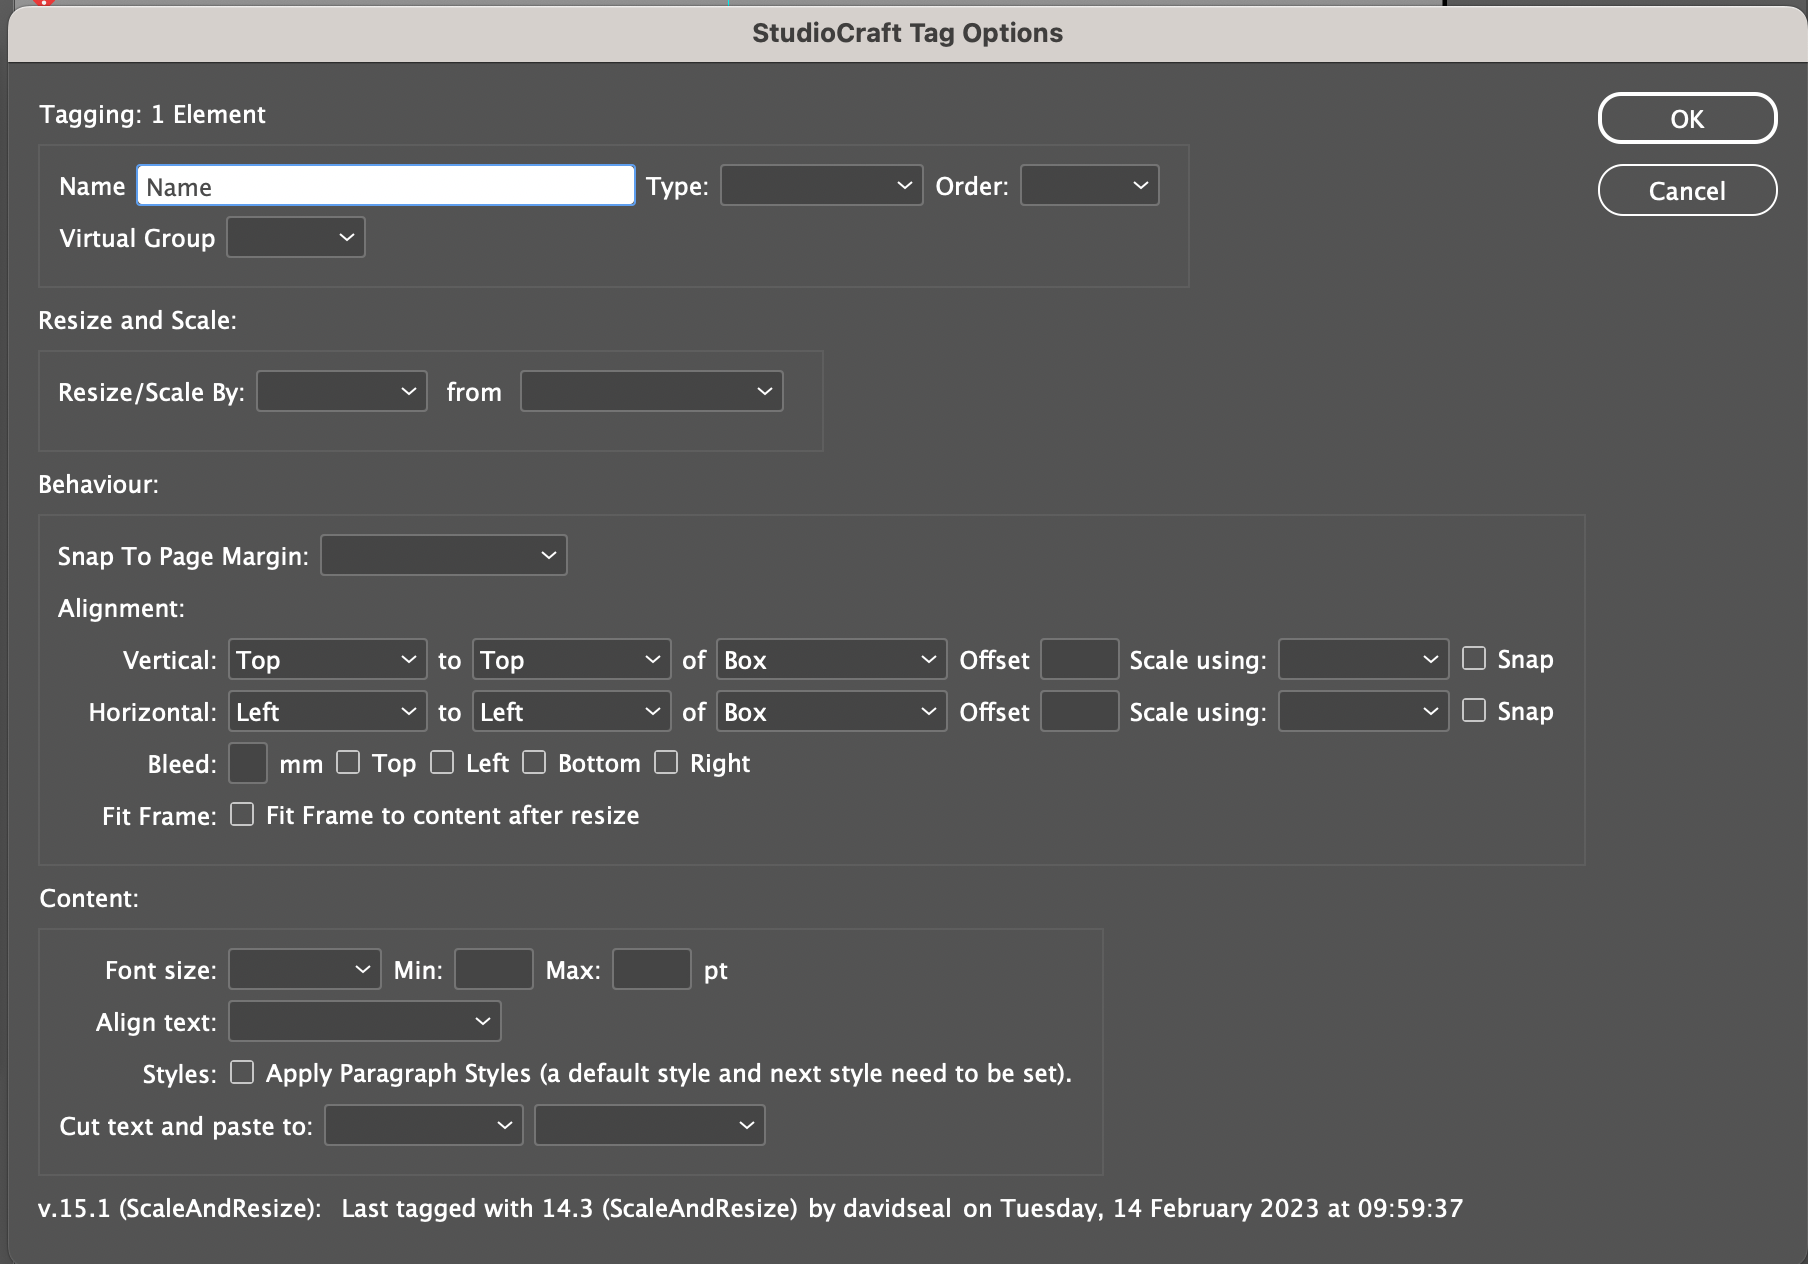
Tagging - Image
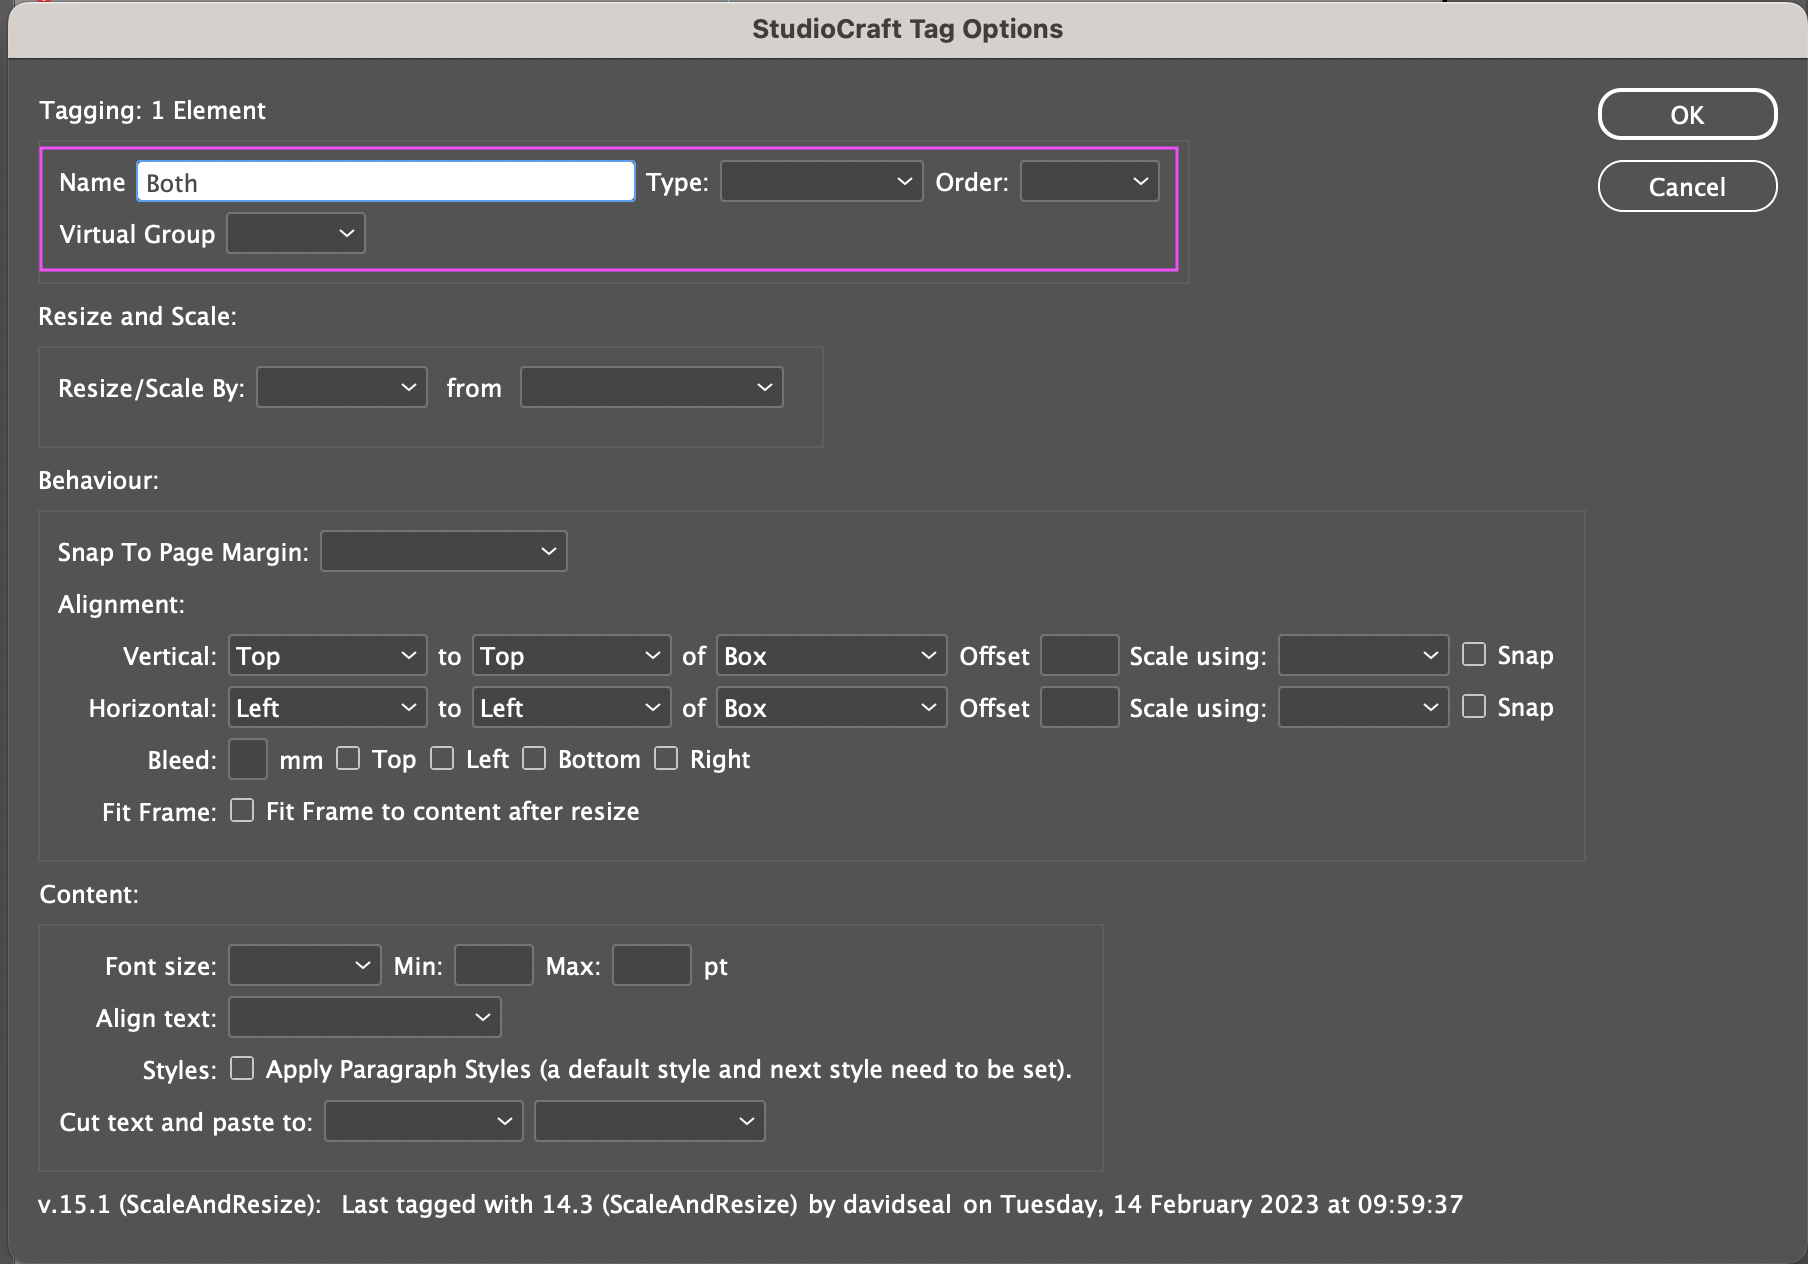
Tag Name
This is pre-populated with the page element name in the Layer panel. If you change the Tag Name it will update the object name in the Layer panel.
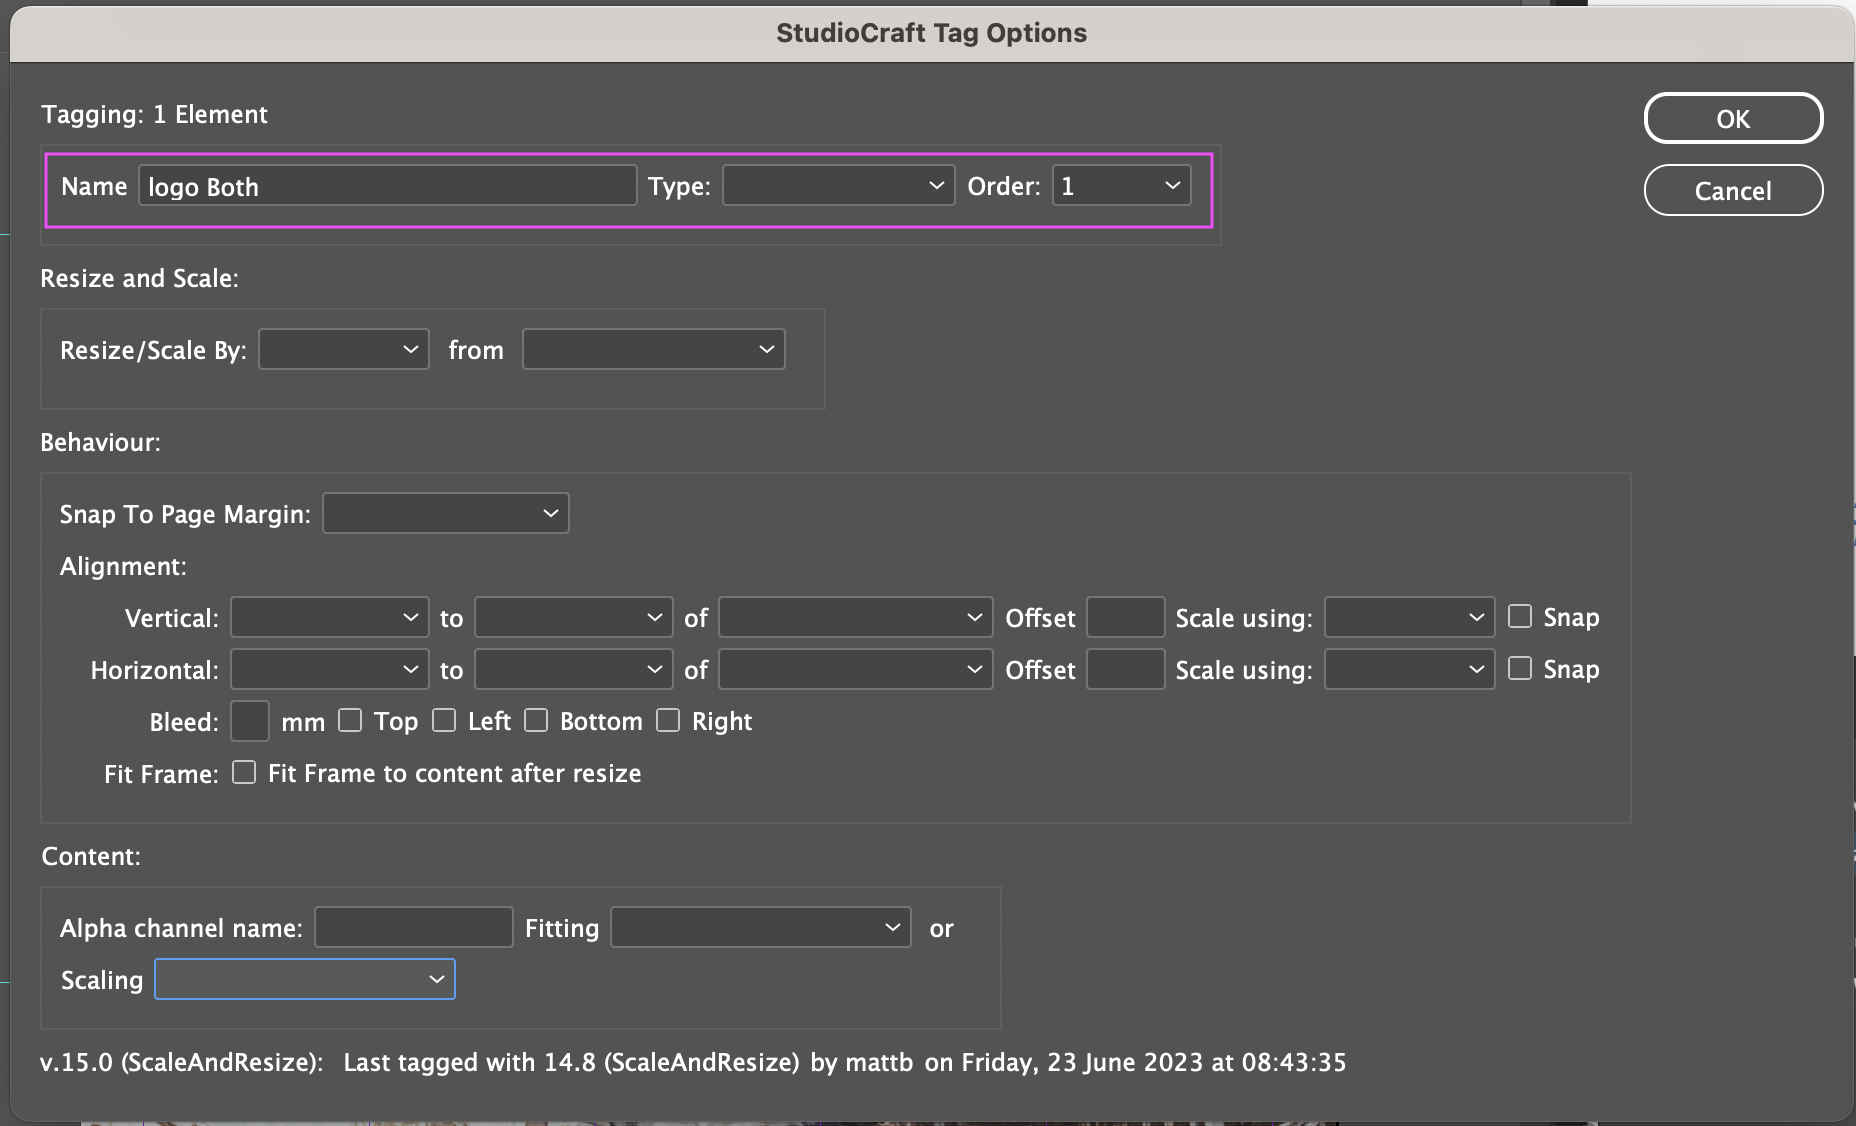
Tag Order
After the document re-sizes, there is an order with which each element of the artwork will re-size. This is important if elements need to re-size in relation to each other for example you may want the Logo to be positioned first and then the headline to align to the new logo position.
You can effectively stack multiple tagged objects by assigning a number for each tagged object.
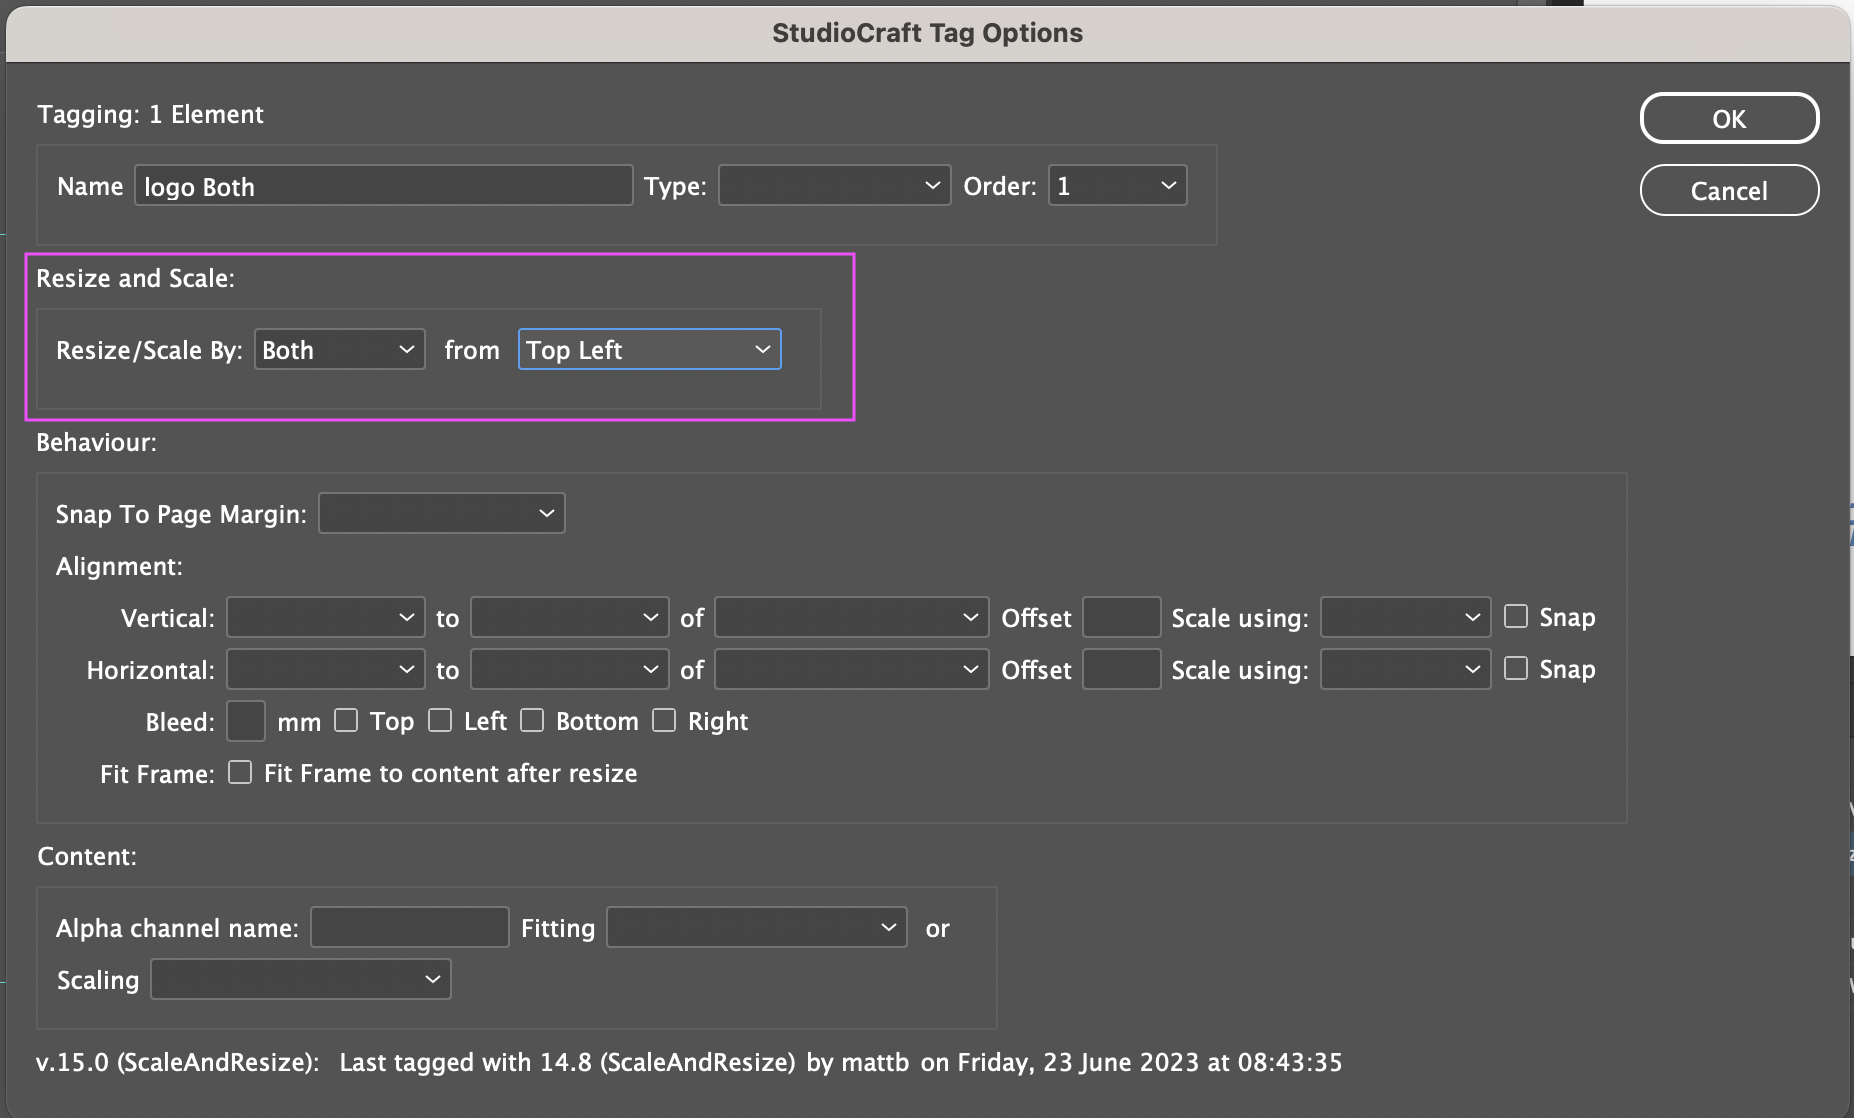
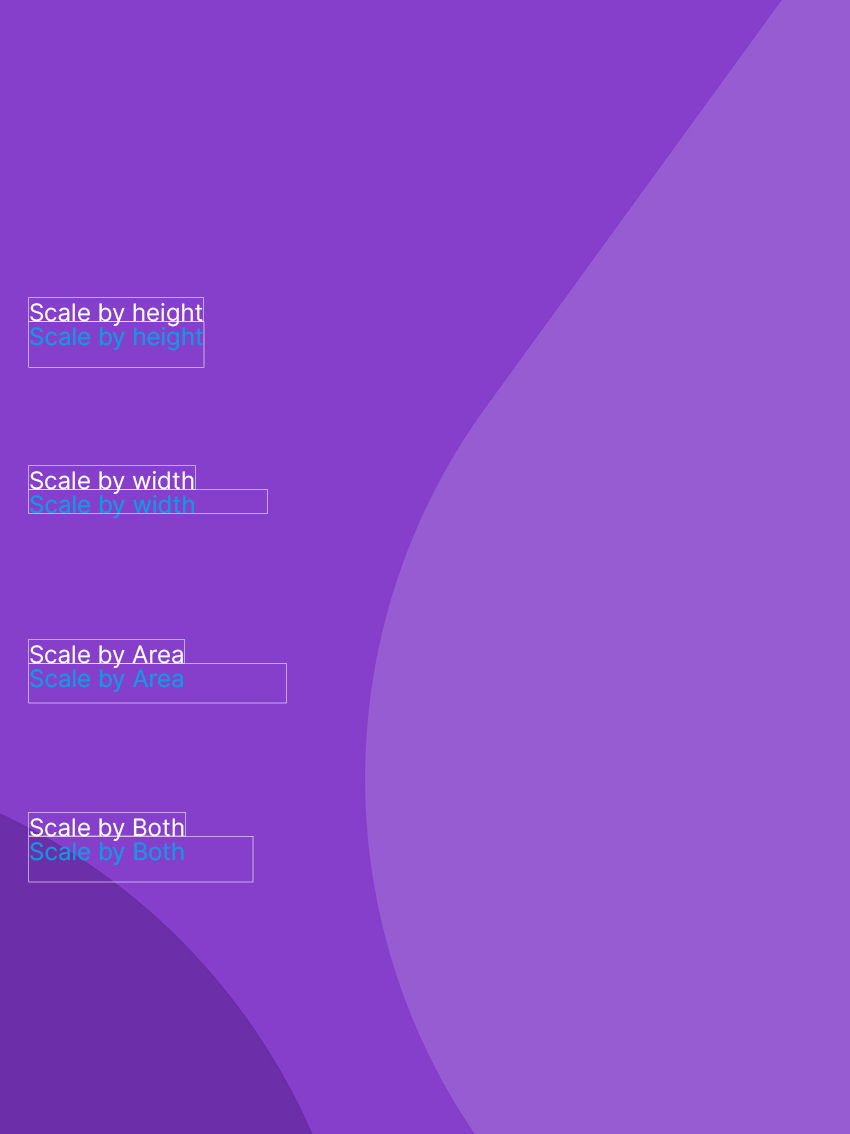
Resize/Scale By
When your project is re-sized, the effect this has on images is determined by the resize/ scale by options. These settings determine the size the image container will be.
Steps:
- Click on the element you want to tag.
- Open the Add/ Edit tags menu option from the CreateTOTALLY menu
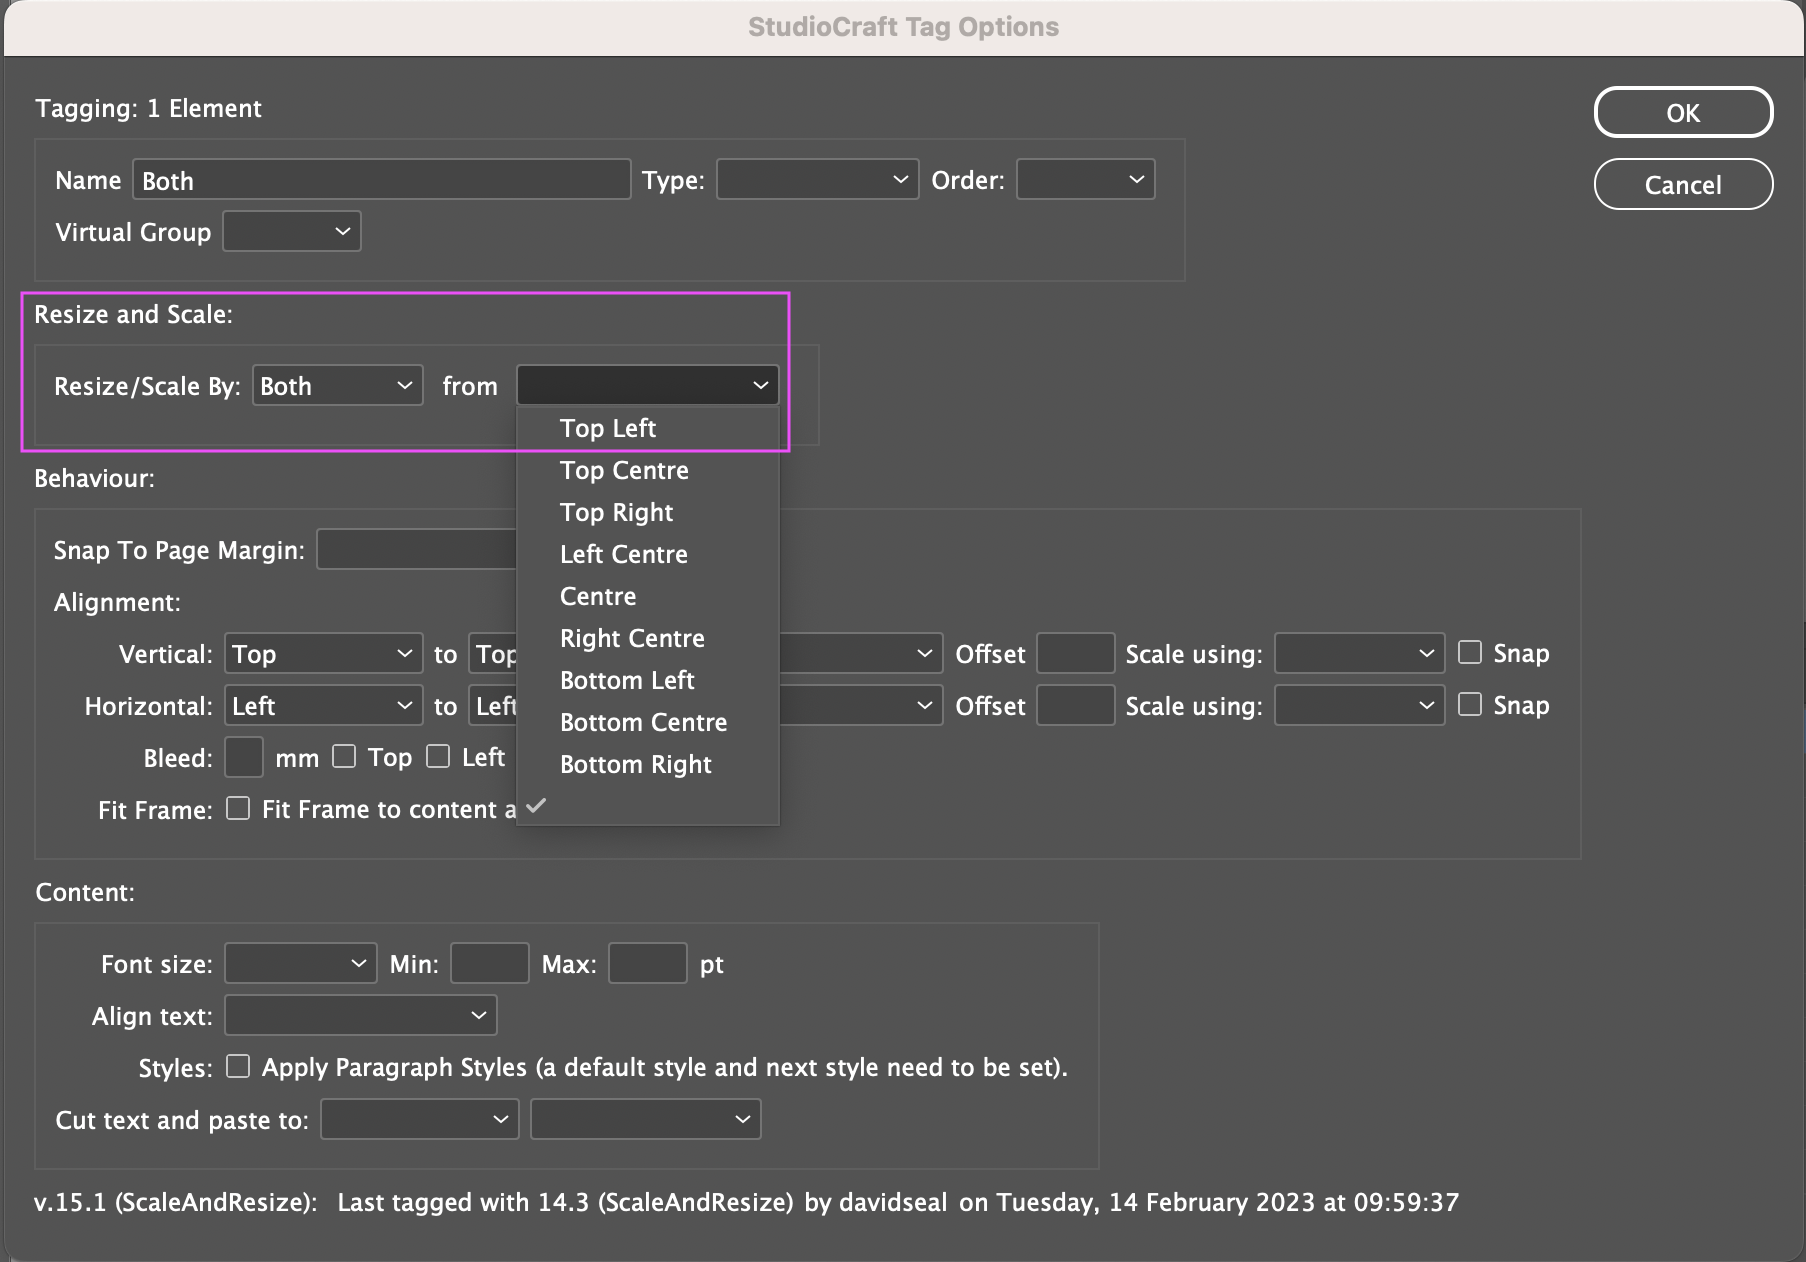
- In the Resize and Scale section, click on Resize/Scale By dropdown to select how to re-size the image box when the document re-sizes. The options are:
- Both - the % increase in width and height to the overall document will be applied to both the width and the height of the image container
- Width - the % increase in width to the overall document will be applied to the width of the image container
- Height - the % increase in height to the overall document will be applied to the height of the image container
- Area -
- Use the dropdown to select from the following position options:
- Top
- Top Left
- Top Right
- Bottom
- Bottom Left
- Bottom Right
- You can also use the checkbox Fit Frame to content after resize (in the behaviour section). This will fit the frame to the resized element, which can be useful if you are aligning another element to the image.
- Click the OK button to save your Tags and close Tags dialog box.
Get files Sample file to practice with (ZIP, 1.4 MB)


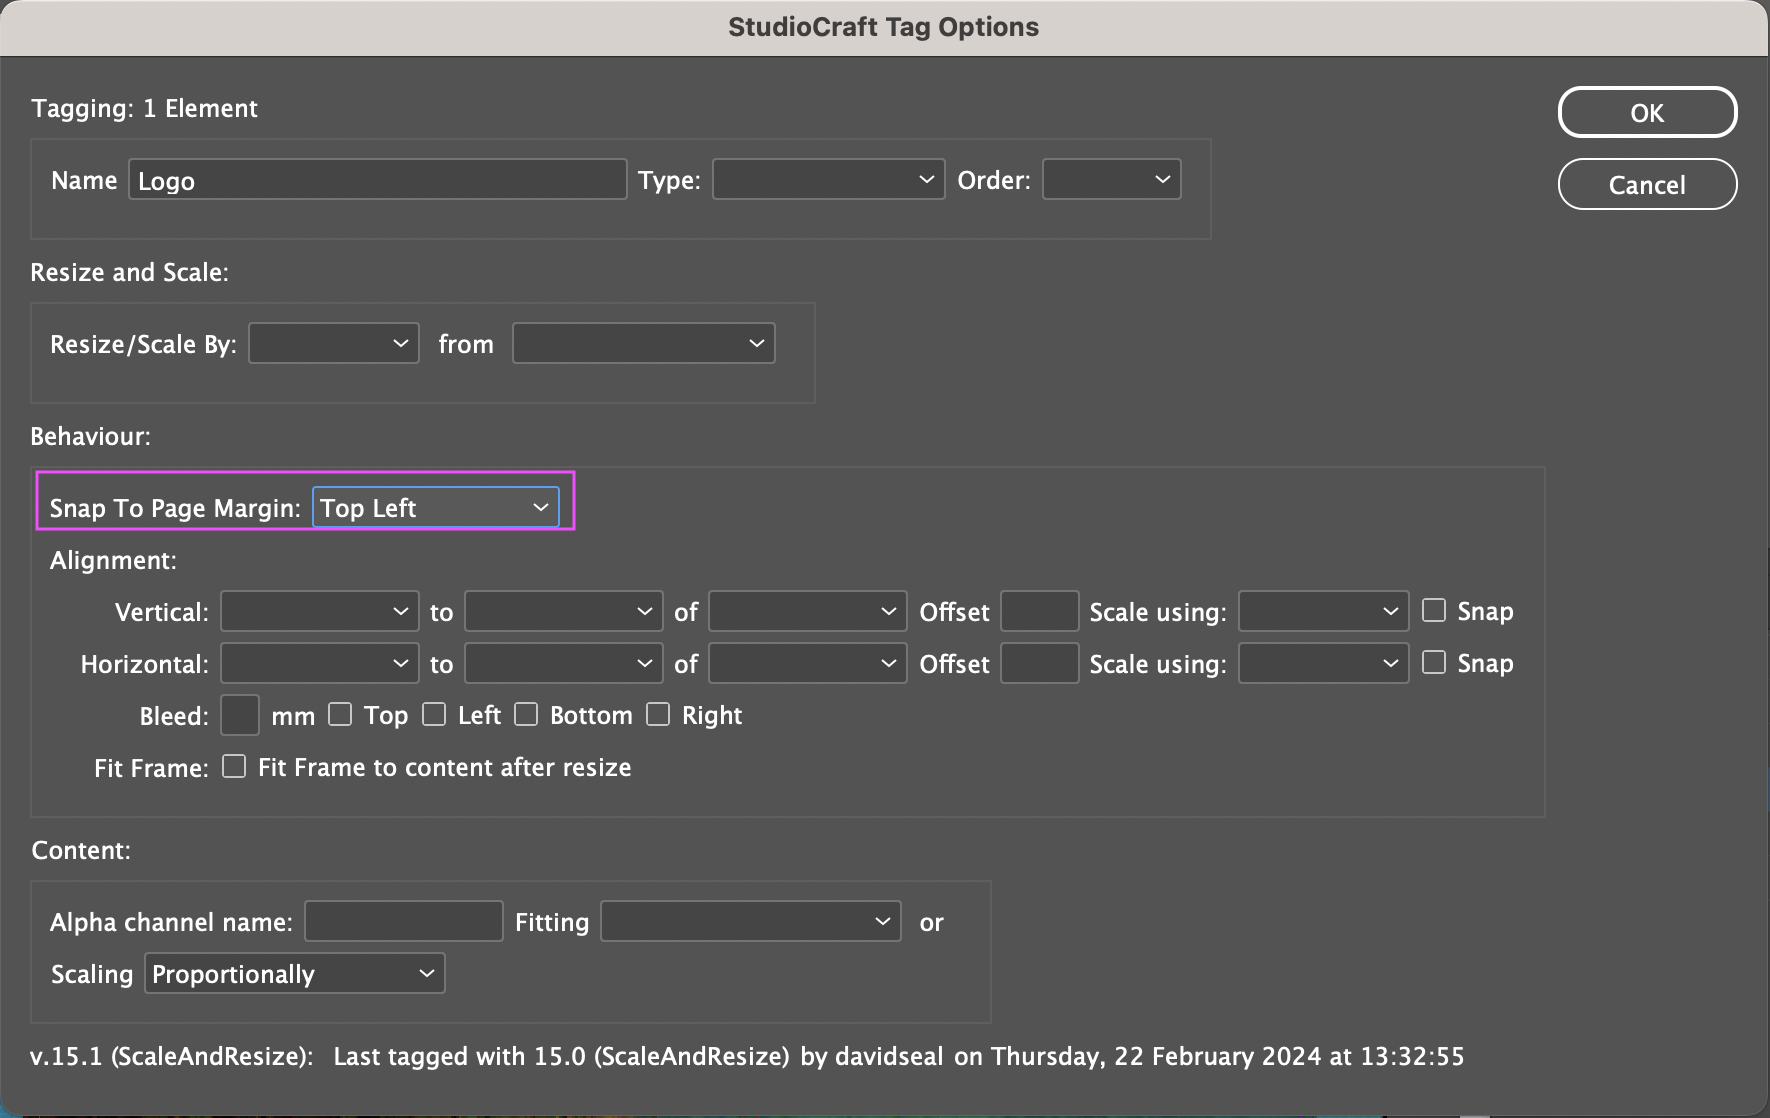
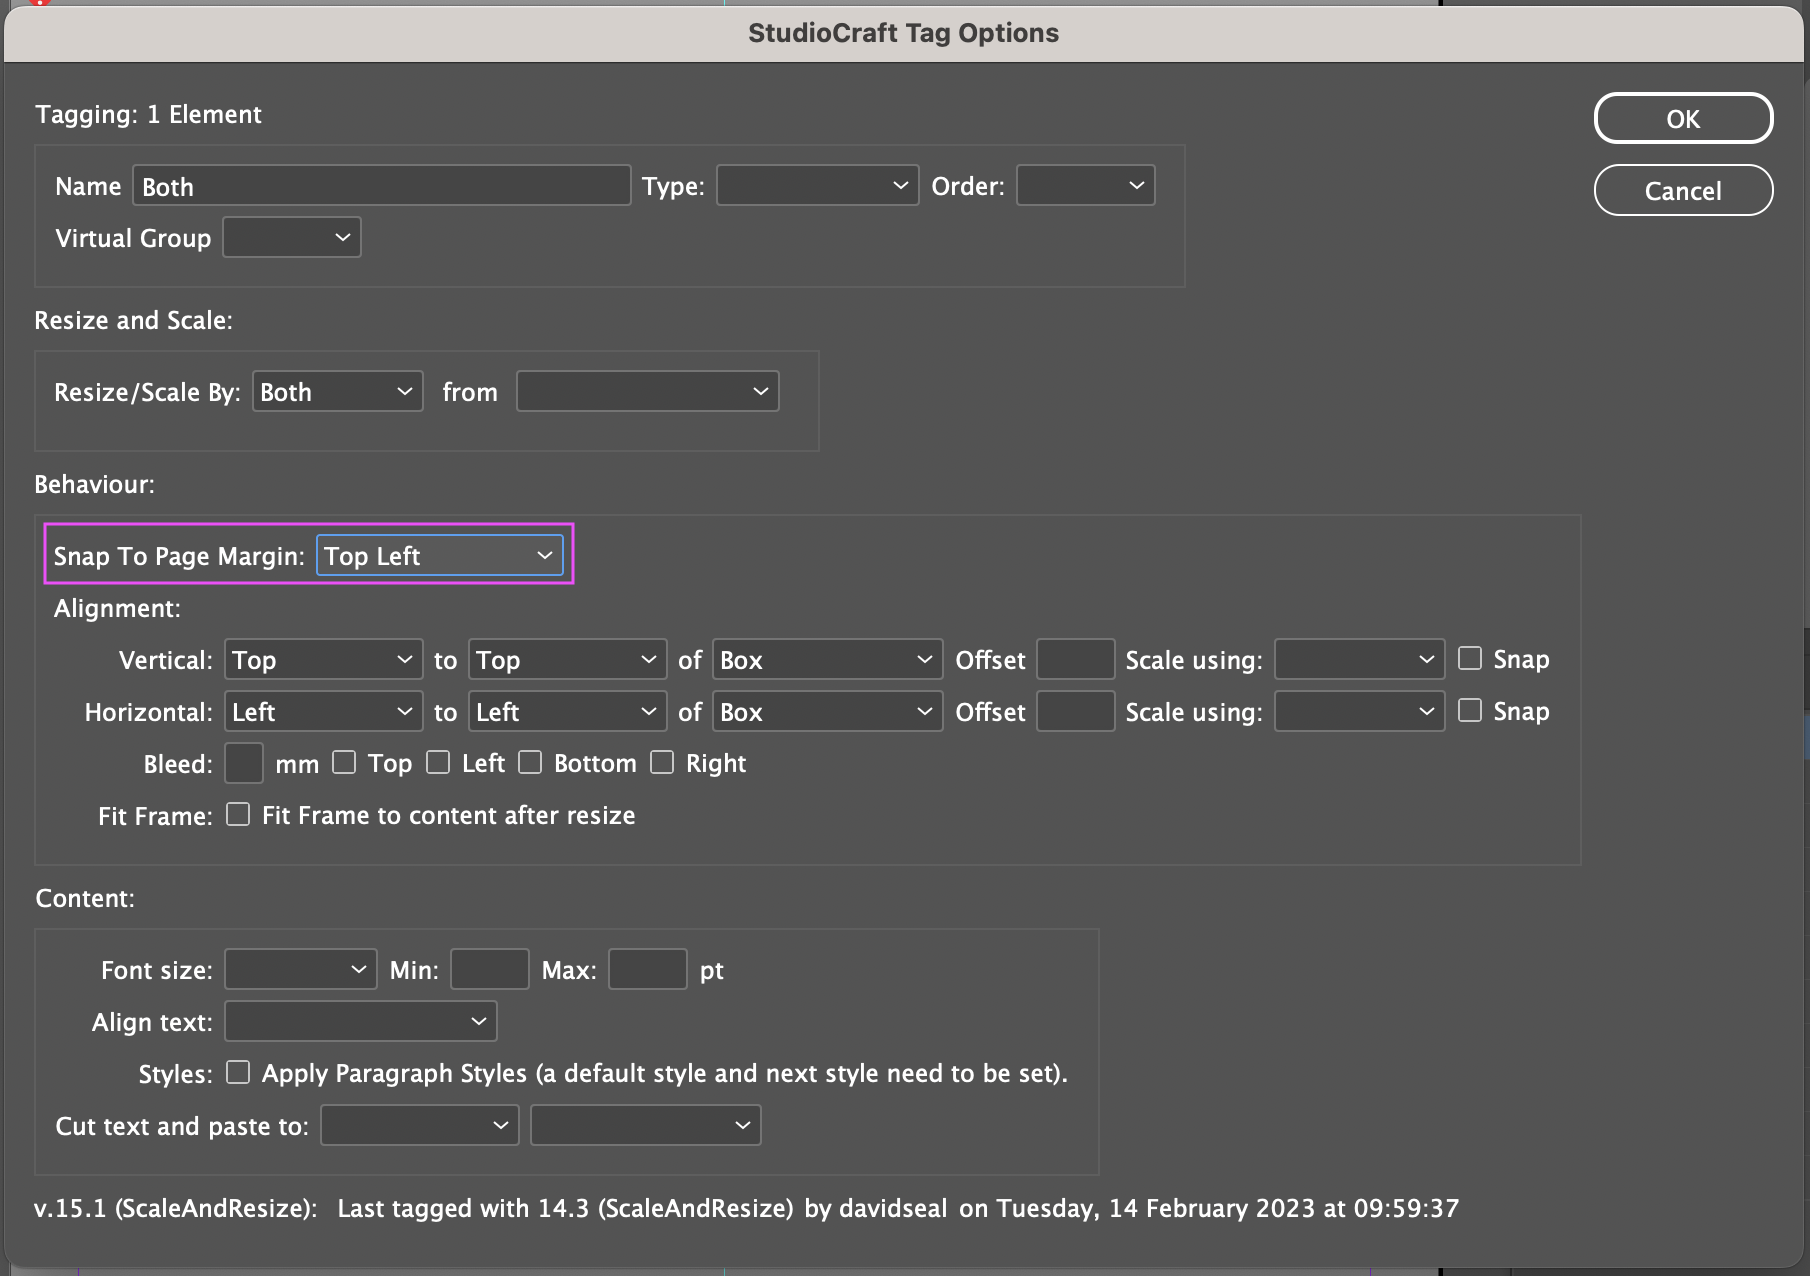
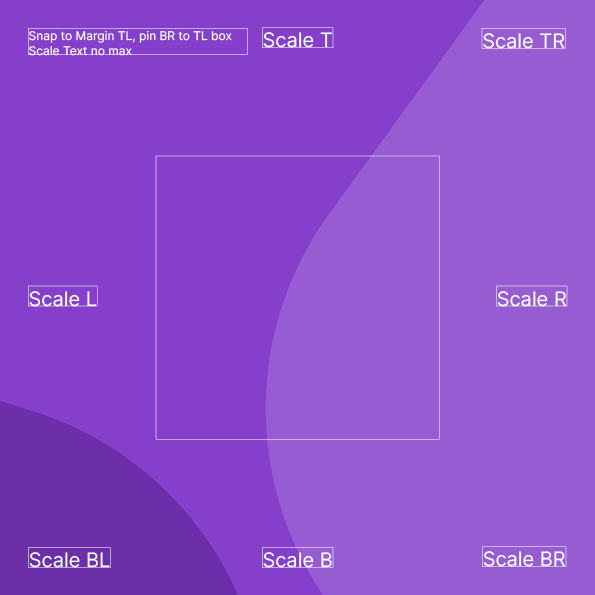
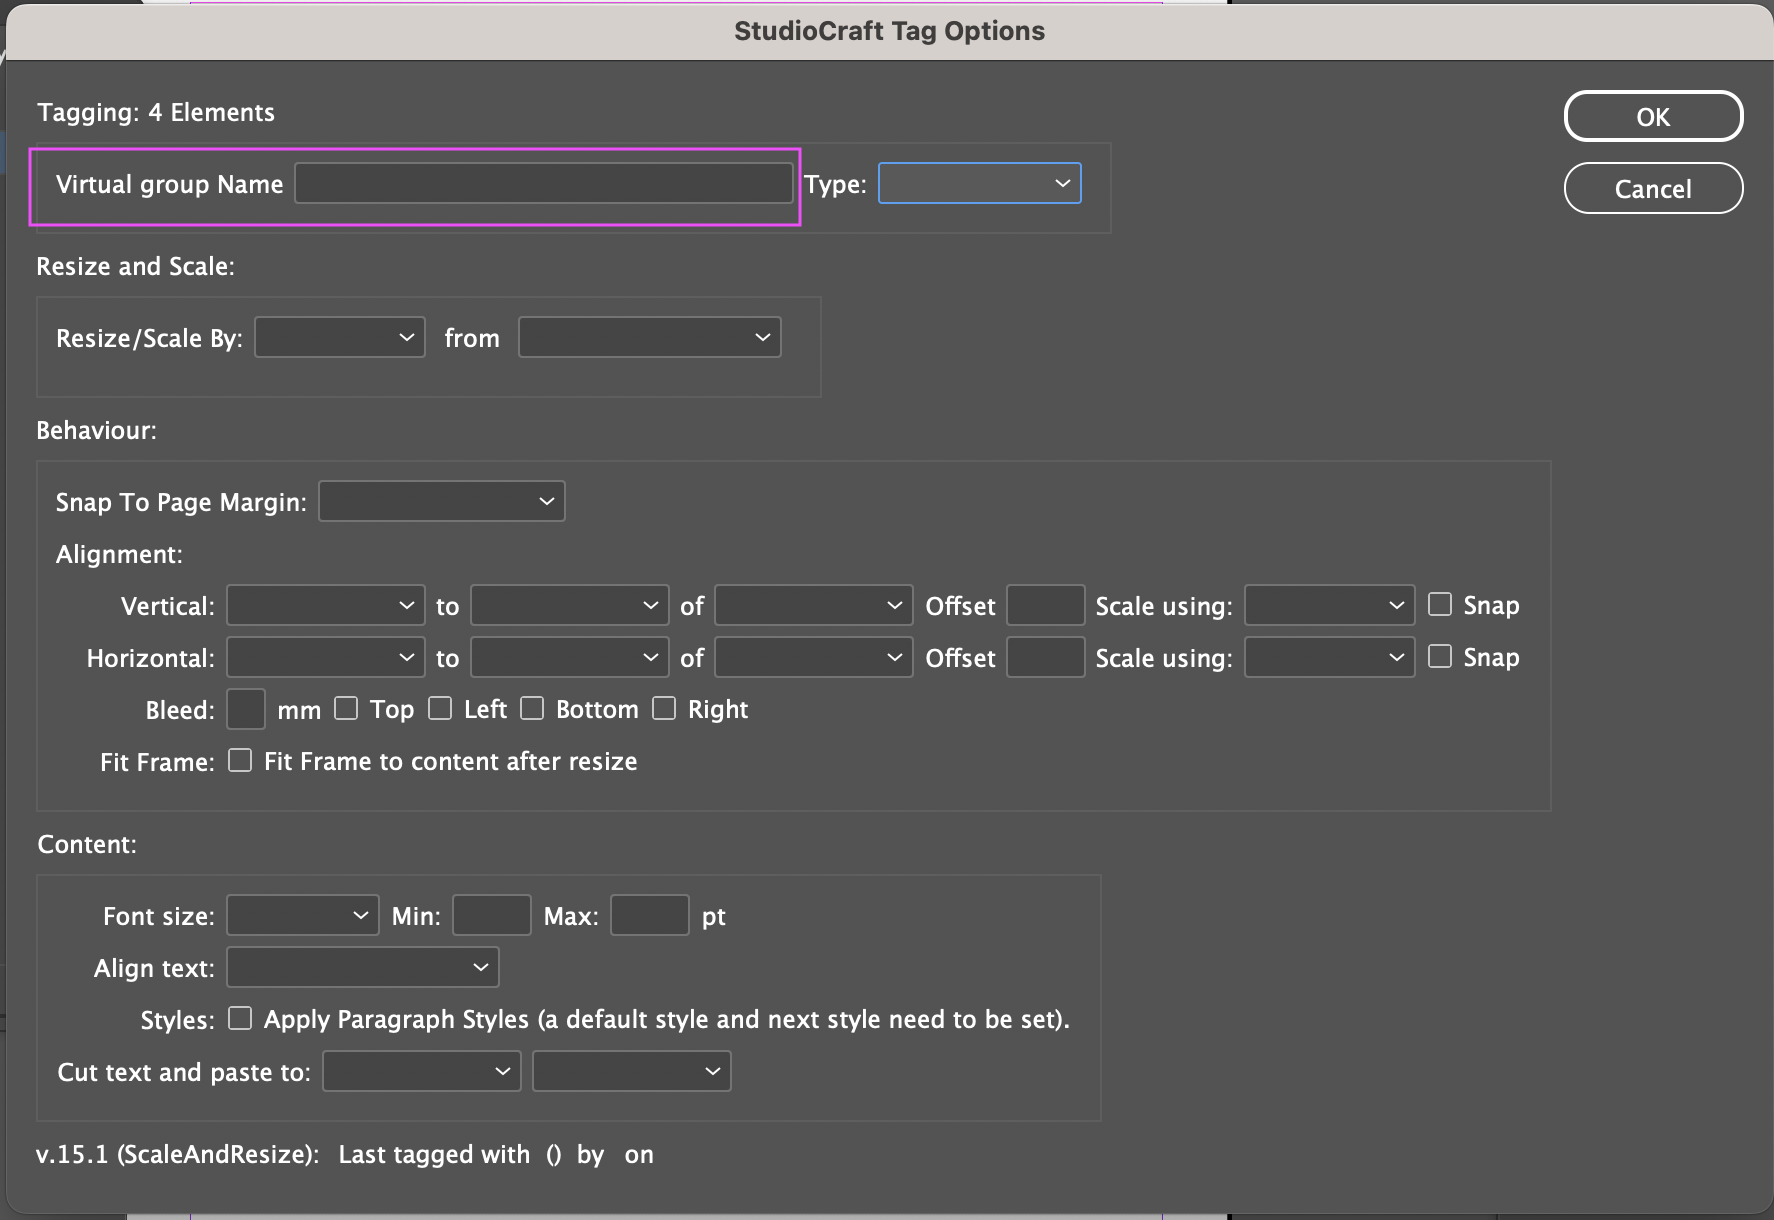
Behaviour: Snap to Margin
Snap to margin can be used to control where an image moves to after the document is re-sized.
Steps:
- Click on the element you want to tag.
- Open the Add/ Edit tags menu option from the CreateTOTALLY menu
- In the Behaviour section, click on the Snap to Margin drop-down. After the document re-sizes, the image container will snap (grow) to the selected location. The options are:
- Top
- Top Left
- Top Right
- Bottom
- Bottom Left
- Bottom Right
- Click the OK button to save your Tags and close Tags dialog box.
Get files Sample file to practice with (ZIP, 1.3 MB)


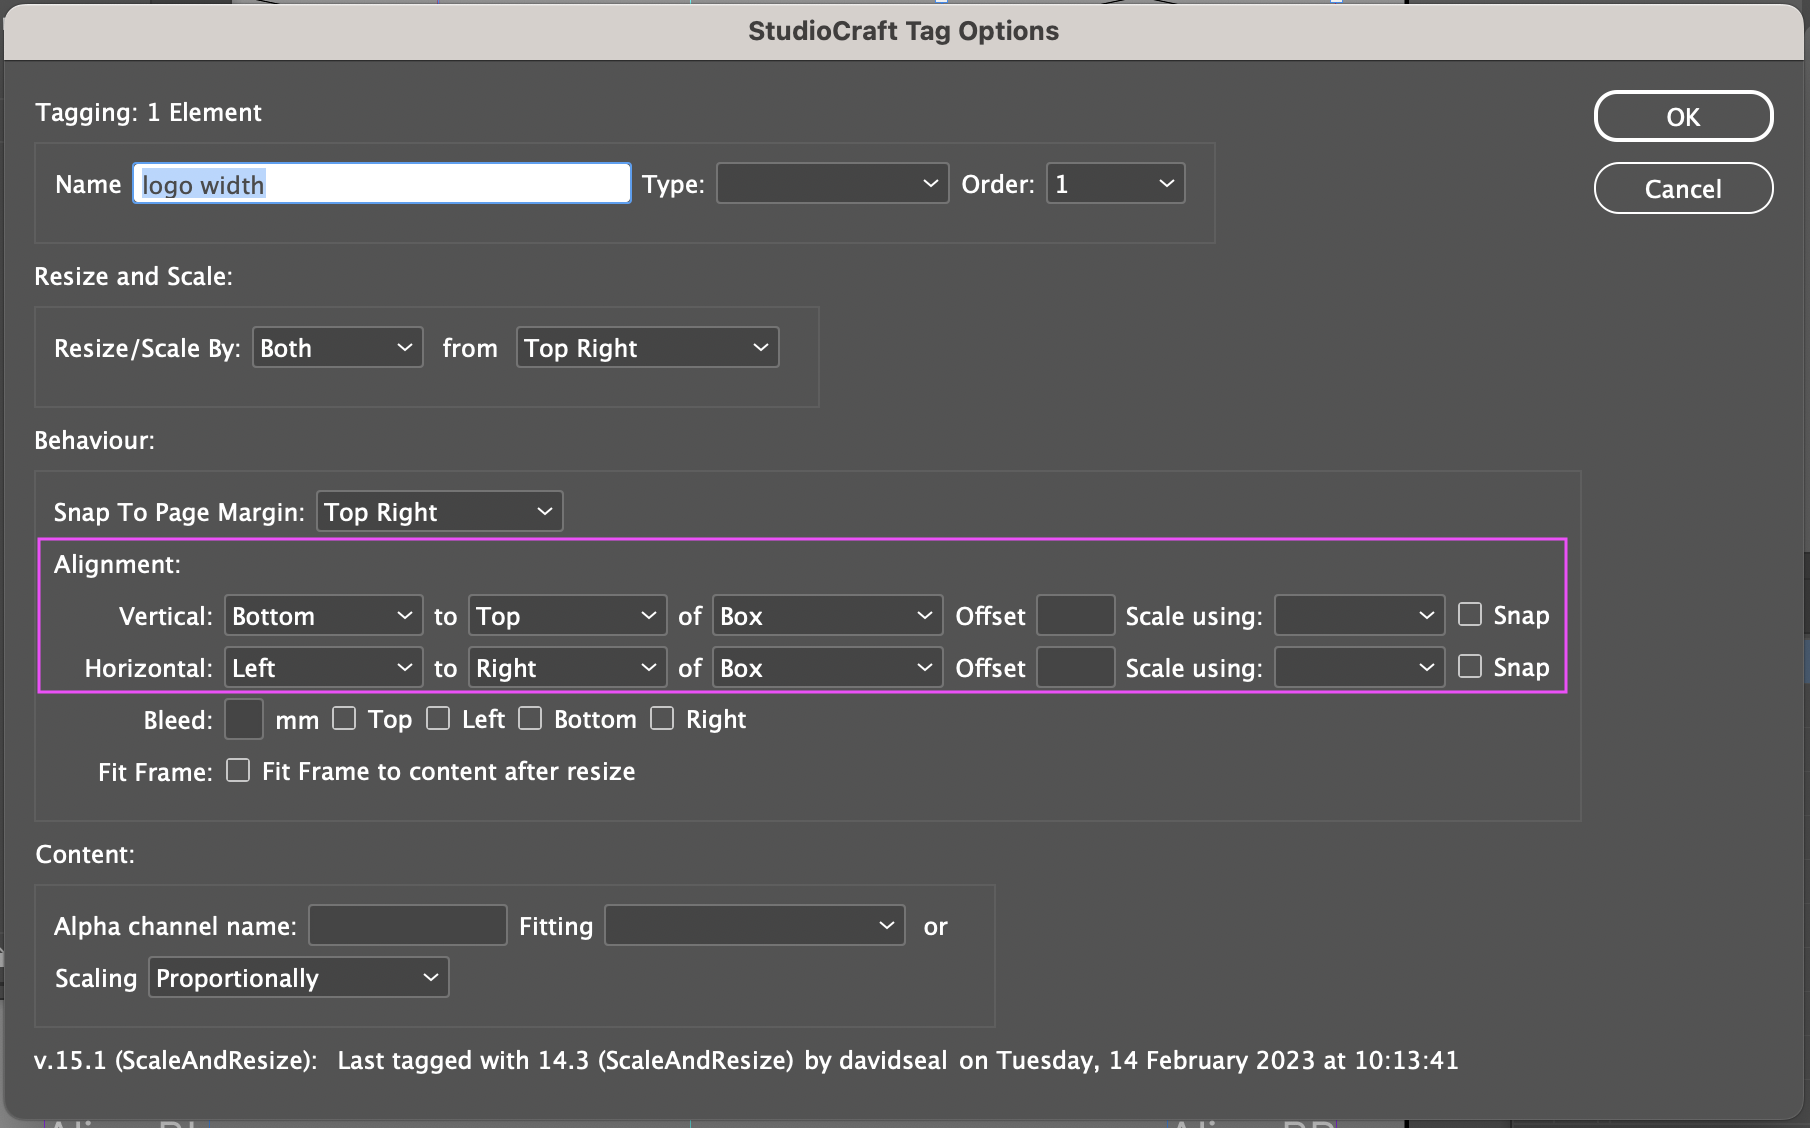
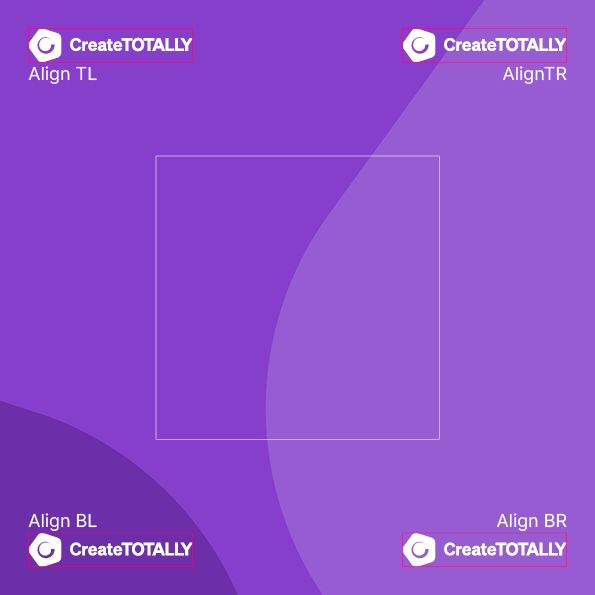
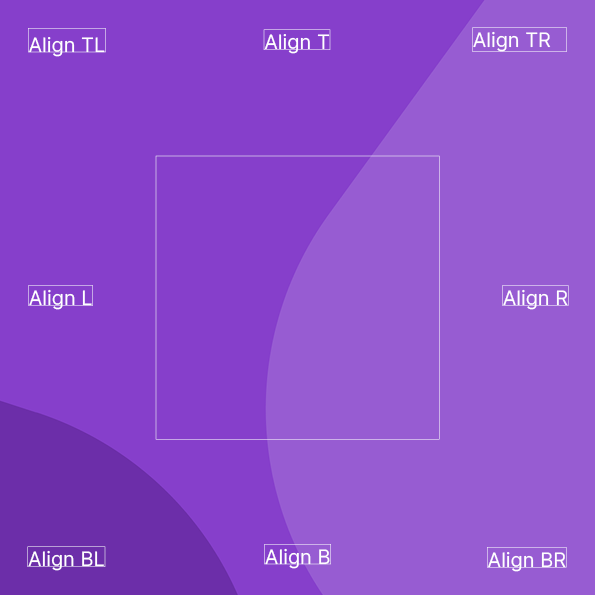
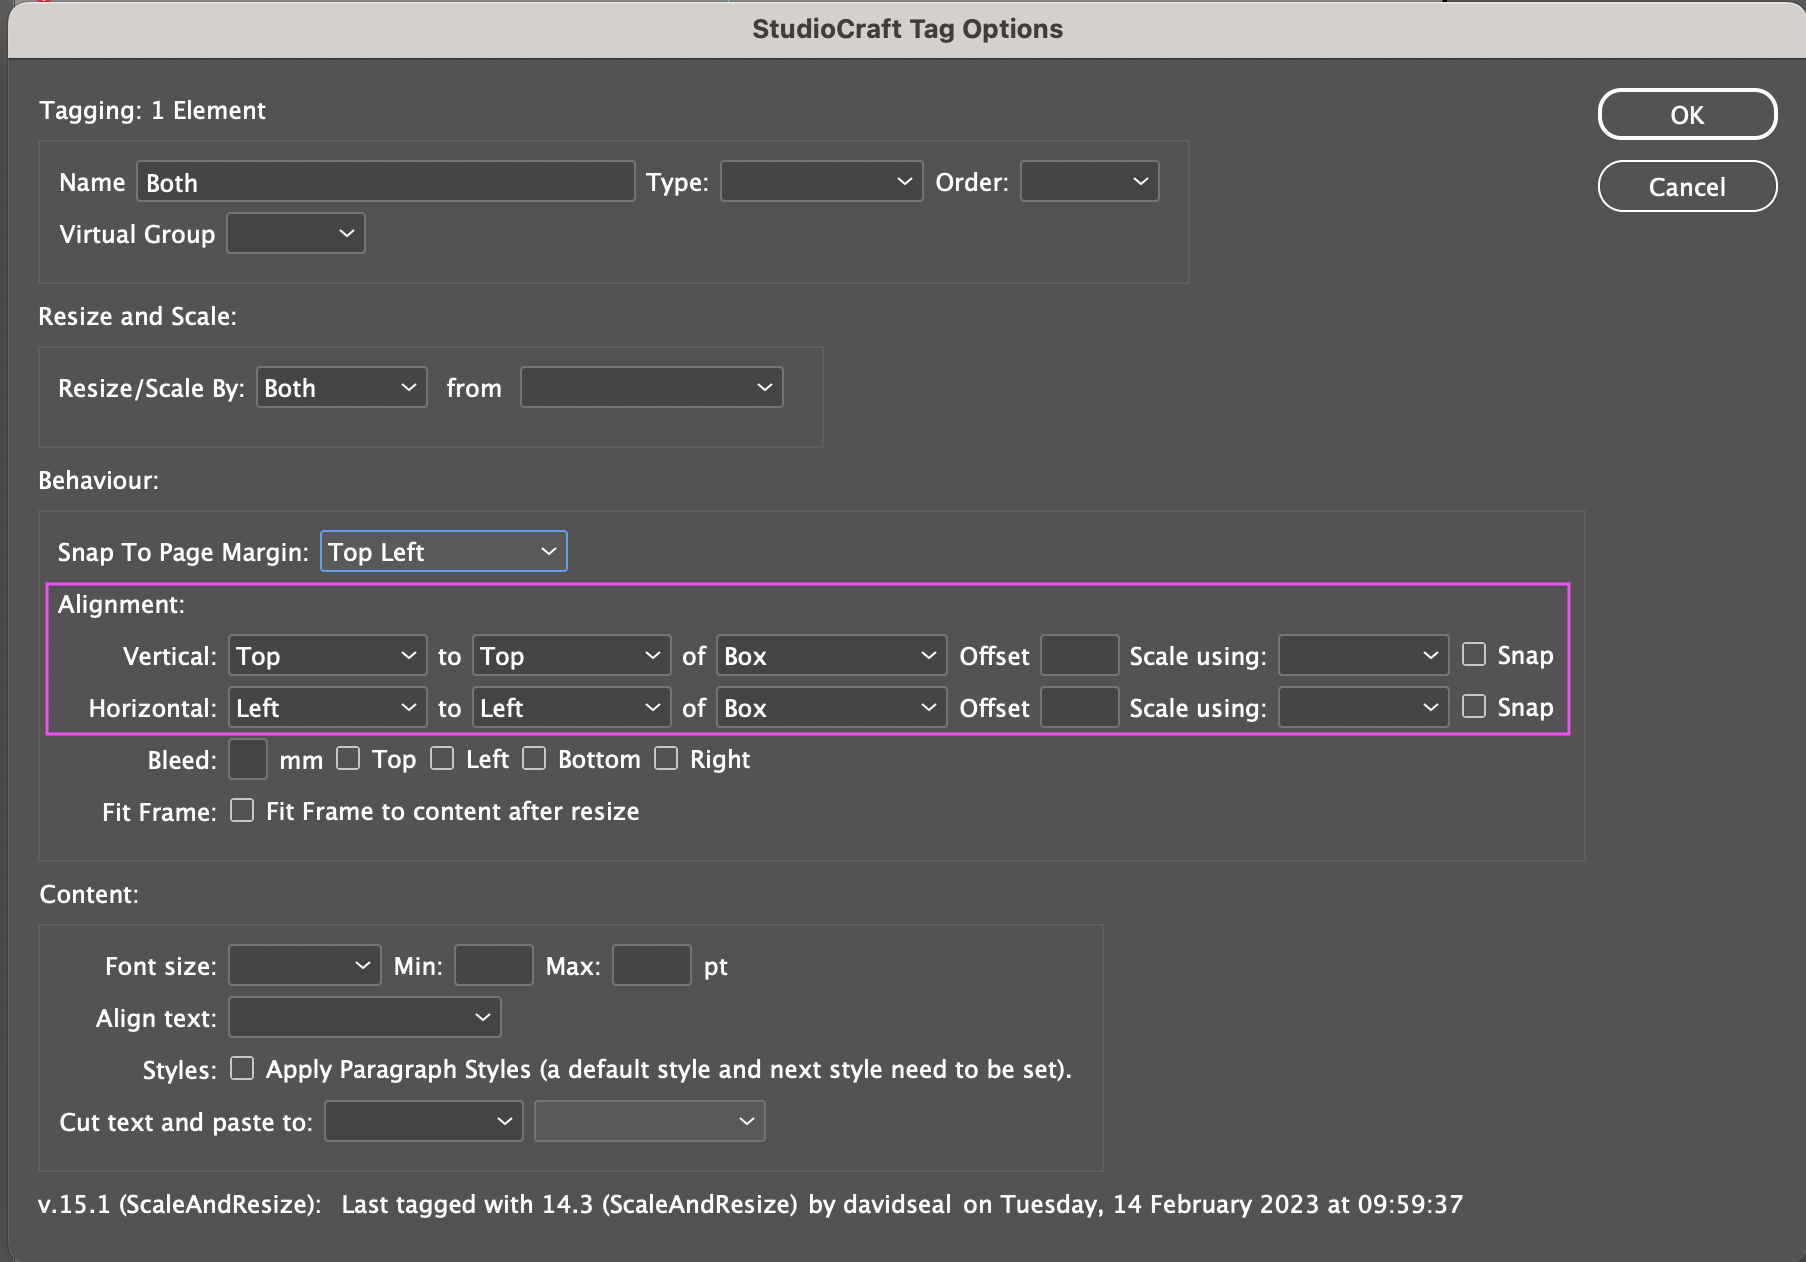
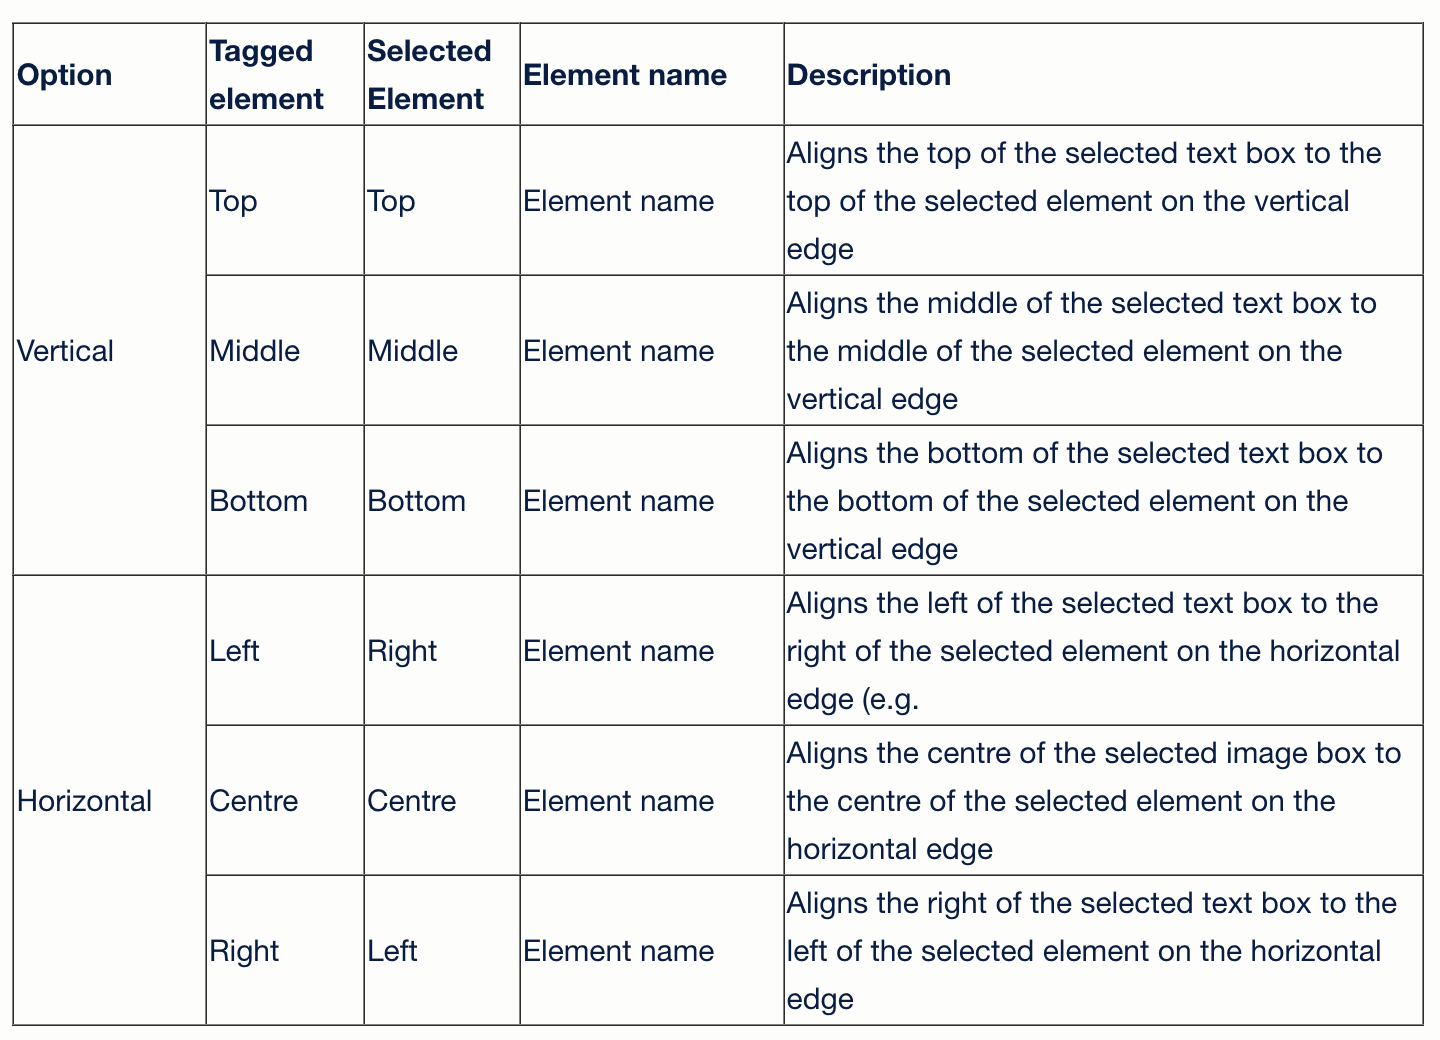
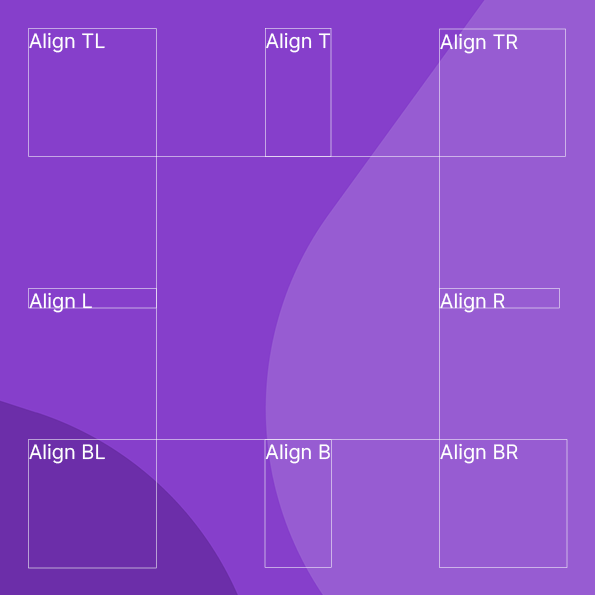
Alignment
The alignment options can be used to control how elements align in relation to other elements during resize.
Steps:
- Click on the element you want to tag.
- Open the Add/ Edit tags menu option from the CreateTOTALLY menu.
- Choose Alignment > Vertical.
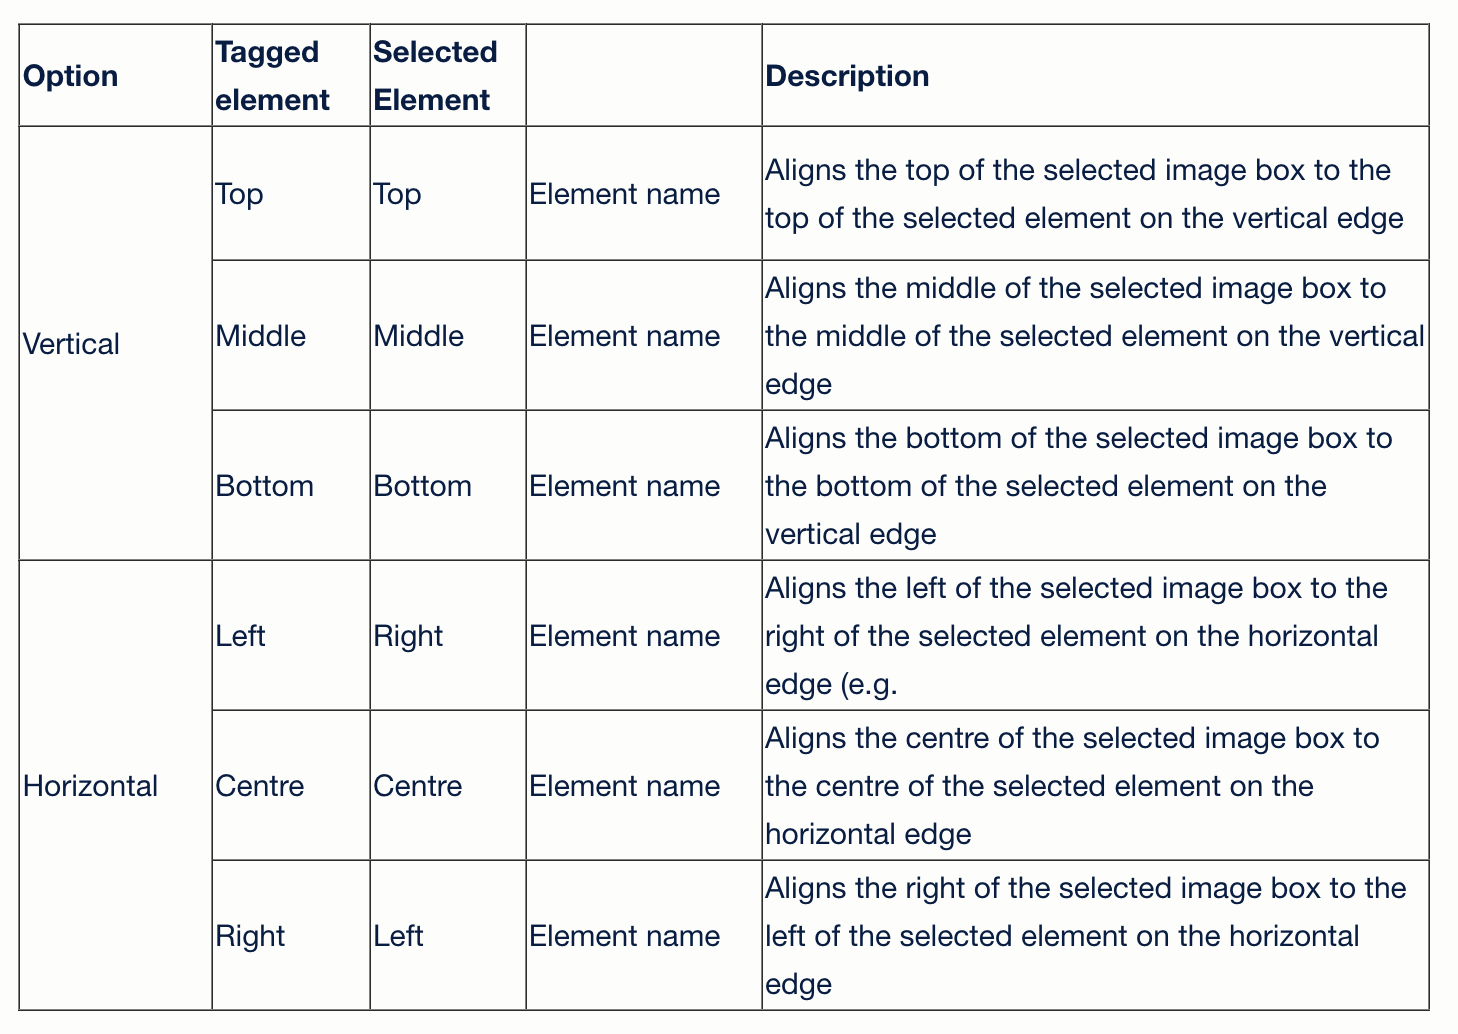
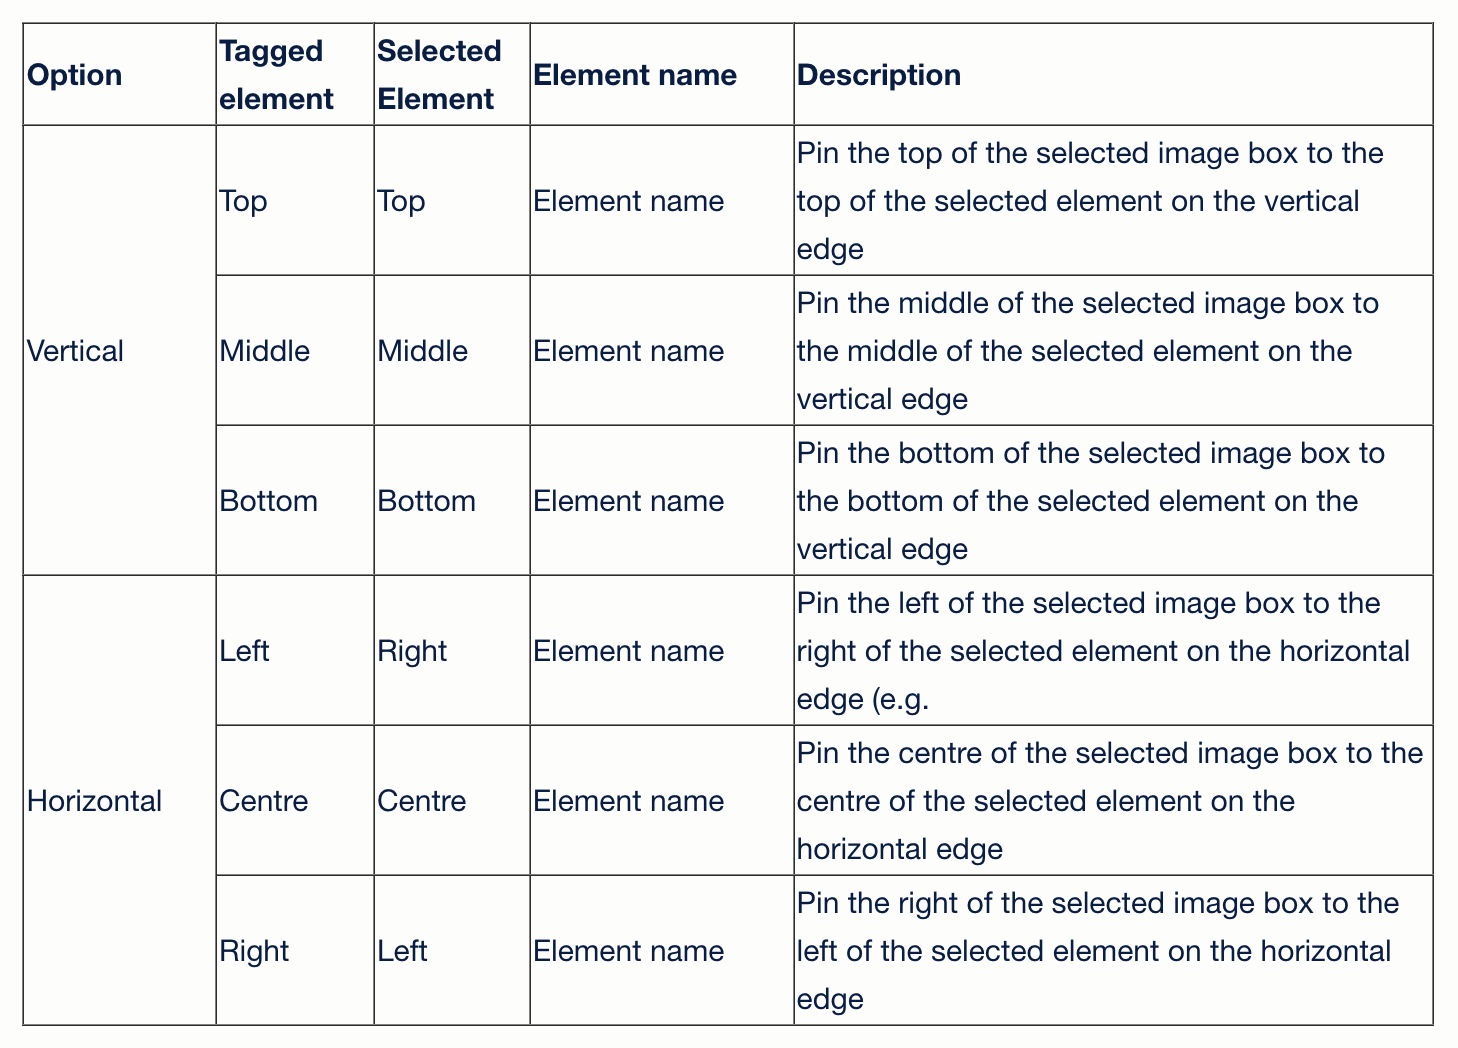
- Select from the dropdown the following vertical options: Top, Middle, Bottom of select image frame and align to image or text frame of another object.
- Choose Alignment > Horizontal.
- Select from the dropdown the following horizontal options: Left, Centre, Right of select image frame and align to image or text frame of another object.
- Click the OK button to save your Tags and close Tags dialog box.
Get files Sample file to practice with (ZIP, 1.3 MB)


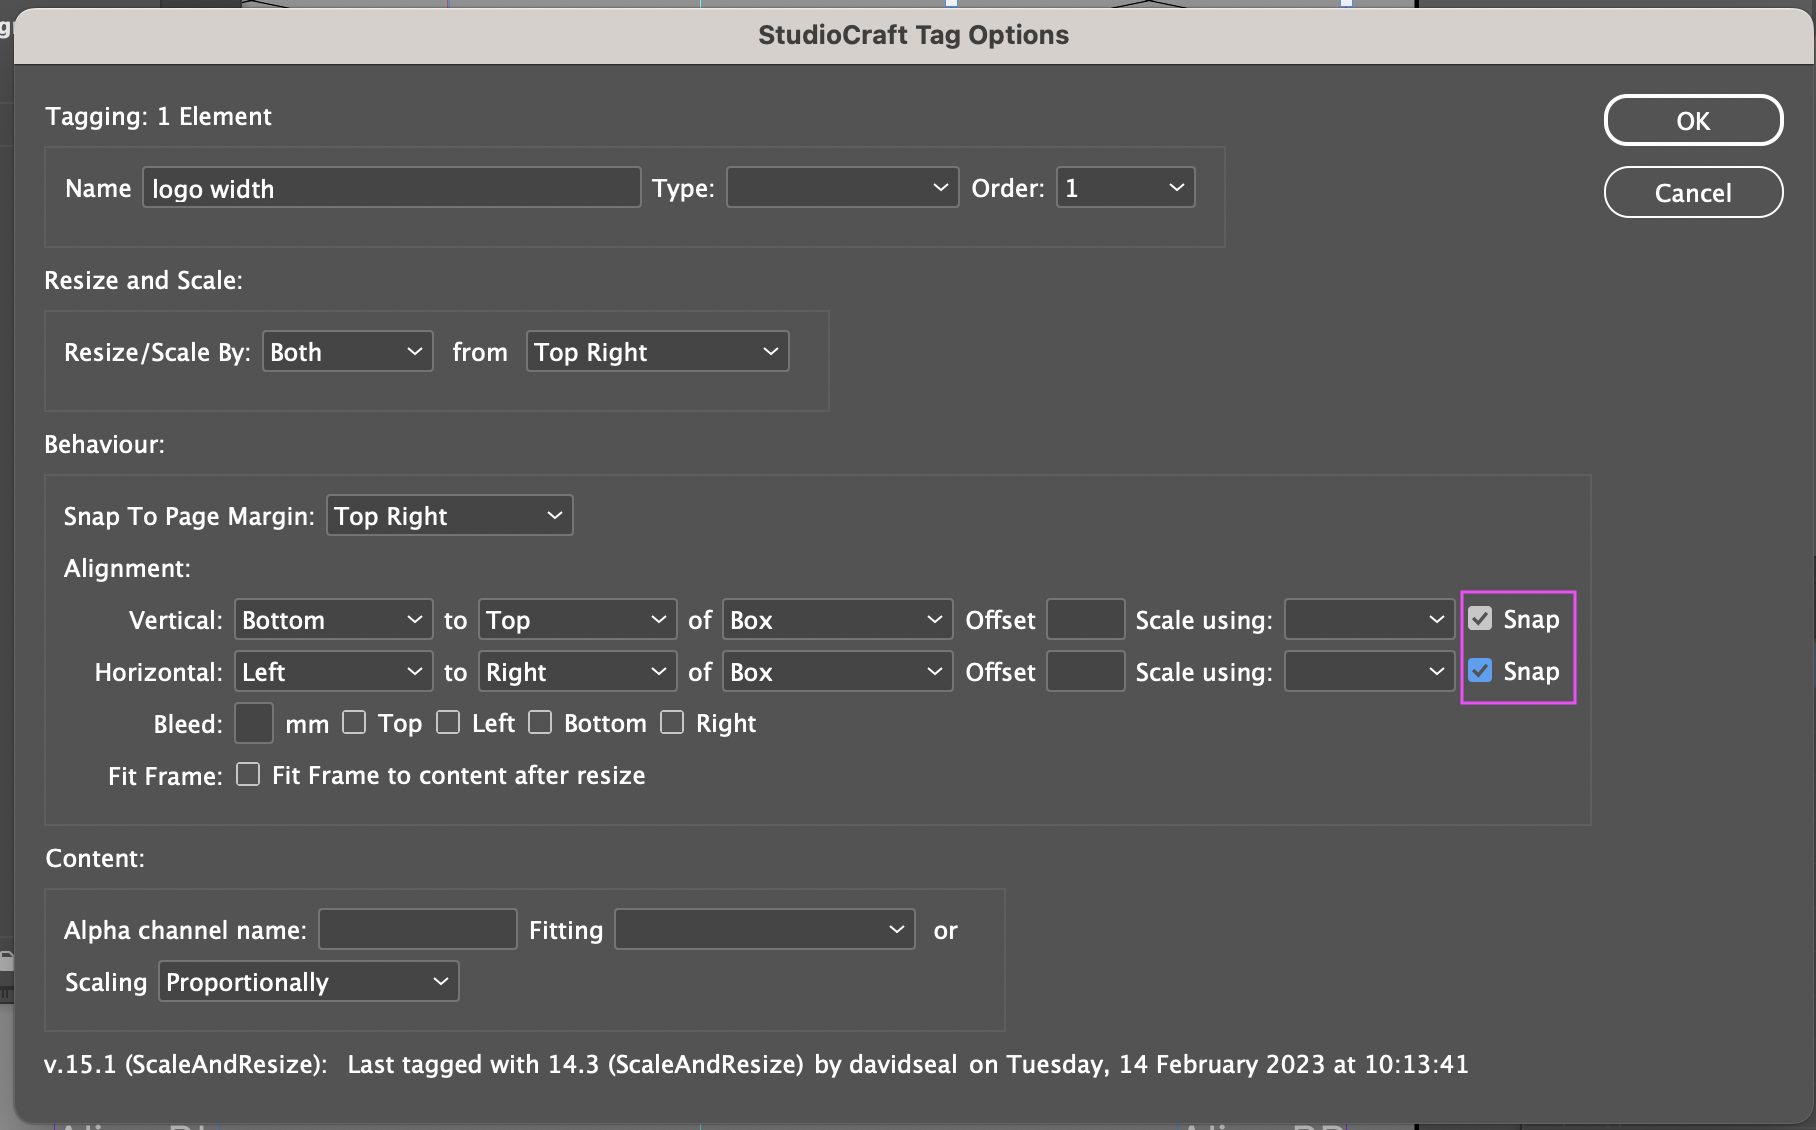
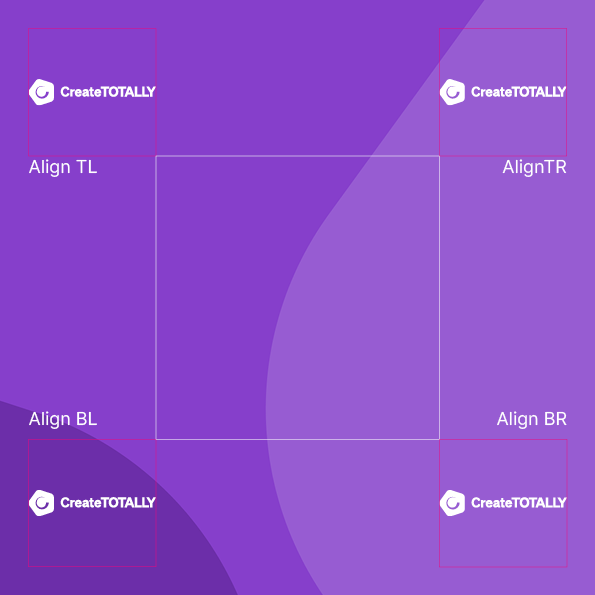
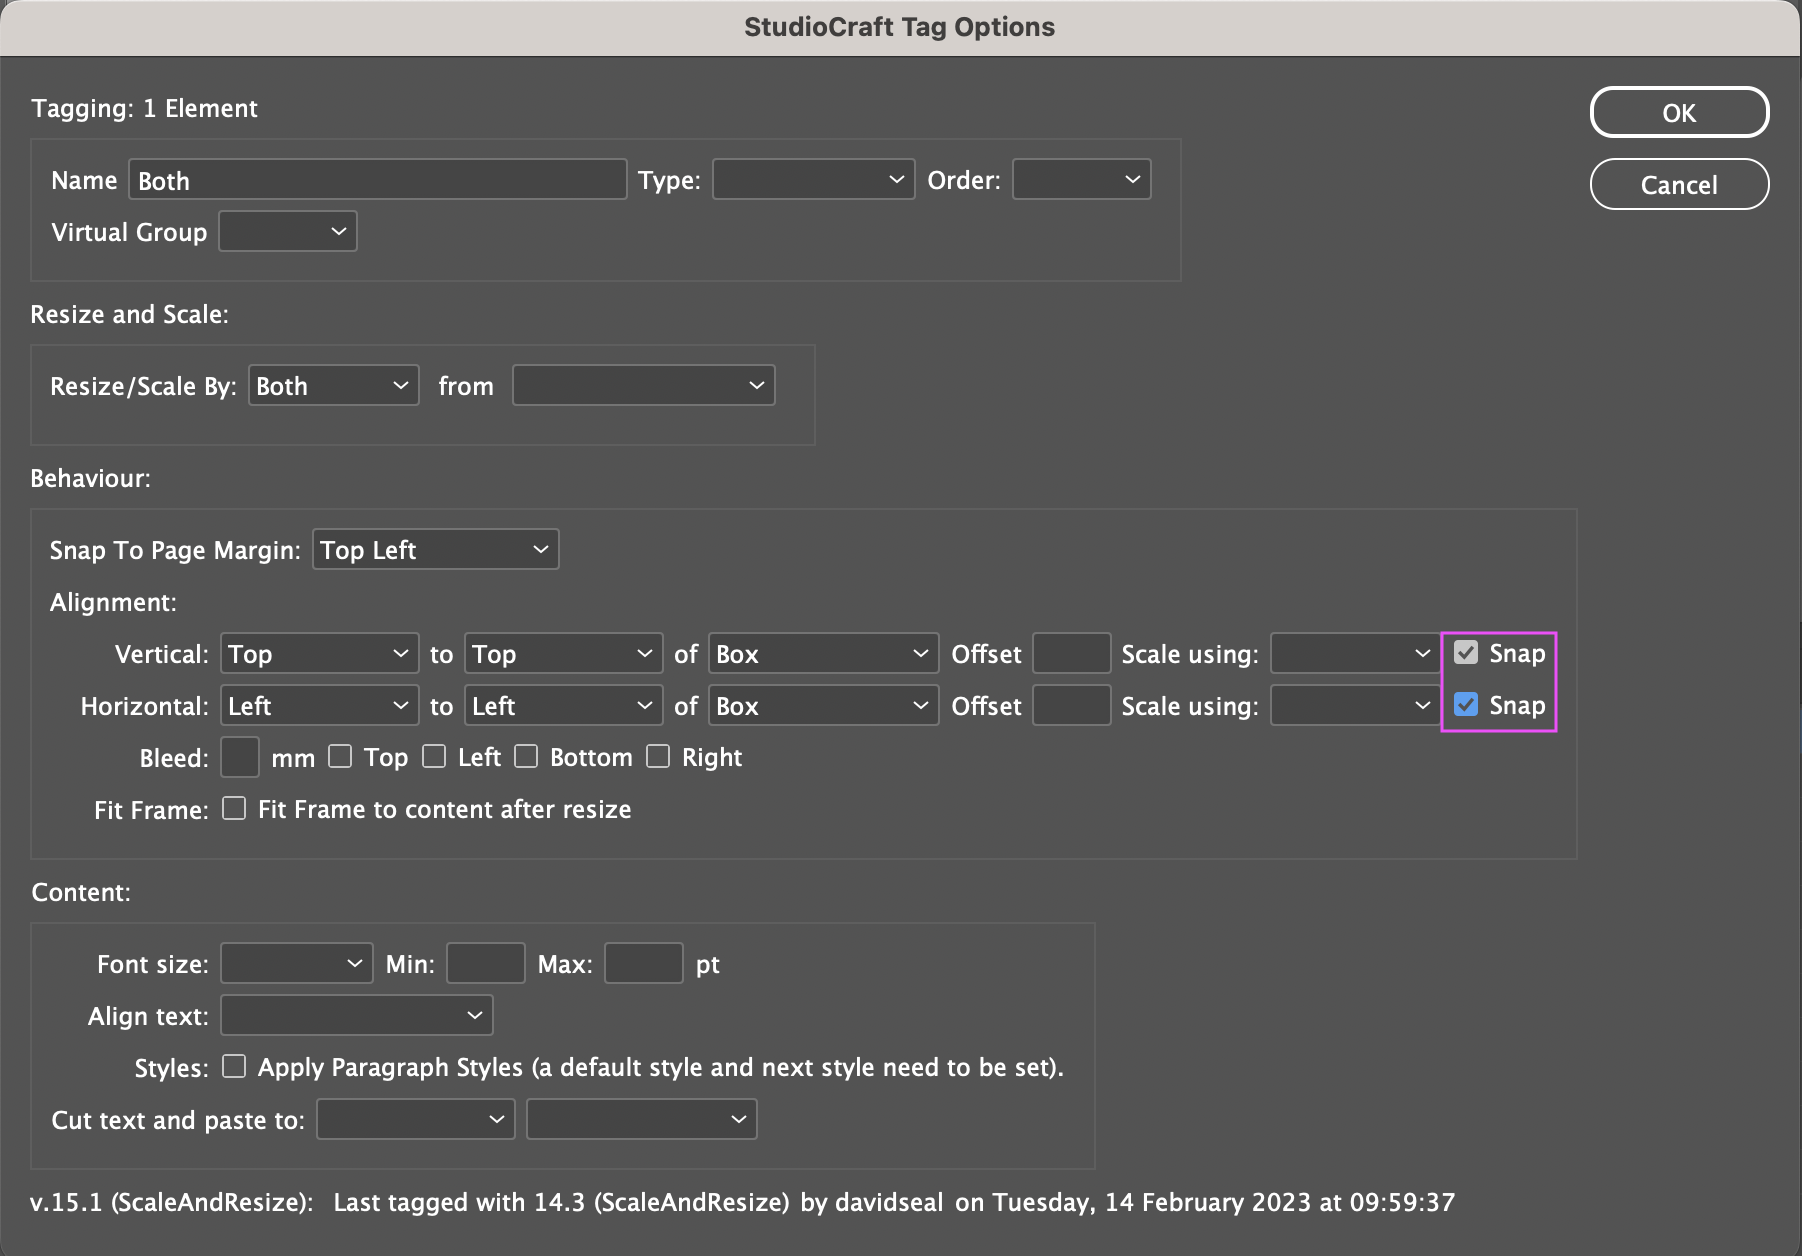
Alignment Pin (Snap)
Snapping will maintain the position of the image box, while moving the horizontal or vertical edge to the selected location. This will change the size of the image box.
Steps:
- Click on the element you want to tag.
- Open the Add/ Edit tags menu option from the CreateTOTALLY menu
- Choose Alignment > Vertical.
- Select from the dropdown the following vertical options: Top, Middle, Bottom of select text frame and snap to image or text frame of another object.
- Select checkbox Snap
- Choose Alignment > horizontal.
- Select from the dropdown the following horizontal options: Left, Centre, Right of select text frame and snap to image or text frame of another object.
- Select checkbox Snap
- Click the OK button to save your Tags and close Tags dialog box.
Get files Sample file to practice with (ZIP, 1.3 MB)
Content
Crop an image using an Alpha Channel
CreateTOTALLY can crop images dynamically using an alpha channel saved in a Photoshop file. Setting this up is a 2 part process:
- Tag your image in InDesign and specify the name of the alpha channel to use to position the variable image
- Add an alpha channel to your variable images
Tag your image in InDesign
In the content tagging option, name the alpha channel that should be used to crop the image. Select the fill method.

Change document spot colours
If you want to be update colours within your template, you can achieve this by applying a named swatch colour to each design element you want to change. Add a variable image linked to an Illustrator file that contains the same named swatch colour, but as the colour you want to change. To set this up:
- Add a spot colour swatch to your InDesign document, apply this swatch colour to all the elements that it should control
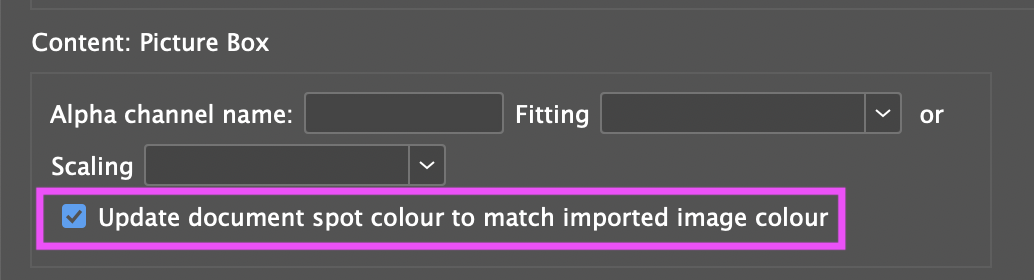
- Add a linked image containing a spot folour of the SAME name. Tag this image and in the content section, check the "Update document spot colour to match imported image colour”
- Add a spot colour swatch of the SAME name to all of your variable images. Note - these need to be Illustrator files
Tagging - Text
Tag Name
This is pre-populated with the page element name in the Layer panel. If you change the Tag Name it will update the object name in the Layer panel.
Tag Type
Text elements can be tagged as:
Blank - This is the standard option for text automation and is what will appear by default
Rich text - If the text box is to be replaced with a separate document containing rich text styles, instead of plain text, select this option
Tag Order
After the document re-sizes, there is an order with which each element of the artwork will re-size. This is important if elements need to re-size in relation to each other for example you may want the headline to be positioned first and then the sub-headline align to the new headline position.

Resize/Scale By
Scale and resize allows you to set how the text frame will re-size when the project re-sizes.
Steps:
- Click on the element you want to tag.
- Open the Add/ Edit tags menu option from the CreateTOTALLY menu
- Choose Resize and Scale > Resize/Scale By.
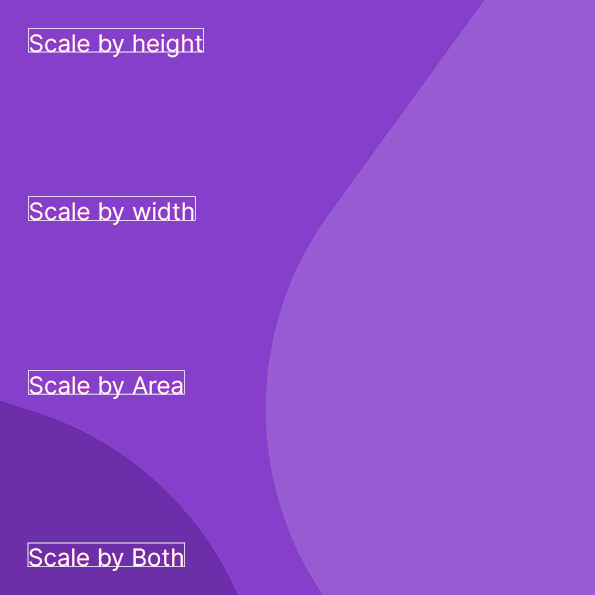
- Use the dropdown to select from the following resize options: Both, Width, Height and Area.
- Use the dropdown to select from the following position options: Top, Top Left, Top Right, Bottom, Bottom Left, and Bottom Right.
- You can also use the checkbox Fit Frame: which will fit frame to content after resize
- Click the OK button to save your Tags and close Tags dialog box.
Get files Sample file to practice with (ZIP, 1.1 MB)

Behaviour: Snap to Margin
Snap to margin will re-size the text frame and then move the selected edge to the margin, growing the text frame to meet this point.
Steps:
- Click on the element you want to tag.
- Open the Add/ Edit tags menu option from the CreateTOTALLY menu.
- Choose Behaviour > Snap to Margin.
- Select from the dropdown the following options: Top, Top Left, Top Right, Bottom, Bottom Left, and Bottom Right Margins.
- Click the OK button to save your Tags and close Tags dialog box.
Get files Sample file to practice with (ZIP, 1.1 MB)


Alignment
Alignment options allow you to position the text frame in relation to another object.
Steps:
- Click on the element you want to tag.
- Open the Add/ Edit tags menu option from the CreateTOTALLY menu
- Choose Alignment > Vertical.
- Select from the dropdown the following vertical options: Top, Middle, Bottom of select text frame and align to image or text frame of another object.
- Choose Alignment > horizontal.
- Select from the dropdown the following horizontal options: Left, Centre, Right of select text frame and align to image or text frame of another object.
- Click the OK button to save your Tags and close Tags dialog box.
Get files Sample file to practice with (ZIP, 1.1 MB)


Alignment Pin (Snap)
Snap allows you to re-size the text frame in relation to the object you are aligning to. This will keep the relative position, but grow the selected edge of the text frame to the object it is snapping to.
Get files Sample file to practice with (ZIP, 1.3 MB)
Steps:
- Click on the element you want to tag.
- Open the Add/ Edit tags menu option from the CreateTOTALLY menu
- Choose Alignment > Vertical.
- Select from the dropdown the following vertical options: Top, Middle, Bottom of select text frame and pin to image or text frame of another object.
- Select checkbox Pin (Snap)
- Choose Alignment > horizontal.
- Select from the dropdown the following horizontal options: Left, Centre, Right of select text frame and pin to image or text frame of another object.
- Select checkbox Pin (Snap)
- Click the OK button to save your Tags and close Tags dialog box.

Fit frame to content
After your document has re-sized, you can fit the frame (image or text) to the content. This may be useful if you are aligning other objects to it, or if you want to allow a text frame to become larger than the original size.
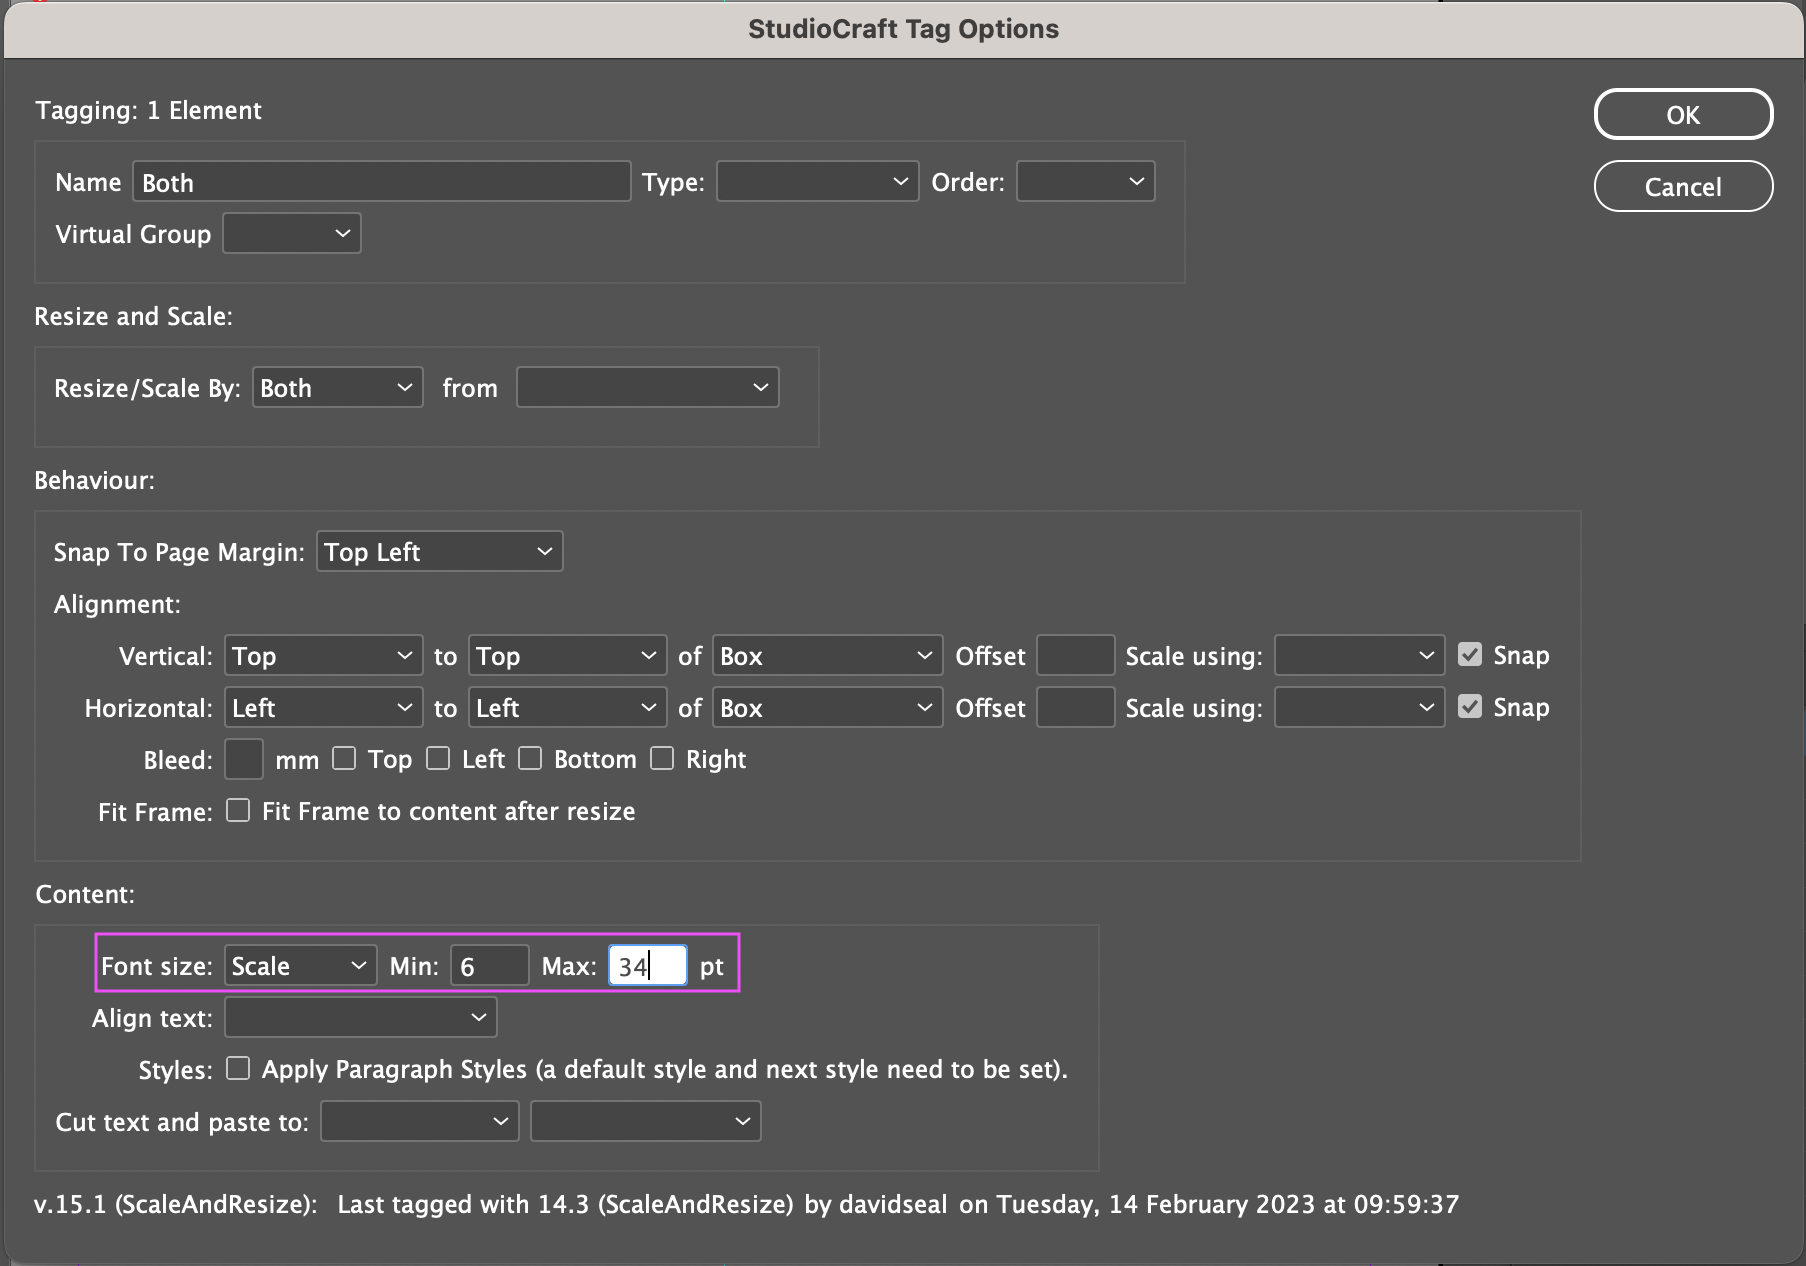
Size Text
Setting the minimum and maximum pt size that a font can scale between helps to control your design. If you require multiple
Get files Sample file to practice with (ZIP, 1.1 MB)
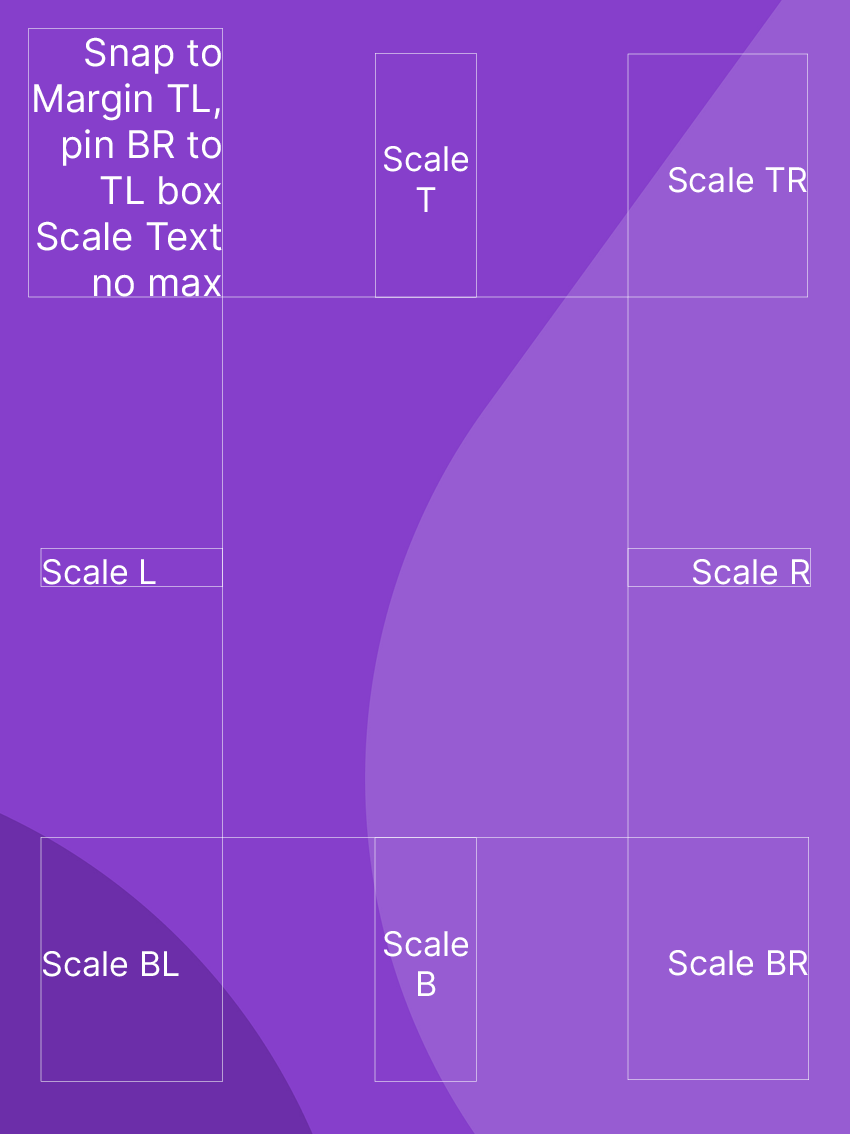
Virtual text groups
If you have multiple text elements that need to resize in proportion, you can select them all and tag as a group. Simply give the virtual group a name and set-up the other controls as usual. During automation, the platform will ensure the same character styles are applied to all text elements in the group. It will do this by fitting the content as per the selected resize/ scale behaviours (and min/ max font sizes) and then applying the character style of the smallest text frame to all the other frames.
Tagging - Tables
Tables inserted into a text frame can be tagged and then customised in the platform. Users will be able to customise the text or images stored in the table, as well as delete columns.
Set-up guidelines
- Cells need to be set-up as either image OR text cells. Do not combine images and text into the same cell.
- Tables need to have cell styles set-up, with a named paragraph style used for text styles
- Merged cells are not currently supported
Tagging a single table
Select the text frame that contains the table and click CreateTOTALLY > Add/ edit tags. The standard re-size and alignment behaviour options that exist for text frames are also available for tables.
In addition, you can control the text content within the table, setting a minimum and maximum font size and the number of lines the text can flow over within the table.
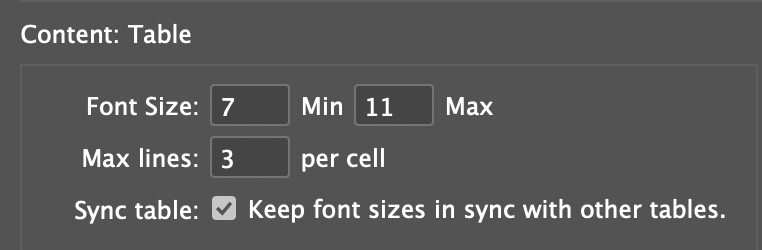
Tagging multiple tables
If you have multiple tables and the font size within them needs to be synchronised this can be achieved with table groups.
Select all of the the text frames containing the tables and click CreateTOTALLY > Add/ edit tags. You'll see the tag name field has changed to a Table group and the number of tables being tagged is highlighted. Give the table group a name and check the "Sync table" option in the content section.

Testing your template
If your template will be re-sized, you can test how the default content resizes directly in InDesign. Make sure your file is saved and all images are linked correctly before testing your template.
Go to CreateTOTALLY > Test template

Enter the width and height of the size you want to test with and press OK
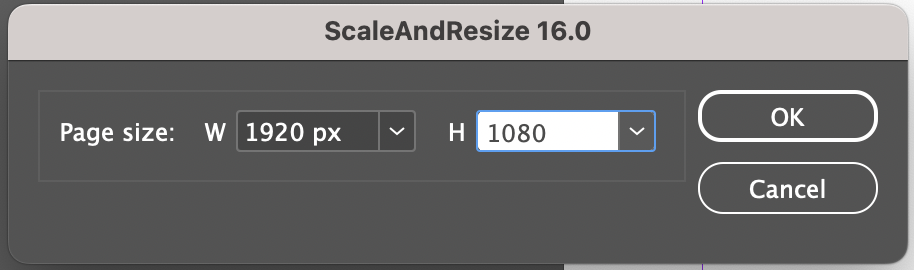
A new tab will be opened with a re-sized version of your template for review.
Advanced file set-up
Crop an image using an Alpha Channel
CreateTOTALLY can crop images dynamically using an alpha channel saved in a Photoshop file. Setting this up is a 2 part process:
- Tag your image in InDesign and specify the name of the alpha channel to use to position the variable image
- Add an alpha channel to your variable images
Tag your image in InDesign
In the content tagging option, name the alpha channel that should be used to crop the image. Select the fill method.
Create alpha channel mask in Photoshop image
Create an alpha channel of your focal area.
To create a mask that is the same size as the image in the master, add screenshot of the master crop from the InDesign file as a new layer. This will give you the proportion of the image and the location of the default text.
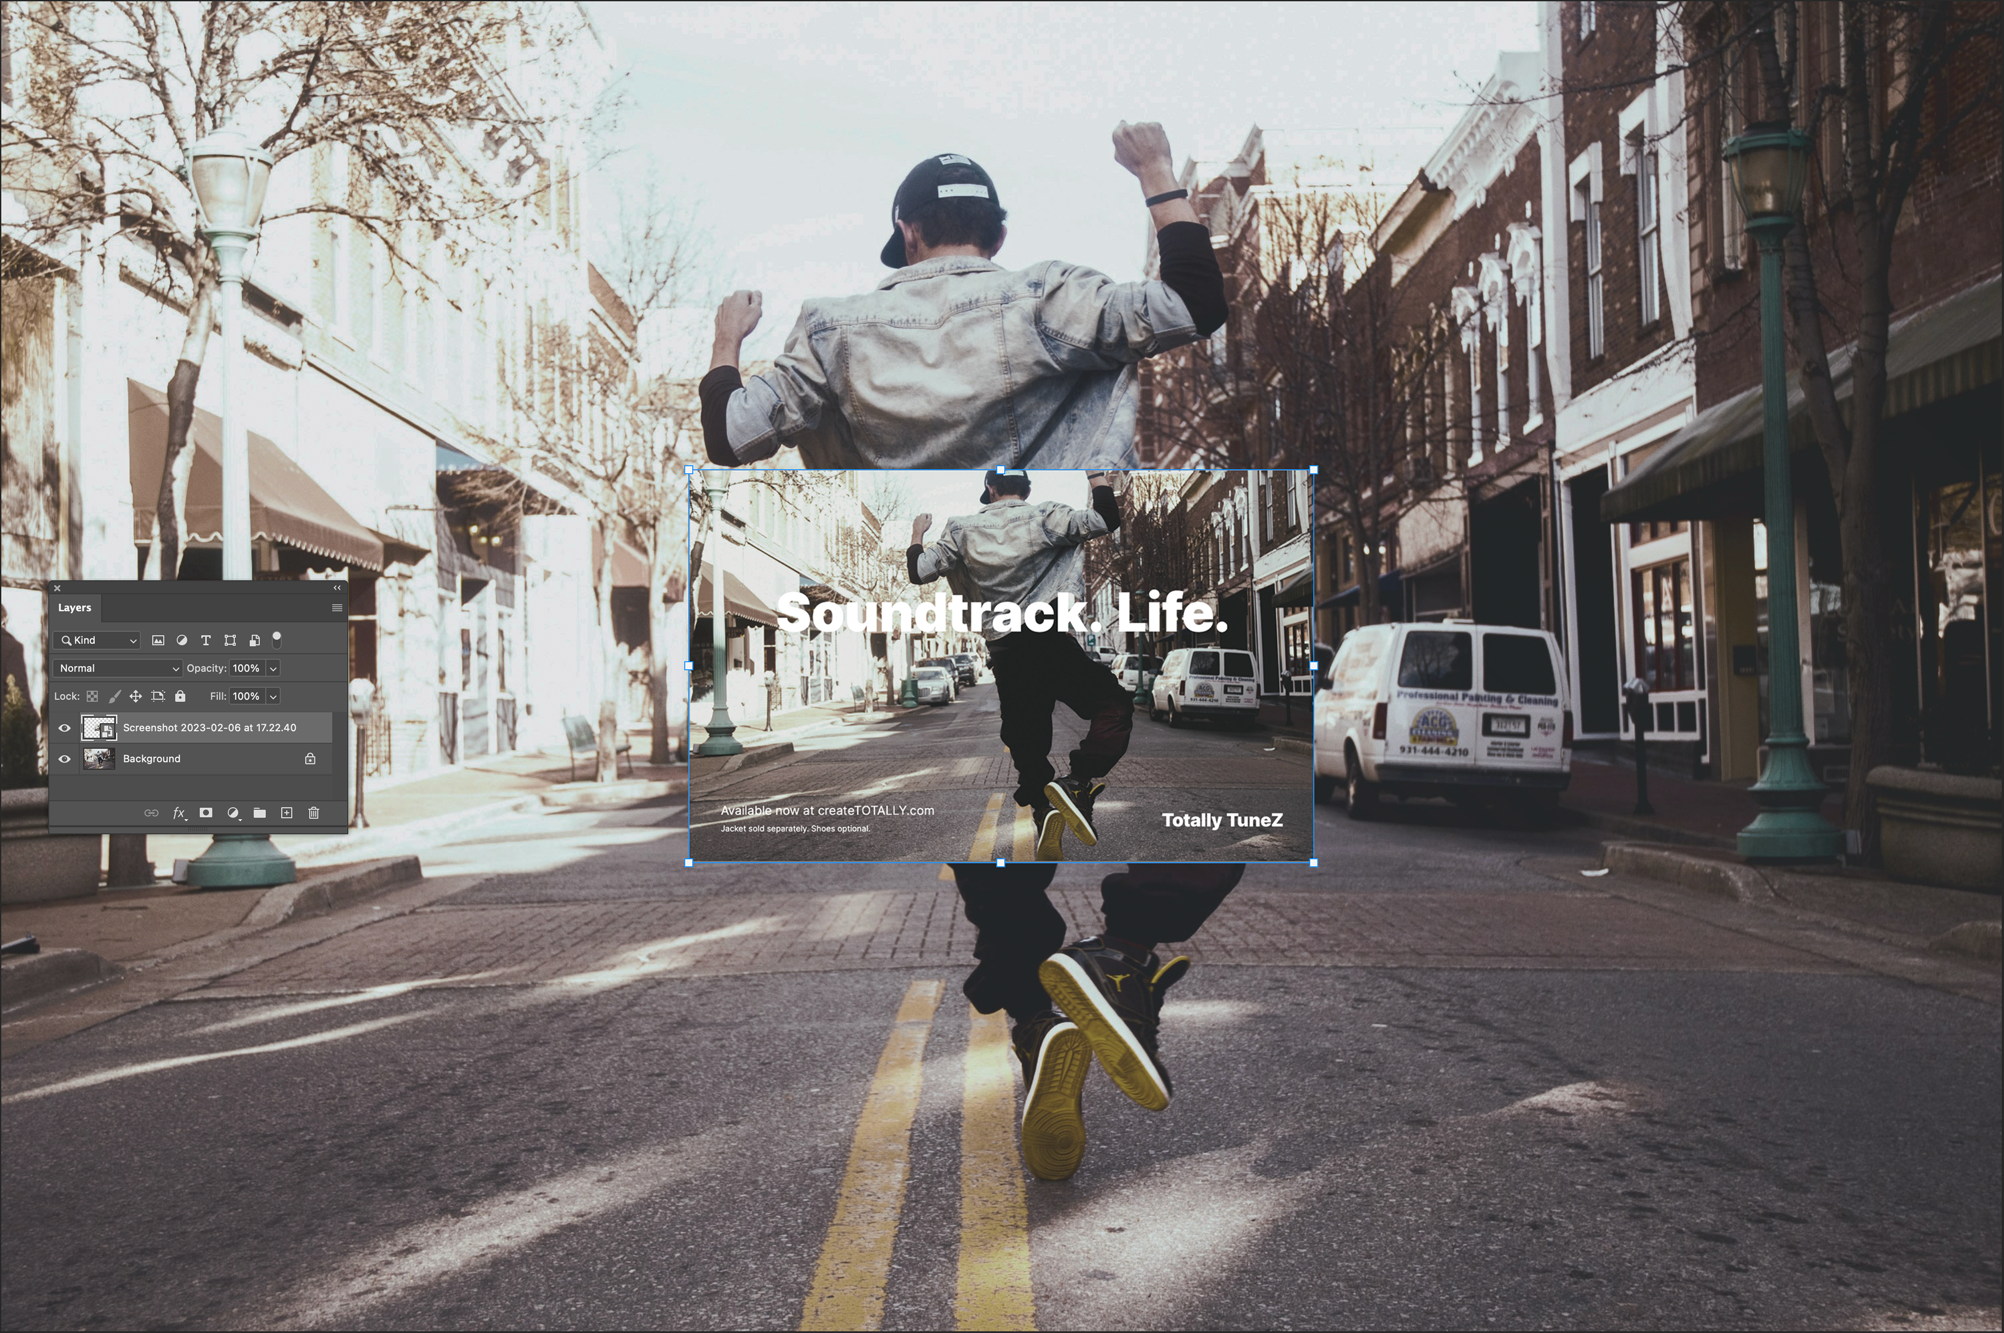
If the screenshot of the master crop file is smaller than the area of the image you want include, you will need to resize the screenshot using the Transform tool. A box will appear around the layer with boxes in the corner. Click and drag those boxes to change the size.
Resize, drag and drop your master crop image until it’s positioned/ sized as you require and then press ‘Enter’. This will keep it locked in place.
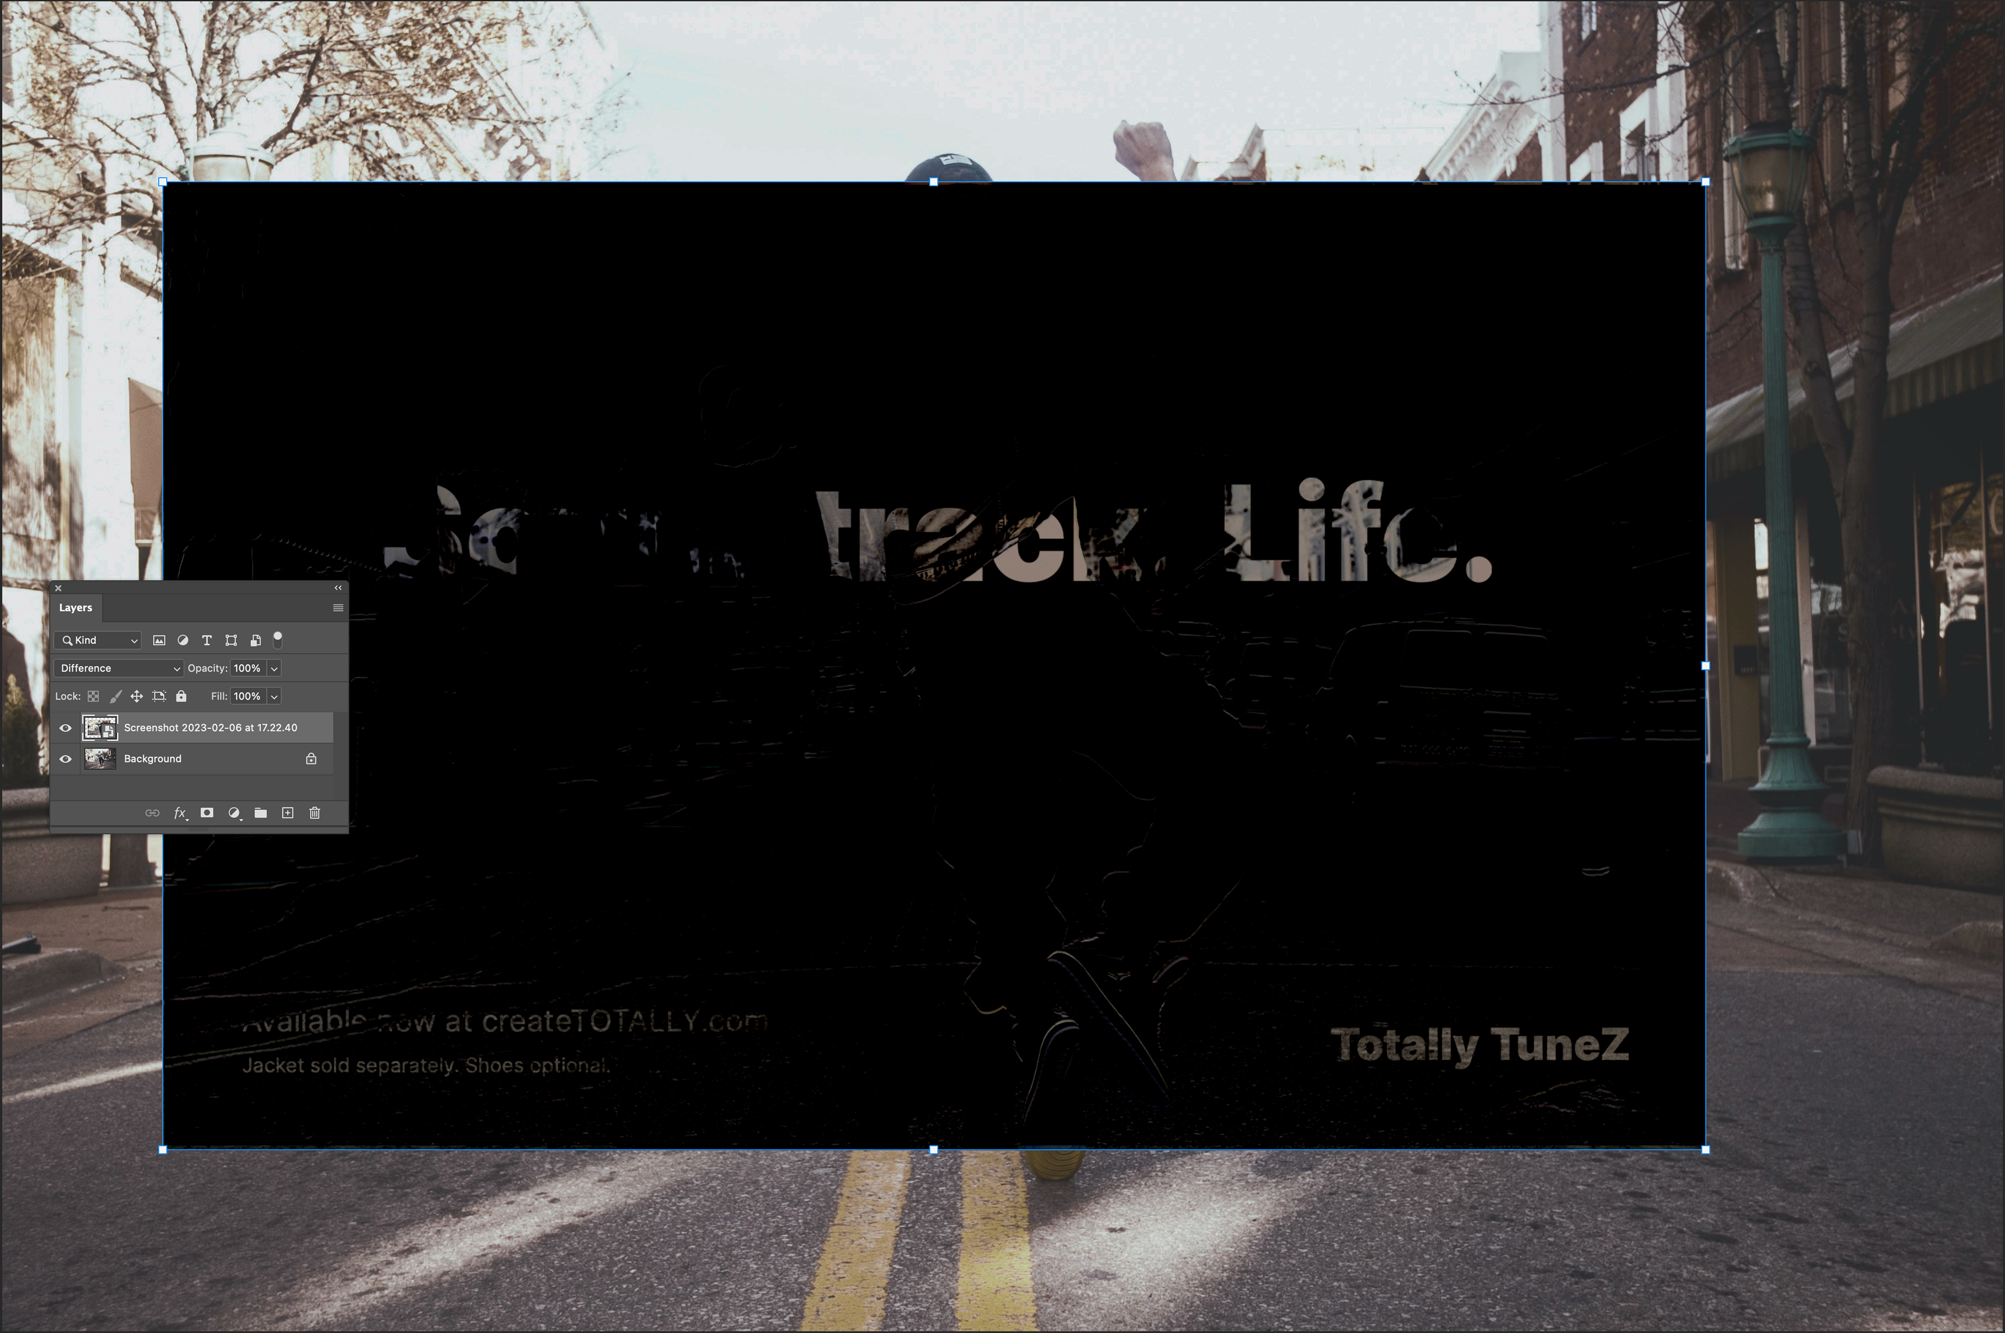
Tip: To check the correct size and position of the master crop layer use blending mode: Difference

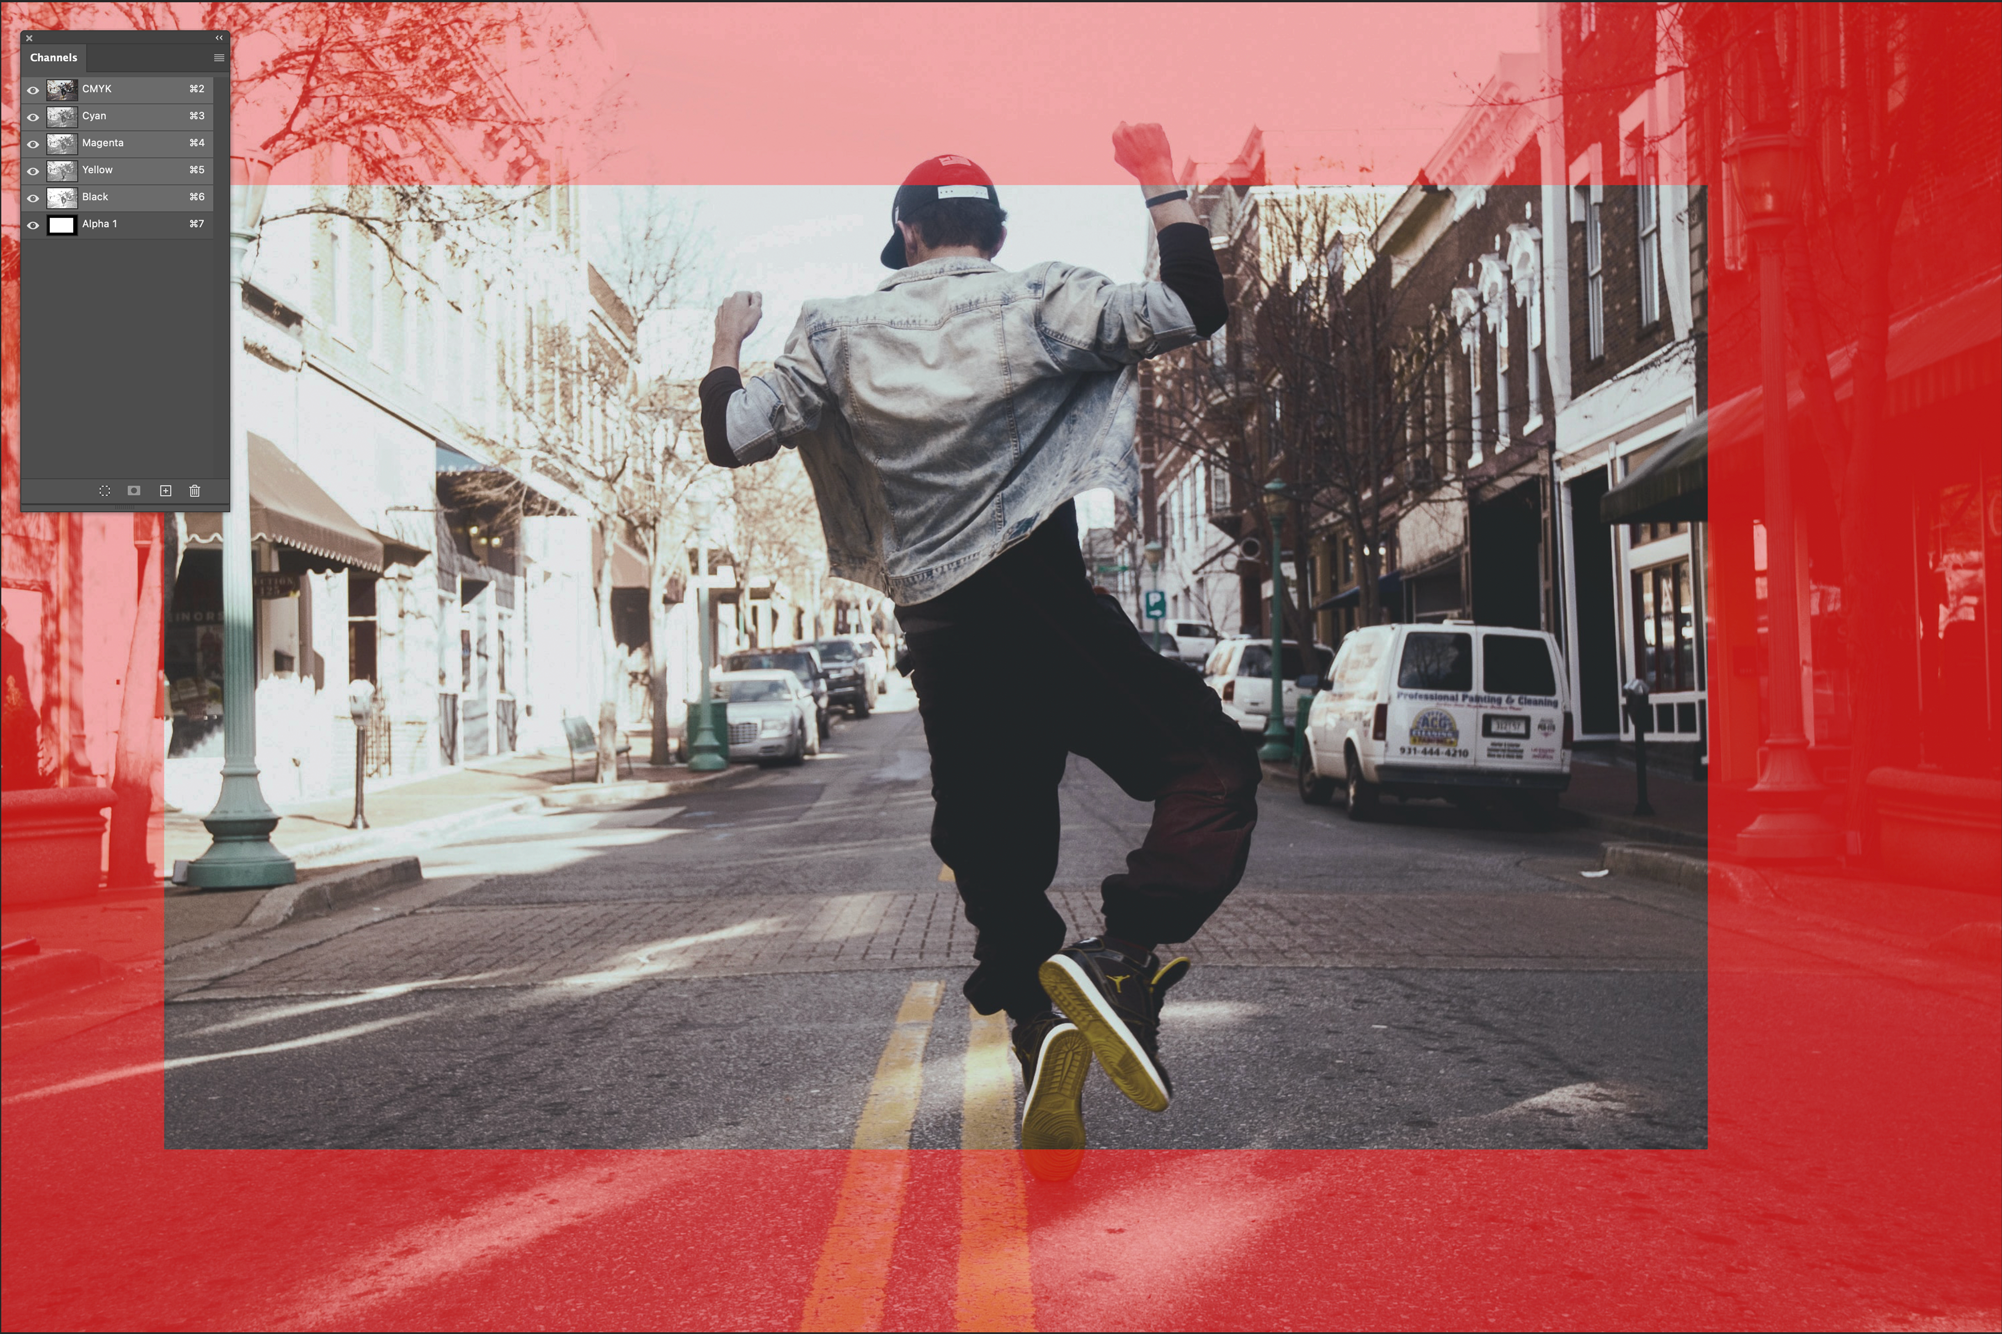
Create an Alpha channel, using the screenshot that you've placed above as a guide. The name you give the alpha channel needs to be the same in all of the images you are setting up.
How to Use InDesign Frame Fitting Options with StudioCraft App
In order to prepare your InDesign artwork for the Automation Engine, you will need to assign the correct Frame Fitting options, as part of the Adaptation process:
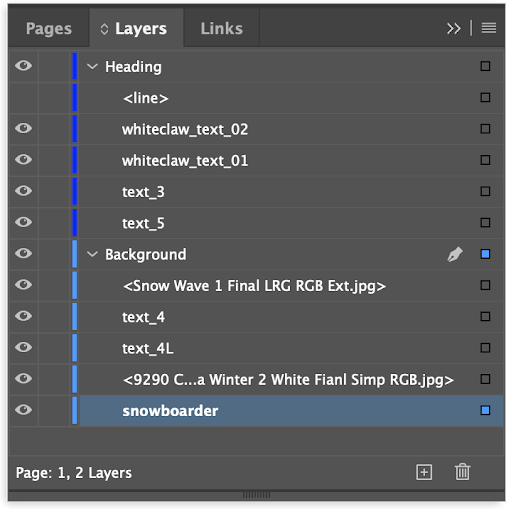
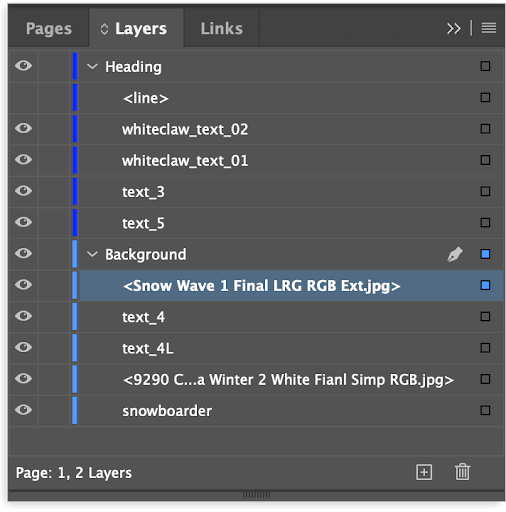
Step 1
Open your InDesign document and use the Layers panel to select objects for automation tagging:
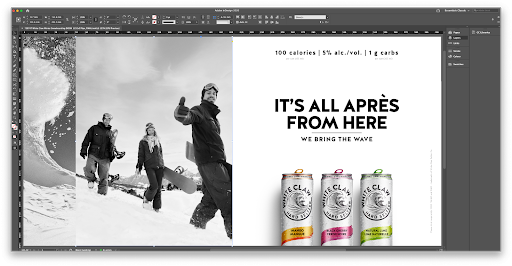
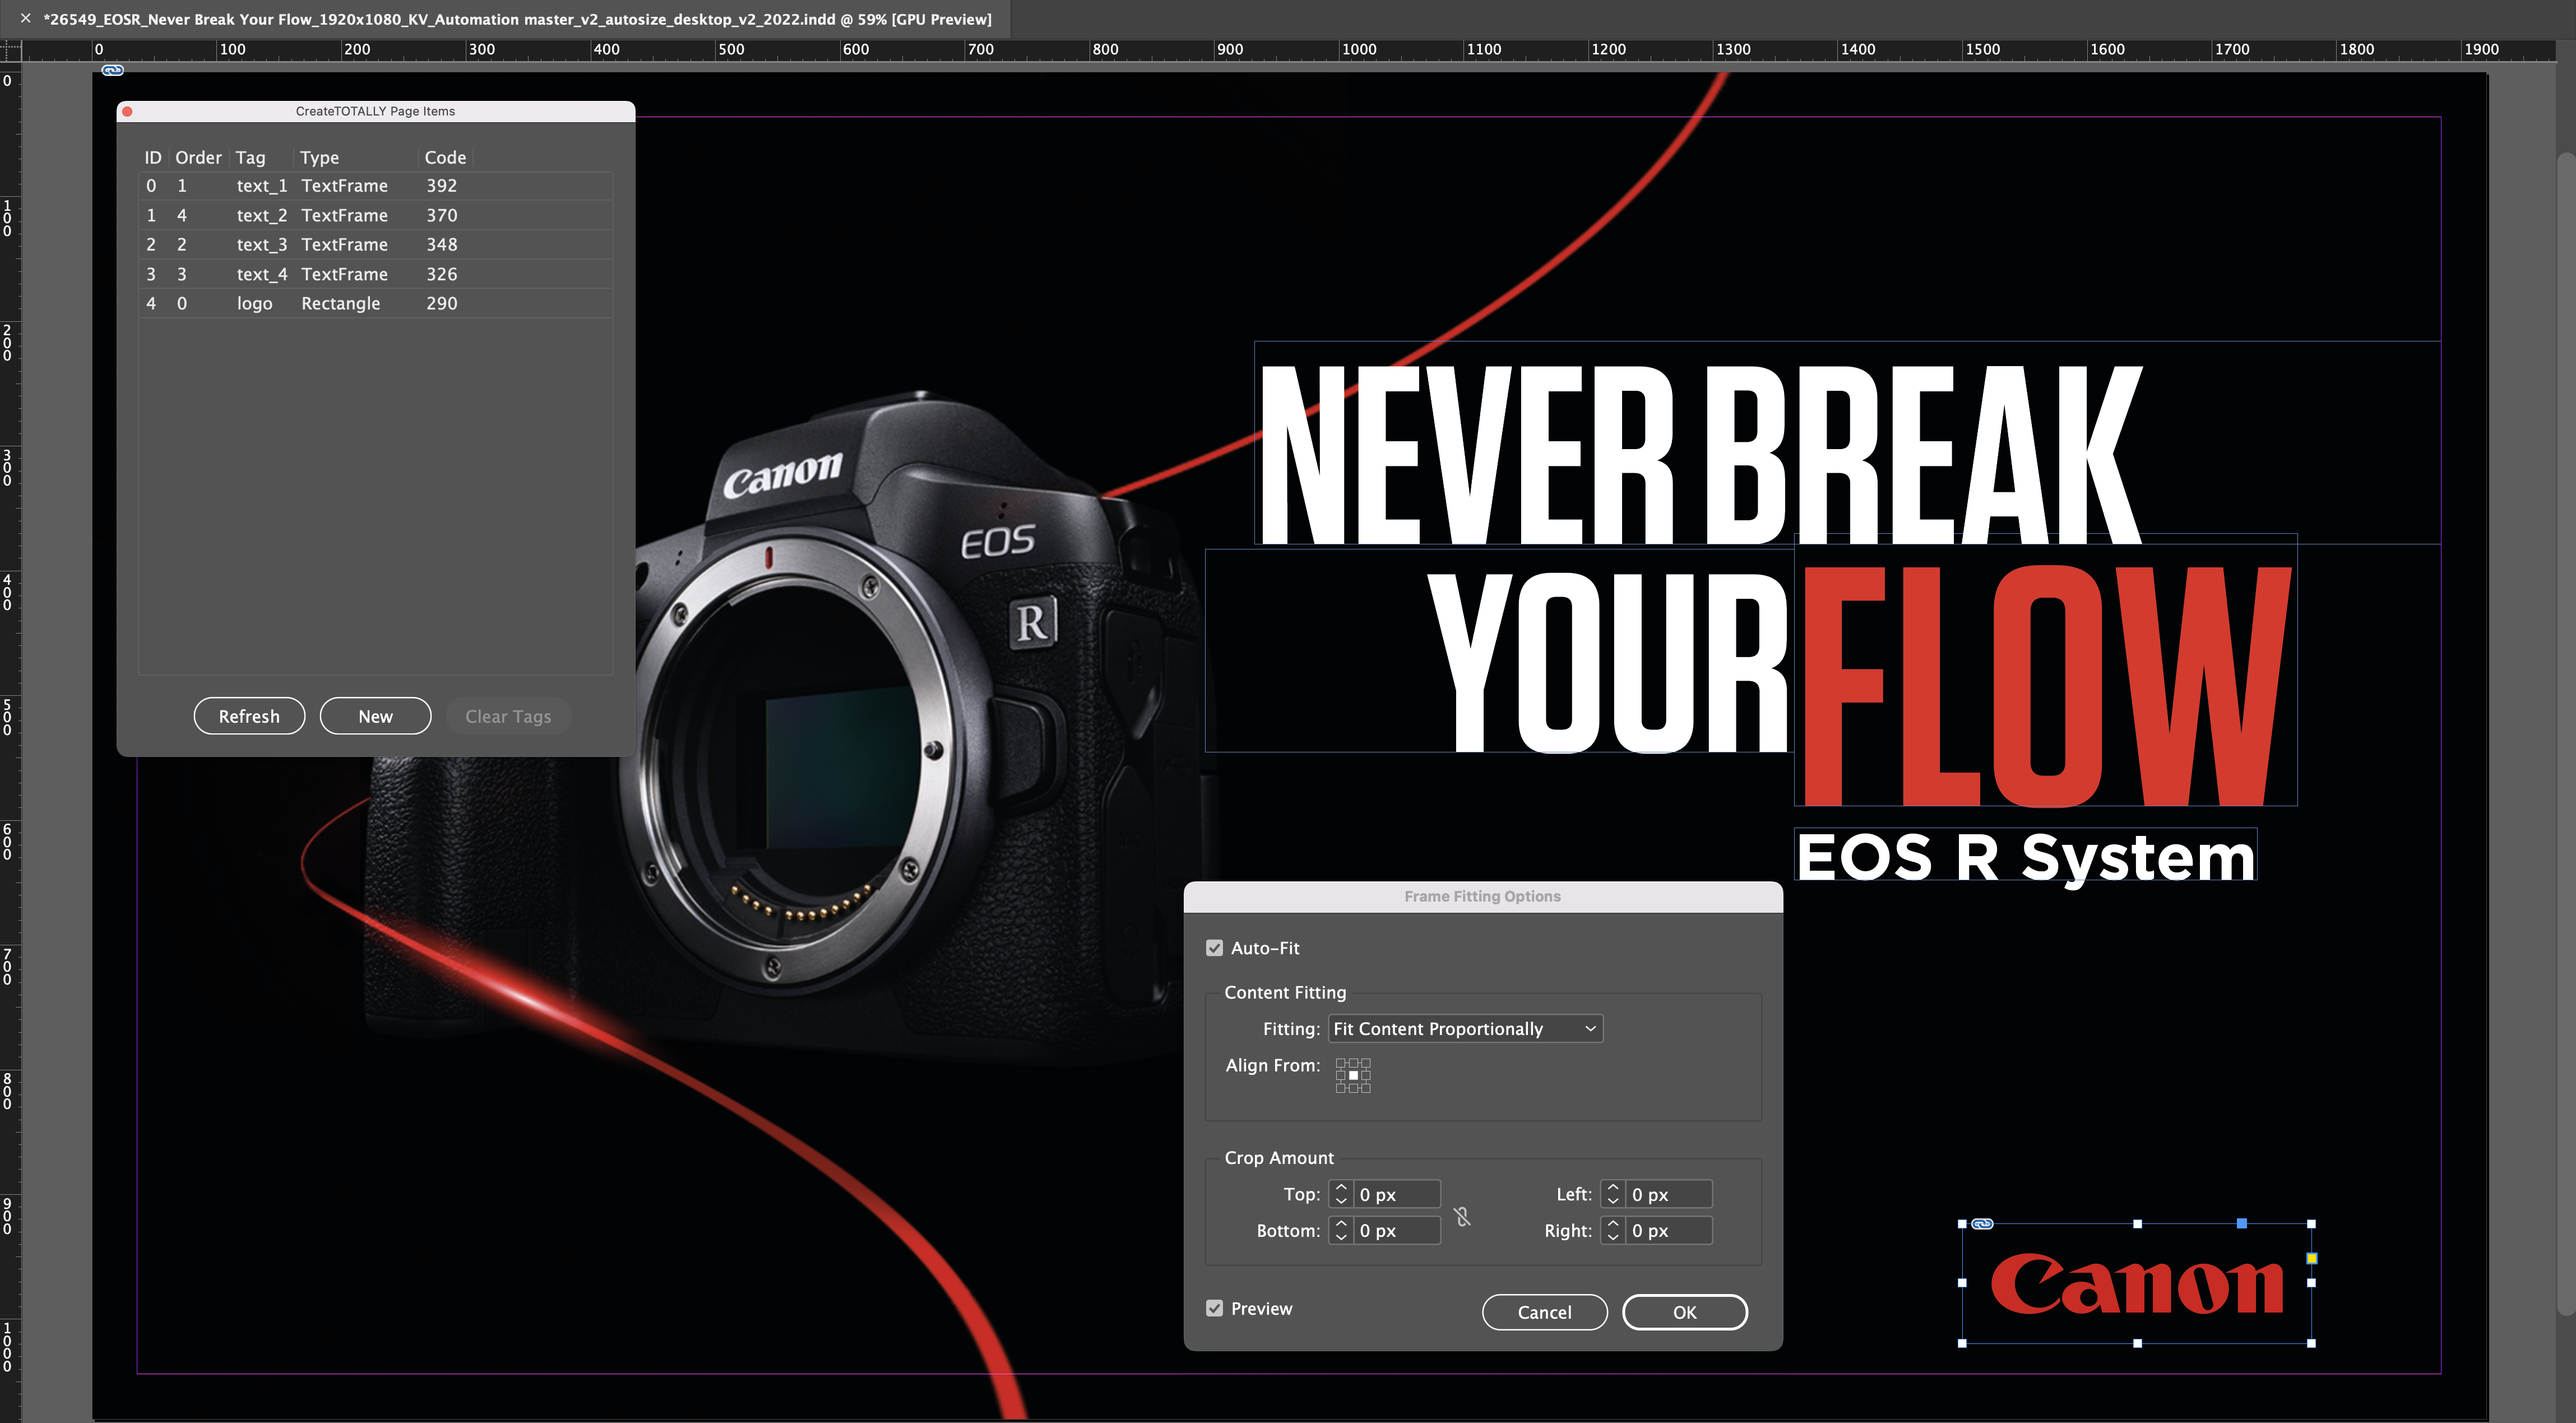
Step 2
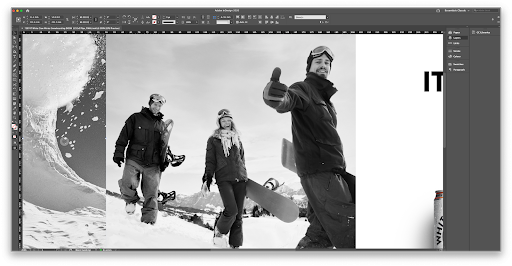
To ensure the left of the slope on the snowboarder image aligned to the bottom right of the Snow Wave image we applied the following Frame Fitting Options to snowboarder image:
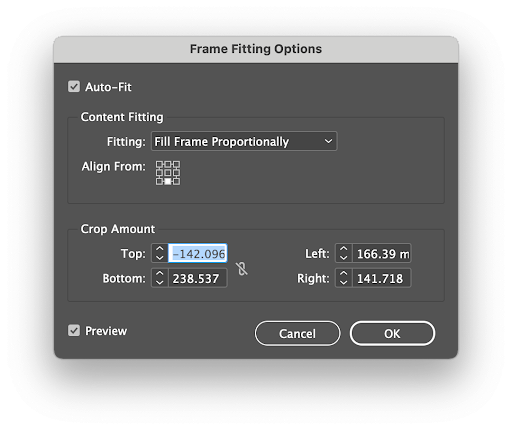
Auto-Fit was selected. Fitting: was Fill Frame Proportionally and Align From: was Bottom Centre.
Tip: Make sure Auto-Fit is selected.
Step 3
To ensure the bottom right of the Snow Wave image aligned to the left of the slope on the snowboarder image we applied the following Frame Fitting Options to Snow Wave image:
Auto-Fit was selected. Fitting: was Fit Content Proportionally and Align From: was centre.
Fit objects to frames
If the frame and its content are different sizes, you can use the Fitting commands to achieve a perfect fit.
Frame alignment options apply to frames that contain either a graphic or another text frame (text frames nested within another frame), but they do not affect paragraphs inside a text frame—you control alignment and positioning of text itself using the Text Frame Options command and the Paragraph, Paragraph Styles, and Story panels.

Fit an object to its frame
- Select the frame of the object.
- Choose Object > Fitting and one of the following options:
Fill Frame Proportionally
- Resizes content to fill the entire frame while preserving the content’s proportions. The frame’s dimensions are not changed. If the content and the frame have different proportions, some of the content will be cropped by the bounding box of the frame.
Fit Content Proportionally
- Resizes content to fit a frame while preserving the content proportions. The frame’s dimensions are not changed. If the content and the frame have different proportions, some empty space will result.
Content-Aware Fit
- Automatically fits an image inside the frame based on the image content and frame size. The frame's dimensions are not changed. To make this as the default frame fitting option, go to Preferences > General and select Make Content-Aware Fit the default frame fitting option
Note:
- Content-Aware Fit removes the transformations, such as Scale, Rotate, Flip, or Shear, applied to the image. However, the transformations applied to the frame are not removed.
- Content-Aware Fit is not available on Windows 32-bit.
Fit Frame To Content
- Resizes a frame to fit its content. The frame’s proportions are altered to match the content proportions, if necessary. This is useful for resetting a graphics frame that you accidentally altered.
Fit Content To Frame
- Resizes content to fit a frame and allows the content proportions to be changed. The frame will not change, but the content may appear to be stretched if the content and the frame have different proportions.