
Managing Translations in CreateTOTALLY
Language translations are added to CreateTOTALLY via translation forms. A translation form is a way of grouping together translation fields (such as headline, CTA etc) for a particular Master Template or campaign, along with the translations in all required languages. They can be prepared in 2 ways:
- Create translation form - selecting a master template to create a translation form for and entering the translations directly in the platform
- Import translation form - the translations can be added to an external spreadsheet and uploaded directly into the platform.
Create translation form
Navigate to System Admin > Translation forms
Click on Create translation form
Complete the basic details in the form that appears:
- Name - the translation form needs a unique name
- Campaign - the campaign the translations are for
- Media type - the media tupe of the master templates the translation form is for
- Master templates - the master template the translations are for. This will automatically populate the translation form with the text fields from the master template and the original copy will be added as the master copy
- Languages - add the languages you have translations for
- Approval workflow - select the approval workflow required
Click Save and add translations to proceed with adding your translations. If you don't have the translations ready yet you can click save to save the form to come back to later.
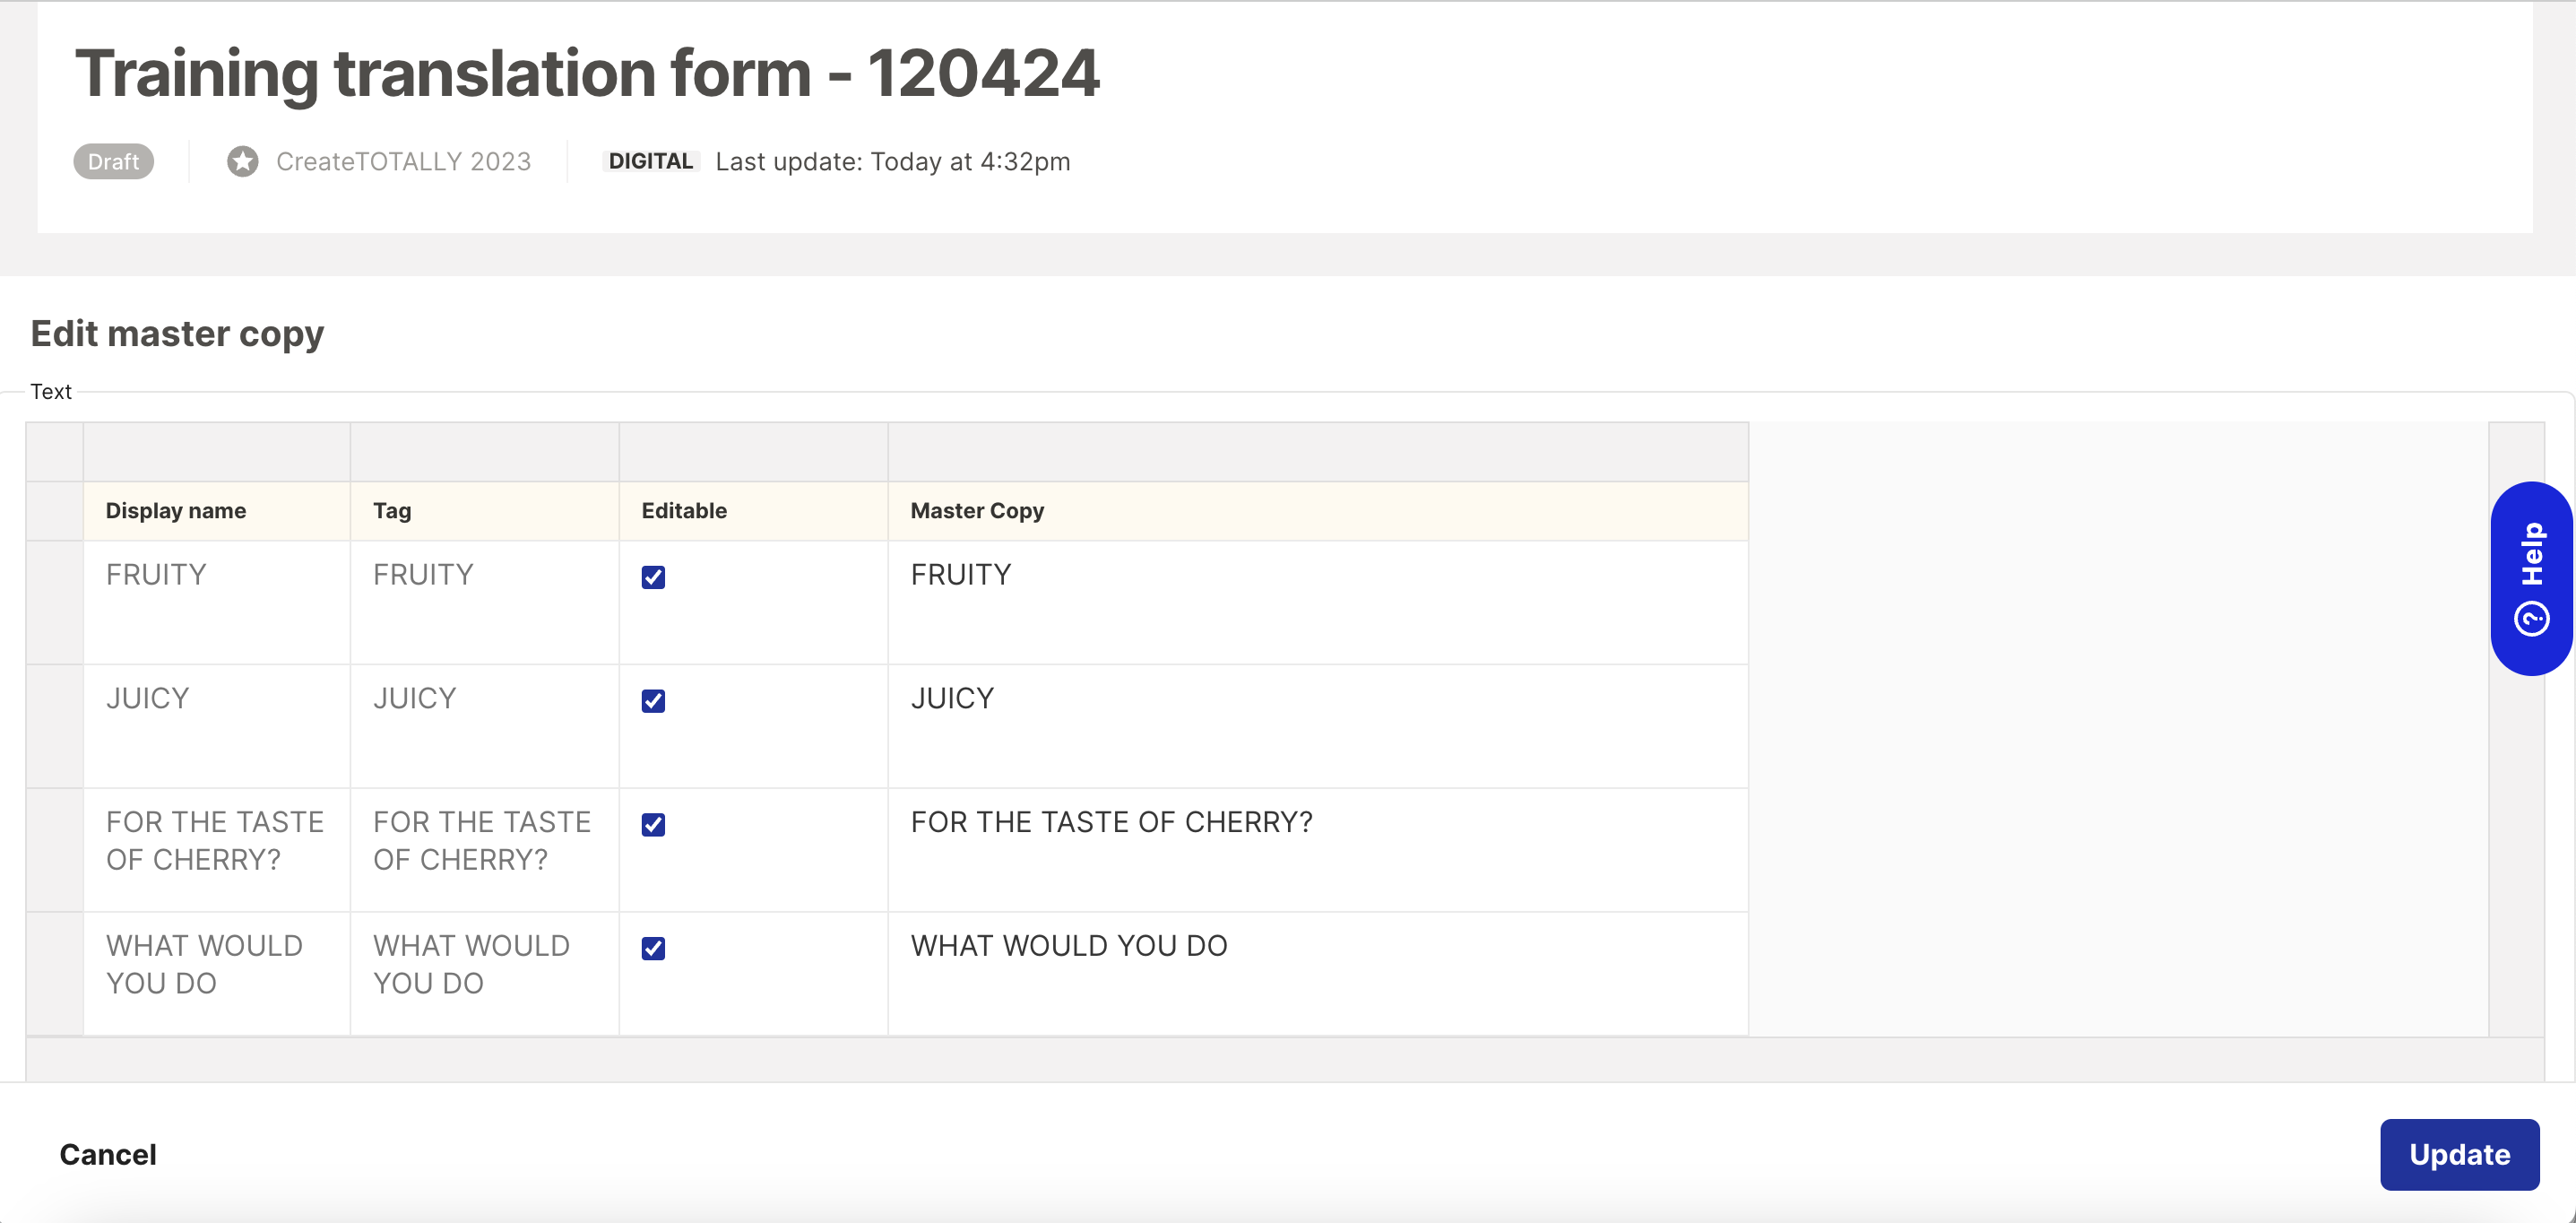
Editing master copy
The master copy will be extracted from the template, but you can update this and specify what fields are editable. Click update when you have reviewed and made your changes.
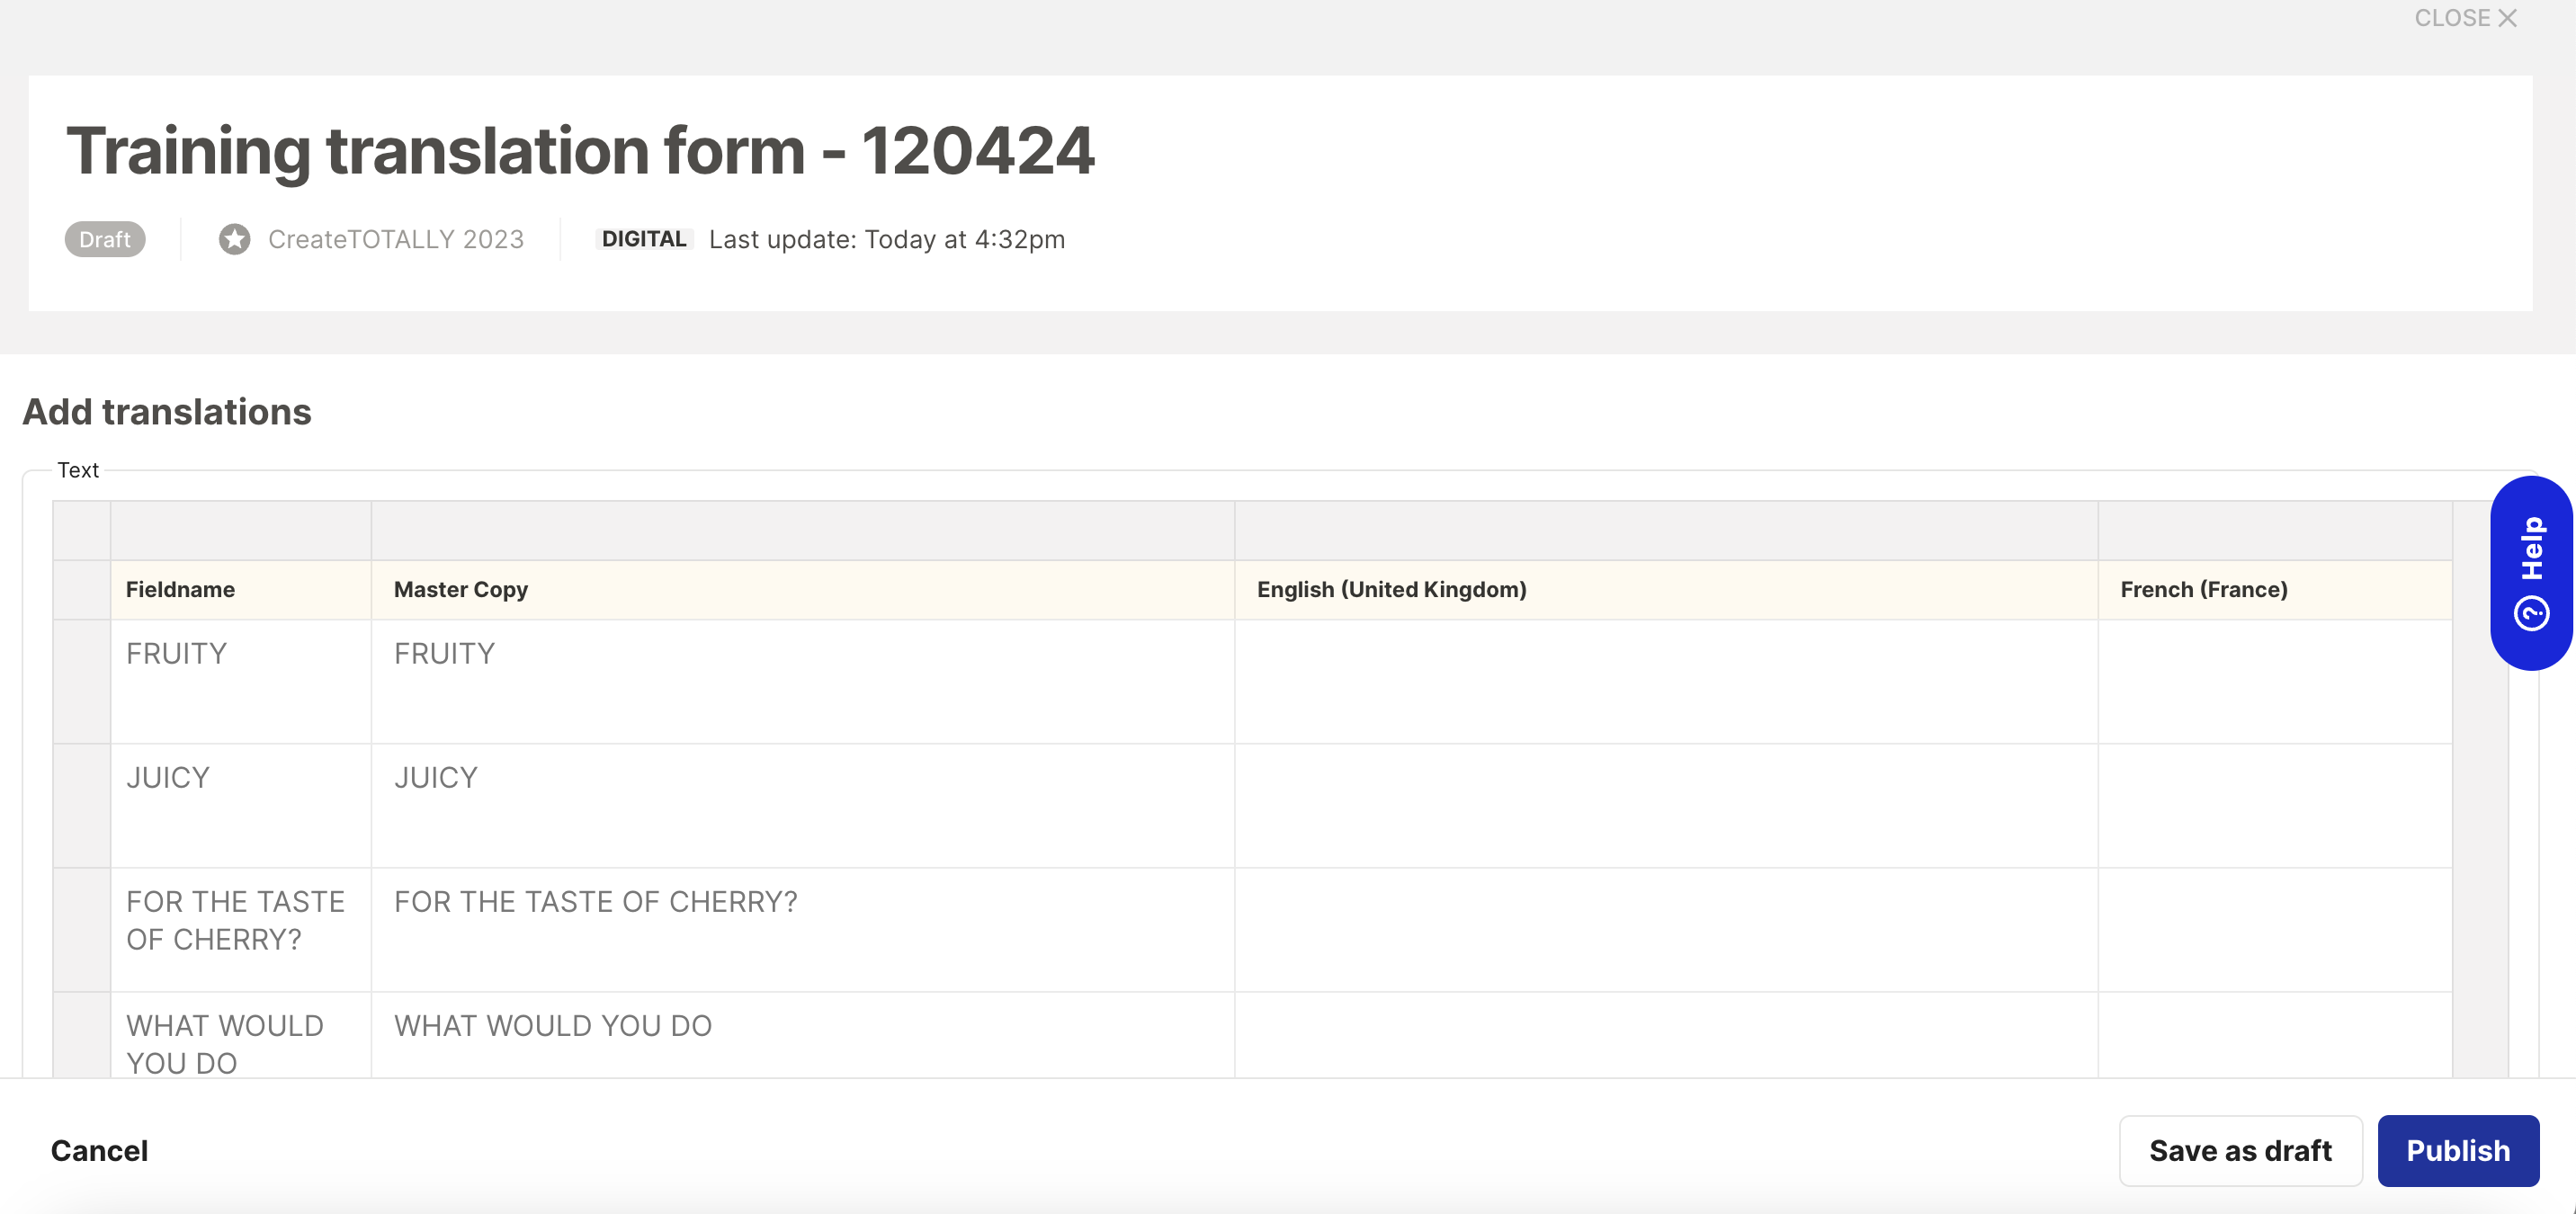
Adding translations
To add your translations you can either:
- Type the translations directly into the table
- Copy and paste from an external spreadsheet/ document. Note, if the cells in your external source are in the same order as the translation form, you can copy/ paste multiple cells in 1 go. If you don't have all your translations, you can add the ones you do have and click save as draft. Otherwise click publish when all the translations have been added
Your translation form will now be available to add to the Master Templates that should use it.
Note - if you have translations with a space between words/ symbols that shouldn’t break over lines e.g 99,5 % or 3 in 1, you can add a non breaking space. To do this enter Shift + Option + Space on a Mac or Shift + Alt + Space on a PC where the space appears.
Import translation form
Your translations can be prepared in an Excel spreadsheet. Start by downloading the sample translation form.
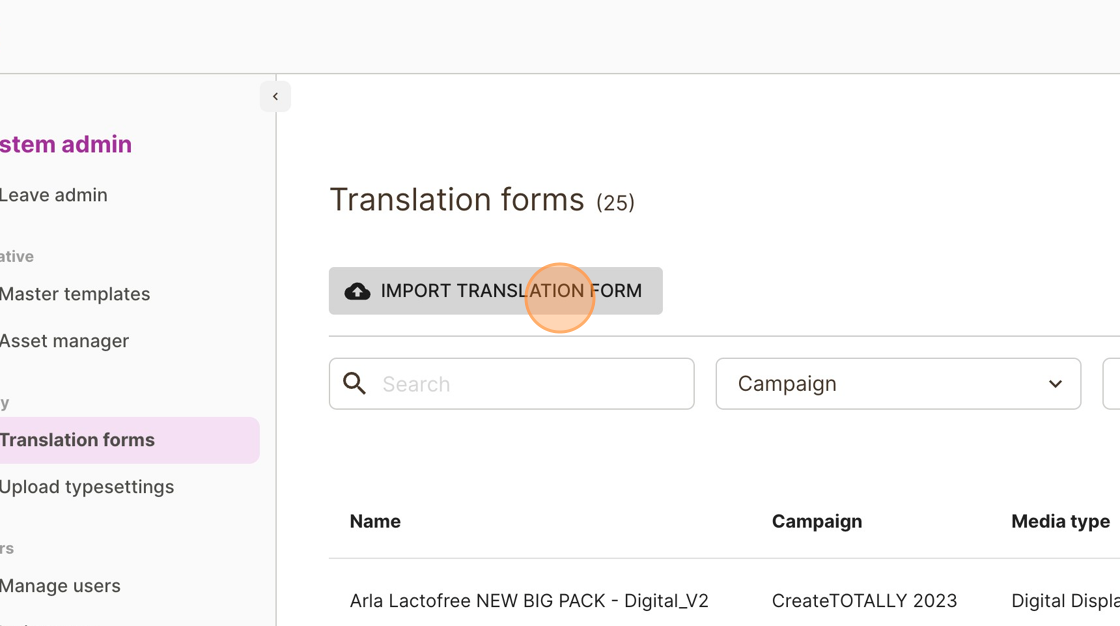
Select IMPORT TRANSLATION FORM

Scroll to the Upload a file section then click download the import template link
Alternatively, you can download a pre-populated spreadsheet from your Master Template by selecting the Generate translations excel icon
Note: the translation form icon will only appear after the template has been analysed.

The translation spreadsheet contains:
- Field name - this is the name of the field that will appear if this text is being approved or during text customisation. It should describe the area of the artwork that this text will appear.
- Creative tag - this is the name of the layer/ tag in the artwork. This is how the platform will know what part of your artwork this text needs to customise
- Customisable - this indicates whether this text field will be editable by the user in the front-end as they are customising the asset
- Languages - each of the columns can then be used to enter a different language. Select the language name from the drop-down in the top of the column
Note - if you have translations with a space between words/ symbols that shouldn’t break over lines e.g 99,5 % or 3 in 1, you can add a non breaking space. To do this enter Shift + Option + Space on a Mac or Shift + Alt + Space on a PC where the space appears.
Once you have prepared the spreadsheet, you can upload it into CreateTOTALLY as a Translation Form.
Creating a new translation form
![Screenshot of: Click "Translation forms"Click "IMPORT TRANSLATION FORM"Click the "Name" field.Type " [[CapsLock]] Create [[CapsLock]] Soda"Click this dropdown.Click "Browse"Click "Next"Click "Finish"](https://cdn.prod.website-files.com/648c13eb6bf8dd3844341221/64e4822c0b3cdd2ed6b1b1d5_stack_animation.webp)
Navigate to System Admin > Copy > Translation forms
Click on IMPORT TRANSLATION FORM
Give the form a name and select the campaign and media type the assets that will use it belong to
Select from the approval options:
- Pre-approved - translations don't require approval
- Client approval - translations will be sent to a Local Market Manager for approval. The Local Market Manager will be selected based on the language
- Internal and client approval - translations will be sent to an Account Manager and then a Local Market Manager for approval
Upload the translation spreadsheet
Click next and the platform will validate the file and create your translations.
If there are any errors in the form, they will be displayed back to you on screen. Errors can be things like missing fields, incorrect language names and duplicated field name/ creative tags. You will be directed to the specific error to allow you to fix it.
Once the translation form has processed, you will see the summary screen. This will show you all of the languages that have been imported.
The translation form view will show you each language, its status and who it is assigned to. Reviewers can be re-assigned from here. They can also be nudged to remind them of the review task.
Updating the approved translations
If you need to add to or change the translations, you can do this by re-importing the form. To do this, click on "re-import translations". From here you can download the existing form (note this will download any approved translations. It won't include translations that haven't yet been approved). Make your updates and upload the form to re-import.
Note: if your form required approval, only approved translation will be available to edit this way.
Translation approvals
If a translation form requires approval, each language will need to be reviewed separately. The approver will be notified of this via email. They will also have a task on their dashboard which will link directly to the translation form. To review the translation, simply click on the task.
Note: the platform will use Campaign User roles to automatically assign reviewers. Client review tasks will be sent to Local Market Manager roles for the specific language and Internal review will be sent to Account Manager roles for the specific language (or all languages).
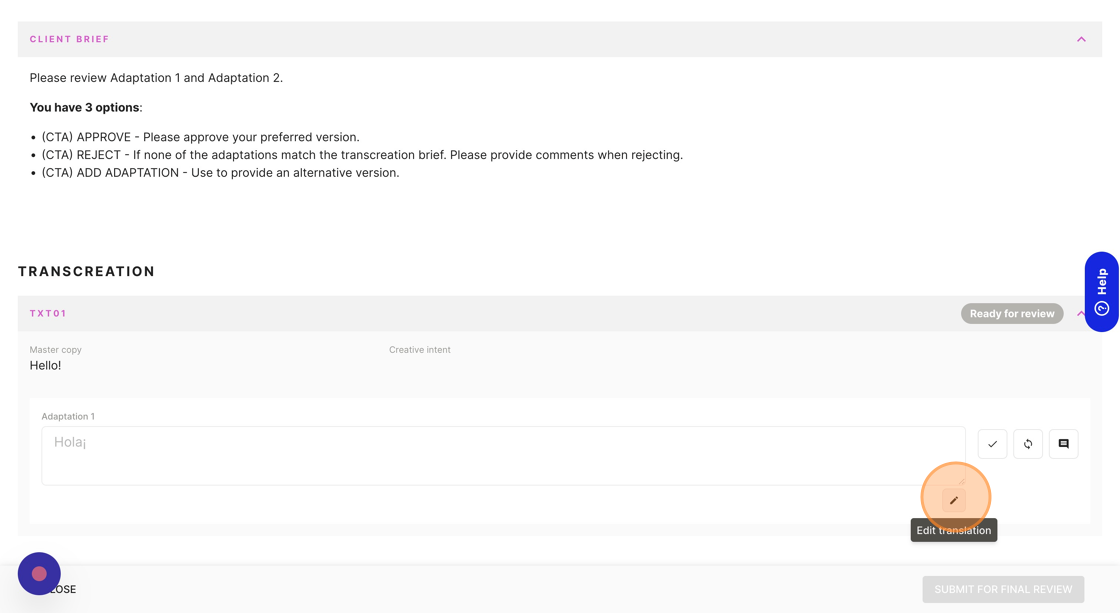
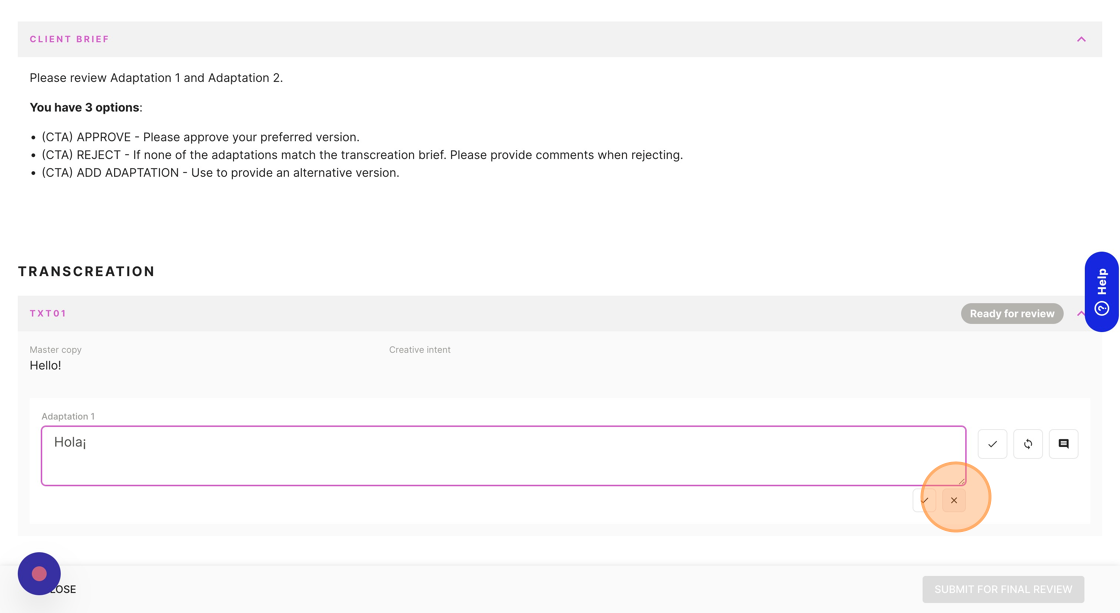
The translation form that appears consists of the basic details at the top of the page and then a brief. The brief will show you examples asset(s) containing the copy, to give the translations context.
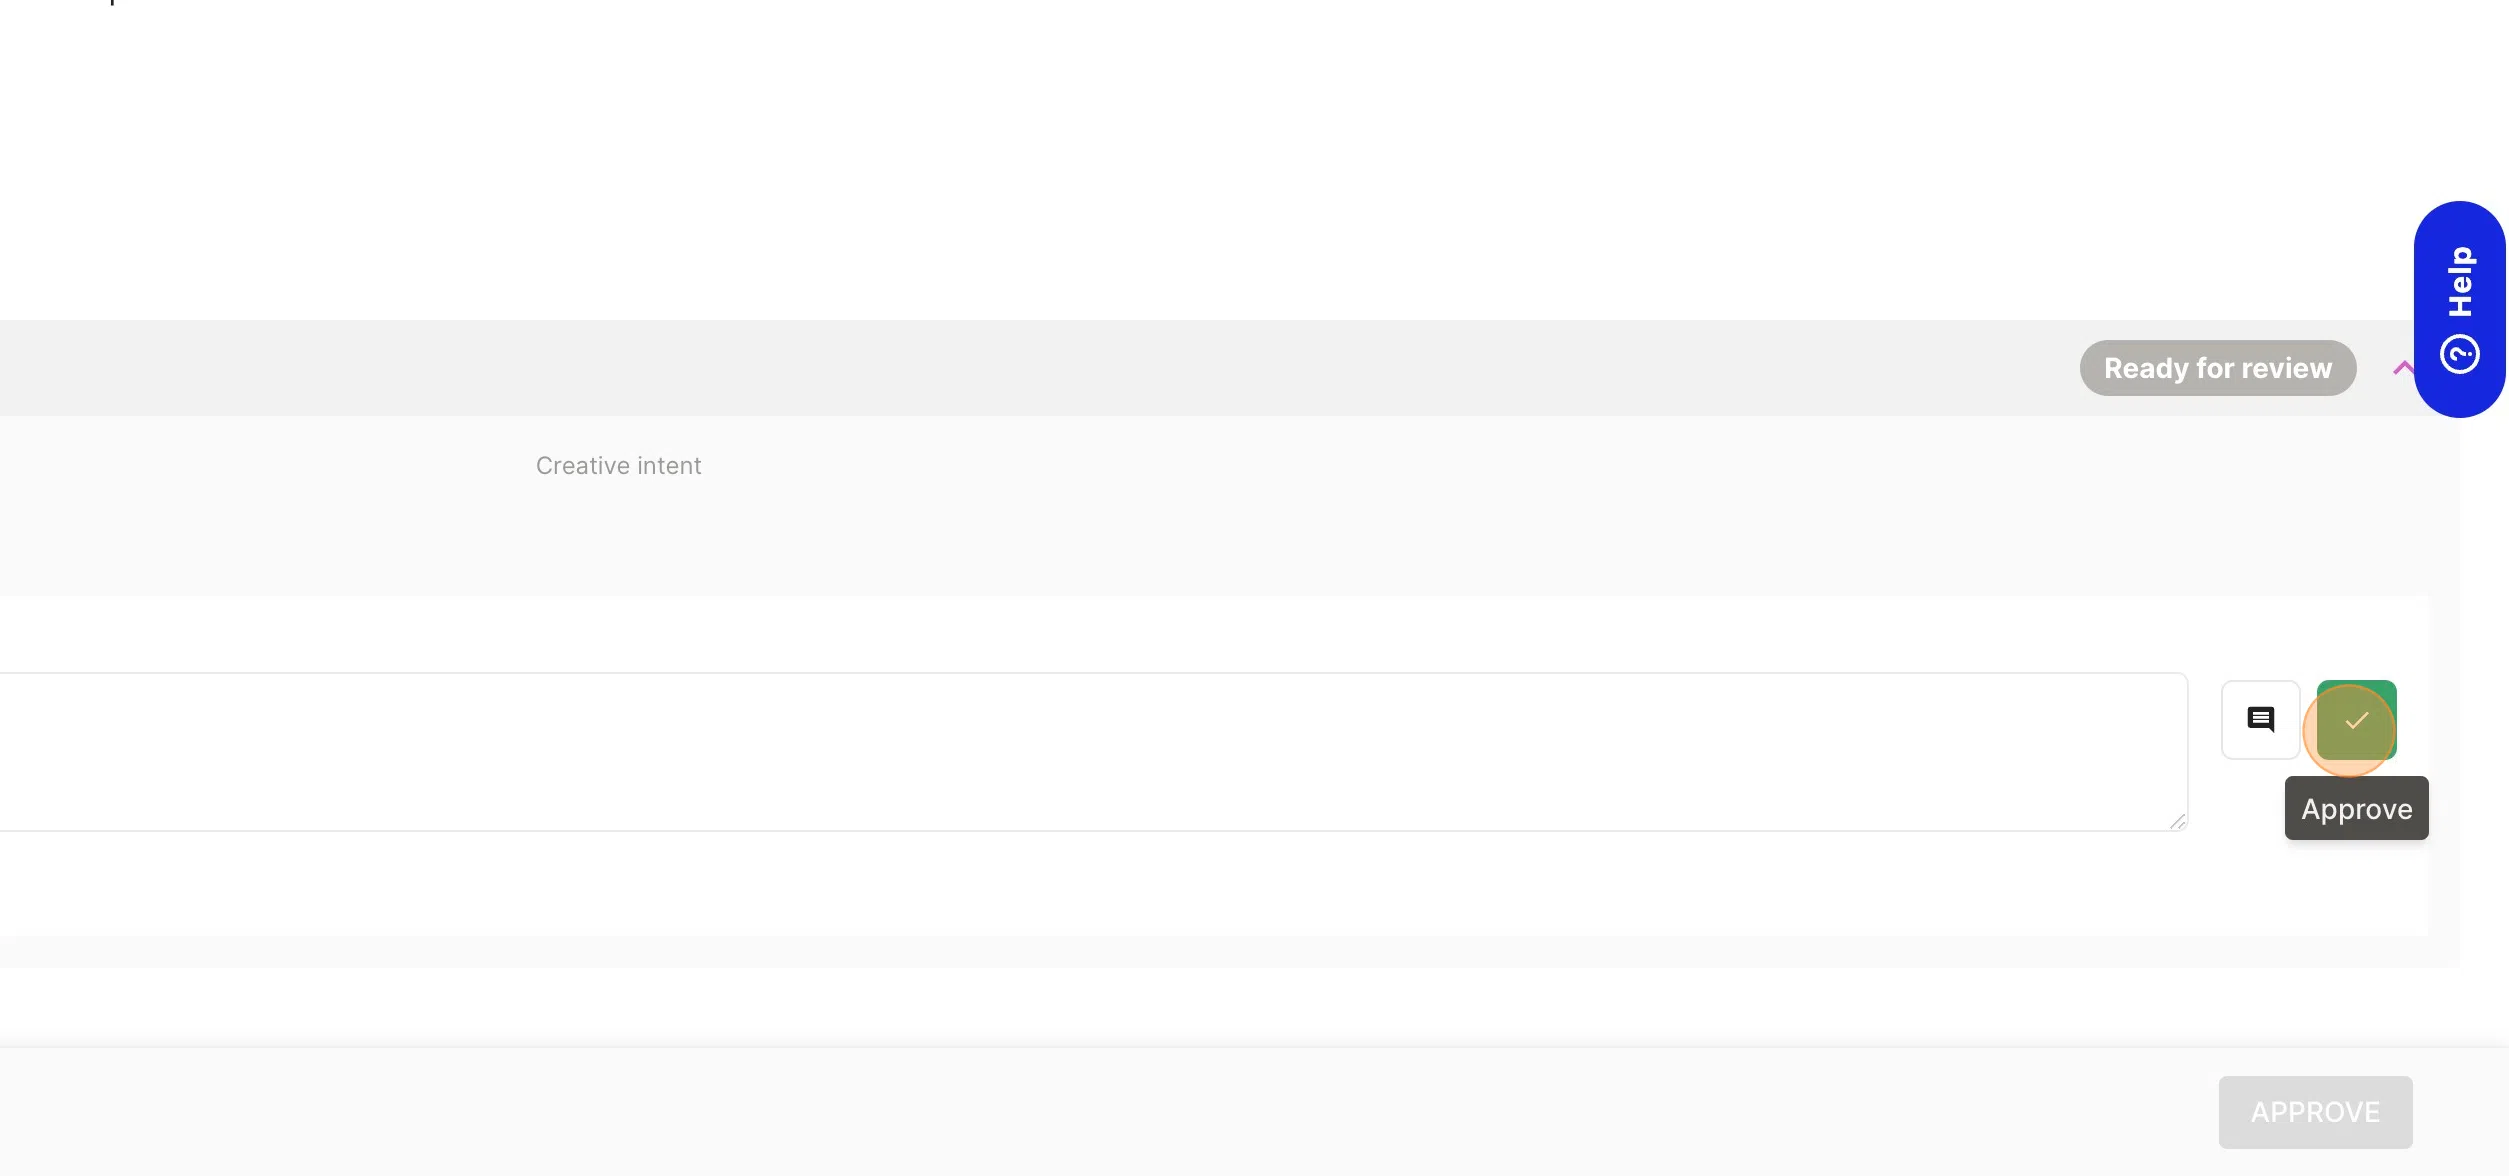
Each field of copy appears in a separate section, allow you to review them 1 by 1. Each field needs to be approved in order for the form itself to be approved. To do this, simply click the tick icon. The "ready for review" label will then change to approved. Once all the fields have been approved, the "approve translations" button at the bottom of the form will become active.
If a reviewer would like to make changes to a translation, they can simply click the pencil icon underneath the field and make their changes.
Once each of the translation fields has been approved, the Approve Translations button will become active at the bottom of the form.
Once they have approved all the fields, the amended copy will be available for use in the campaign.