
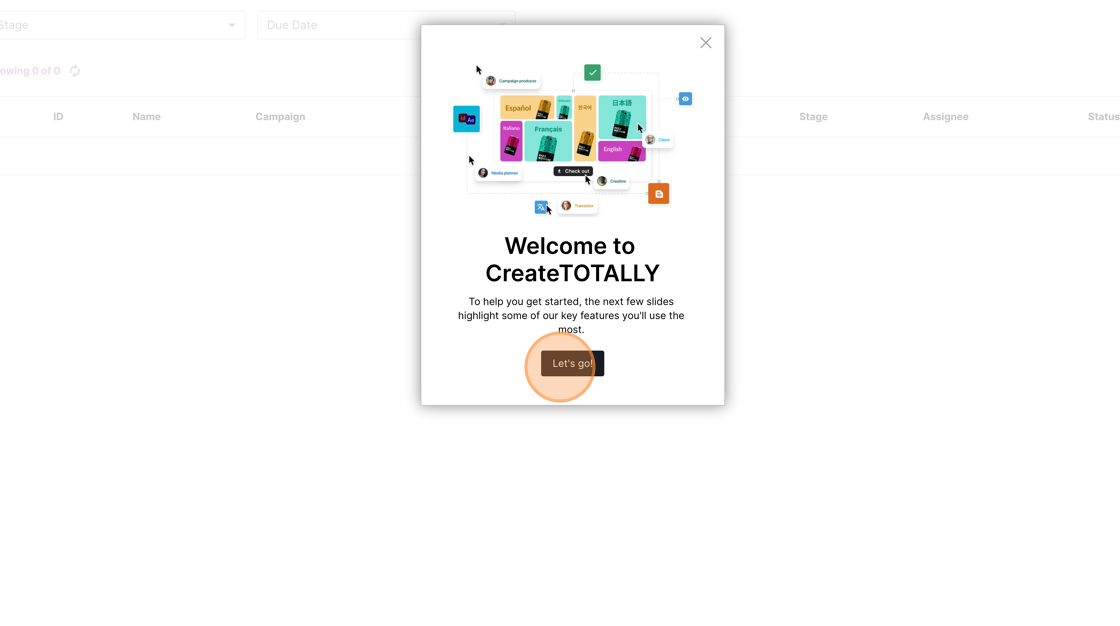
Welcome to CreateTOTALLY
CreateTOTALLY is a creative automation platform designed to streamline and optimise your content production processes. Our platform offers a comprehensive suite of features, including content production planning, no-code templating, creative automation, workflows, reviews and approvals, team collaboration, and advanced reporting.
Getting started
We know you must be excited to get started with automating your content. Here are the main steps you'll need to get up and running!
When you log into the platform for the first we will take you through a quick tour of the key features.


Install Adobe plugins
To prepare InDesign files for use with CreateTOTALLY, you need to install our app StudioCraft for InDesign. This can be downloaded here.
To package After Effects projects to upload into CreateTOTALLY, you will need our app StudioCraft for After Effects. This can be downloaded here.
Prepare your project files
We have created detailed guides for how to set-up your project files:
Upload your project file and set-up your Master Template
To turn your project files into templates, navigate to System Admin > Master Templates.
Click Upload Files and upload a preview of each of the projects you are setting up. You will then need to add all the required metadata and set the Master Templates to be active. Find out more about that here.
Next, click on files and click to open the folders to locate your new Master Templates. They will be created in the Creative you selected when adding your metadata. This will automatically add them into the client and campaign required.
Open up the automation folder and drag all of your project files in, then upload. Once all your files are uploaded, click the analyse button next to your project file.
If your Master Templates have customisable images or videos, you can then mark them as variable and apply your tags. Find out more about that here.
Upload your translation form (if required)
If your Master Templates will be localised in different languages, you may want to upload a translation form that contains this copy. This can then be assigned to the Master Templates. Every time an adaptation is ordered for a language in the form, the copy will be automatically updated. Find out more about translation forms here.
Test your template in a bulk content plan
Once your Master Templates are set-up, you will want to test that they are working as you expect. You can do this by leaving System Admin and setting up a new content plan.
Click on Media Plans in the left hand navigation and Import Content plan. Give the plan a descriptive name like Campaign name Test Plan MMDDYY, select the campaign, media type, market and country you are preparing the plan for. This will give you the Master Templates that are available.
Select the Master Templates you want to test and then download the spreadsheet. Complete your details following the instructions here. It's important that the details you enter match exactly the spelling in the platform. There are drop-downs in the Excel file for some of the key information such as language and master template.
Then click next on the bulk content modal and upload your spreadsheet. The platform will check the details and if they are all correct, you will see a success message. If you have any errors, you will be shown when needs to be fixed on screen. Common error solutions are available here.
Check the details of your adaptations on screen and if you are happy with them, submit to render them.
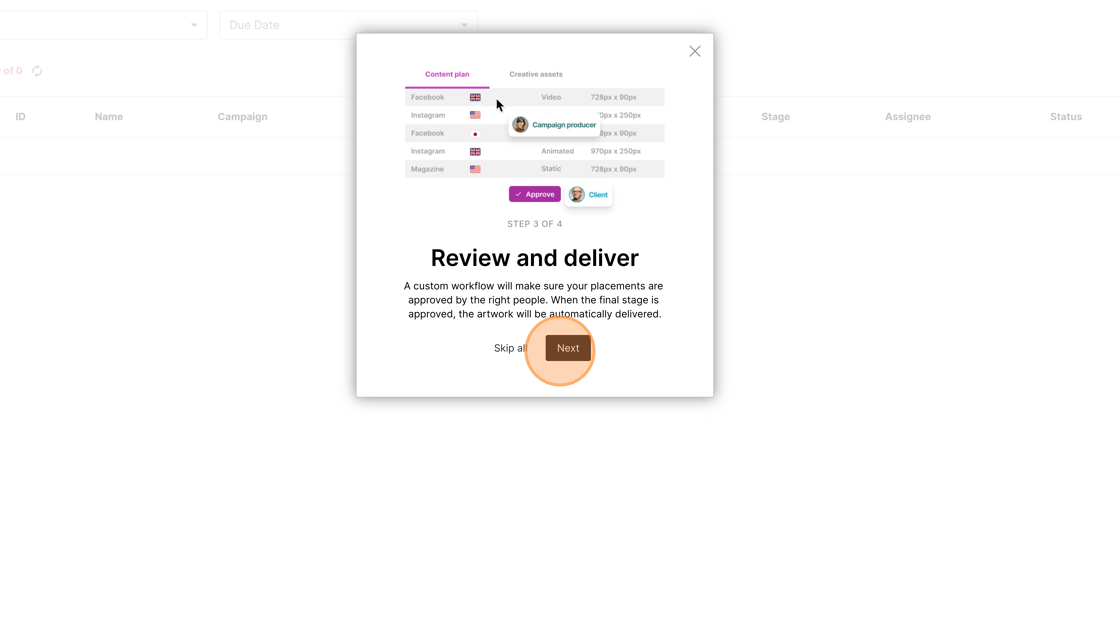
Review your adaptations
Once the adaptations are ready, they will be automatically sent on the approval workflow that is set-up for them. Approval workflows can be configured for the campaign, media type, market and country selected. You can access the proofs for review in a number of ways:
- Tasks list - a task will be added for each proof you need to review. Simply click on the task to open the proof
- Insertion screen - from the content plan, you can click on the approval status to view the full details of the adaptation. From here you will see the review button to view the proof (if you are an approver). If you aren't an approver, but would like to view the proof, you can add yourself to the workflow from here
Browser settings required to review proofs
Note - our artwork review tool relies on 3rd party cookies in order to work. Please ensure these are enabled on your browser or you may not be able to leave comments on a proof. Within your browser settings, check to ensure:
- Chrome - Settings > Privacy and Security > third-party party cookies > Allow third-party cookies
- Safari - Settings > Privacy > Prevent cross-site tracking is disabled
- Internet Explorer - Select the "gear" icon > Privacy > Advanced > Third-party Cookies - make sure they are enabled
- Edge - Settings and more > Settings > Site permissions. Select Cookies and site data - make sure cookies are enabled
If you would like, you can check-out the automated project files. You need to install our app StudioLink. This can be downloaded here.
This allows you to review the Adobe files in detail and make any small tweaks to the artwork you need.
Click check-out to download the full job bag with the StudioLink app. Review the files and make any changes you would like. To continue, make sure you check-in the files (or check-in without changes). This will create a new proof with any changes you've made which can then be reviewed.
Getting around
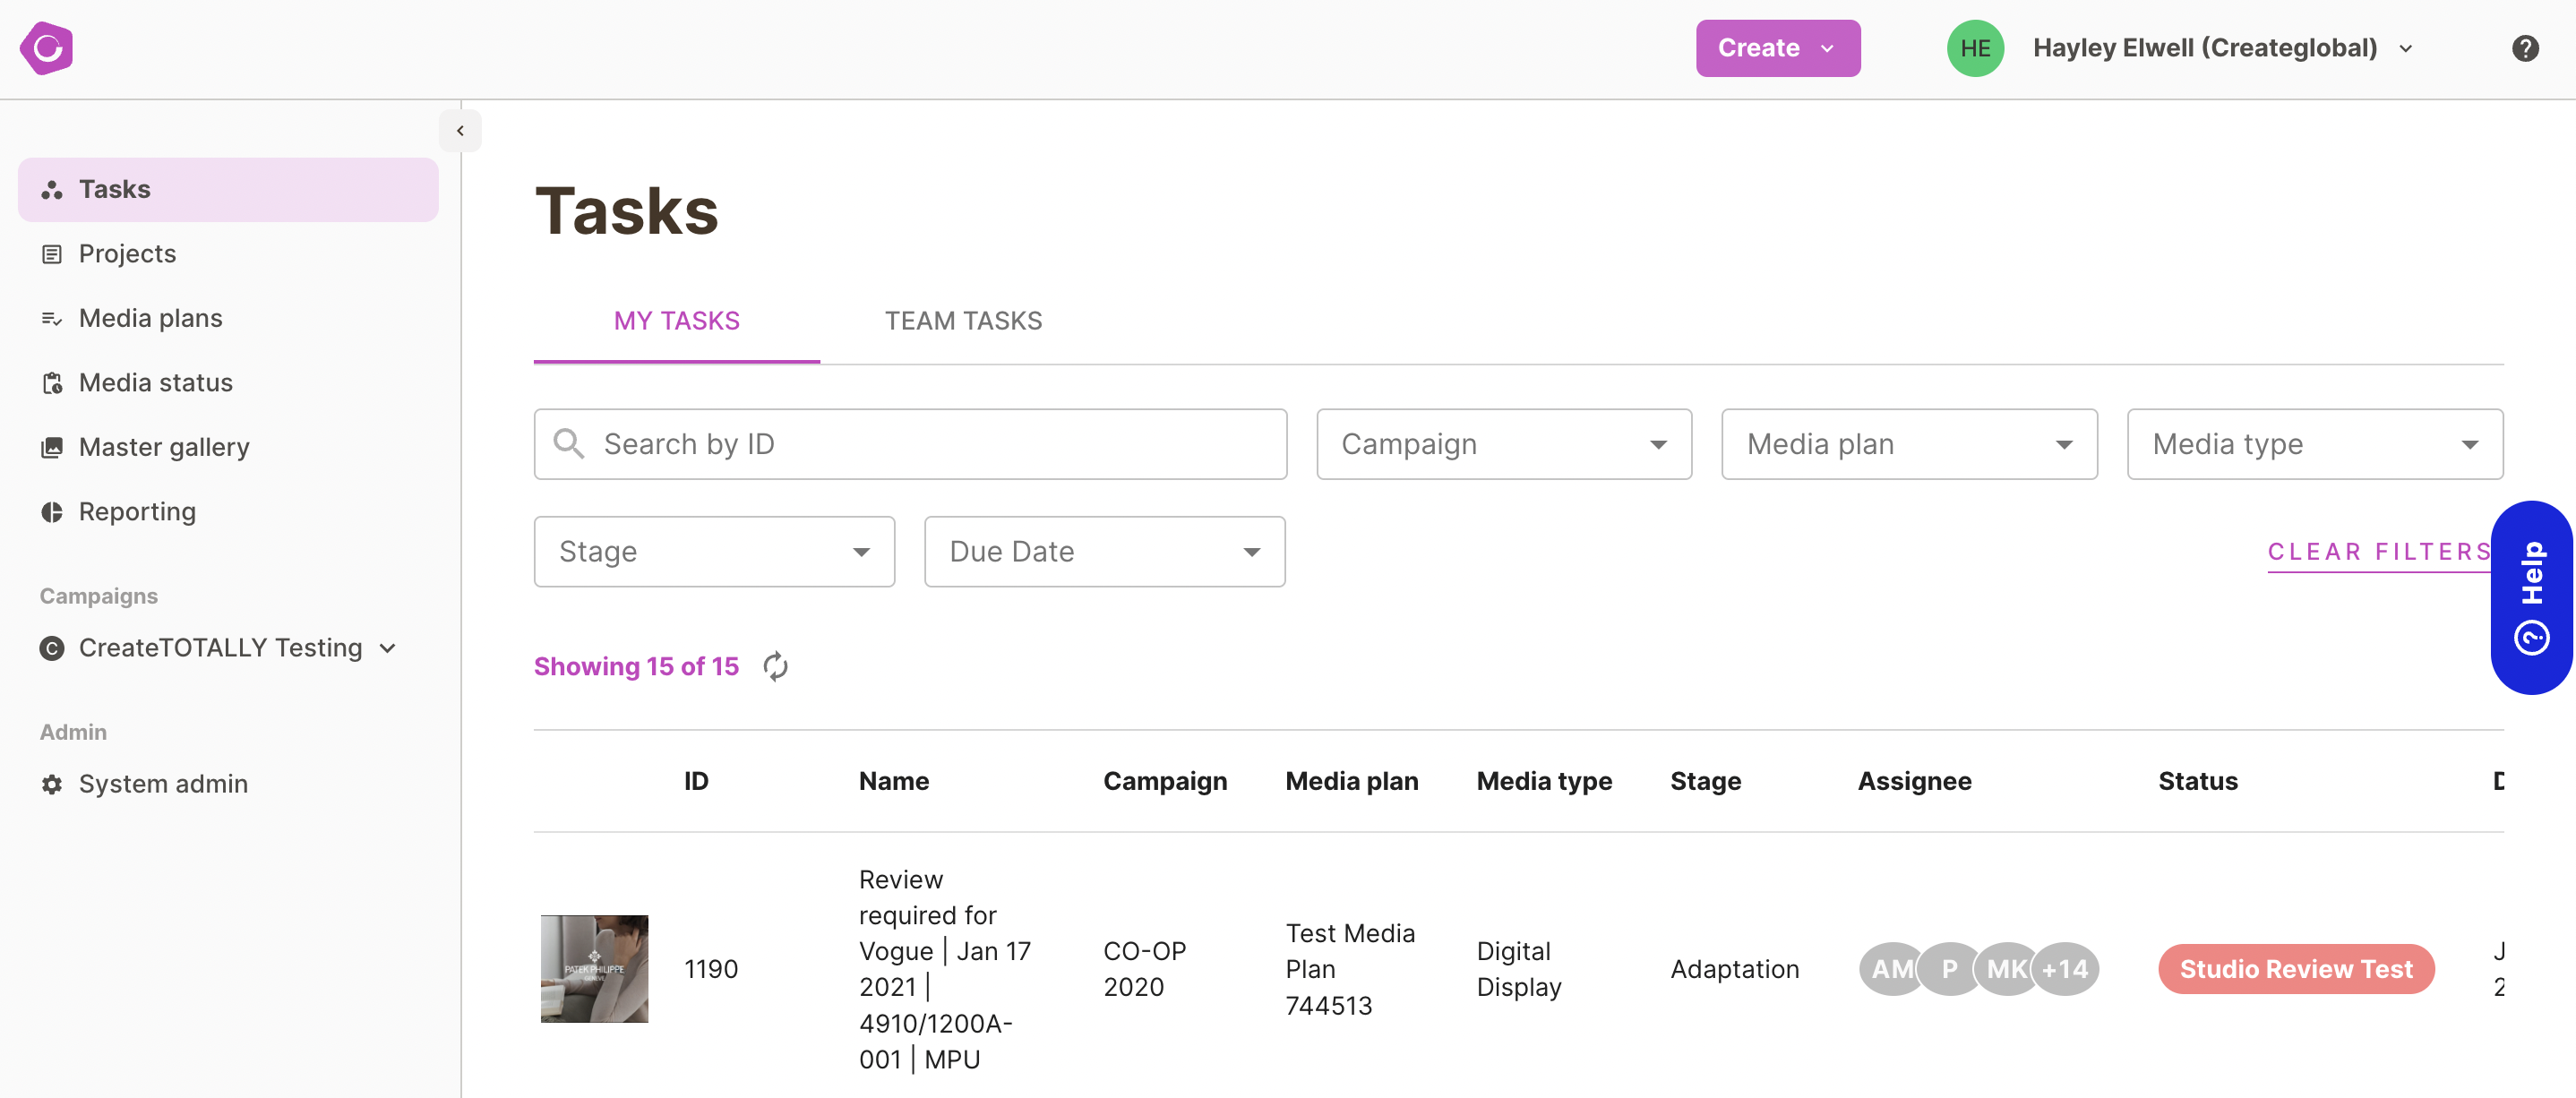
Left hand navigation menu
You can access all the main features you need from the left hand navigation menu.
This includes:

Tasks - A list of all the actions you need to take in the platform, sorted by due date
Projects (not available to all users) - A list of the projects that have been created in the platform
Media/ Content plans - All of the plans that you have created or have access to will be available here
Media Status - A list of all the artwork adaptations you have access to
Masters - A gallery showing all the master templates available
Reporting - The reports you have available will be visible here
Campaigns - Each campaign you have access to will its own section where you can focus on all of the aspects of the campaign
System admin (only available for certain user roles).
You can hide the navigation panel, click on the drawer icon. Once minimised, click on the drawer icon to open the menu again.
Top navigation
The top navigation panel gives you access to quickly create things you need to do on a regular basis, namely creating a new media plan or project.
You can also logout by clicking on your name > logout. If you are going on holidays and would like your future tasks to be assigned to someone else in your absence, you can do this in Deputy settings.
The support site can be found by clicking on the ? icon in the top right hand corner.

Task list
When you login to CreateTOTALLY, the first page you will see is your Tasks. This is a list of all the actions you need to take, ordered by Due by date (earliest date first). You can take action on a task directly by clicking on the row.
The task name describes the action required and clicking the task will navigate you directly to complete the action. You can search for a specific task by its job ID, or filter to locate specific tasks types, by:
- Campaign
- Media/ Content Plan name
- Media type
- Stage
- Due date
Task Types
In the task list, each different task type will feature either an icon or a thumbnail next to it. These are a visual indicator of the type of task:

Video or Static proof

HTML proof

Translation

Media plan/creative allocation
Task Status
So that you can quickly see when tasks are due, the status is displayed as a traffic light colour:
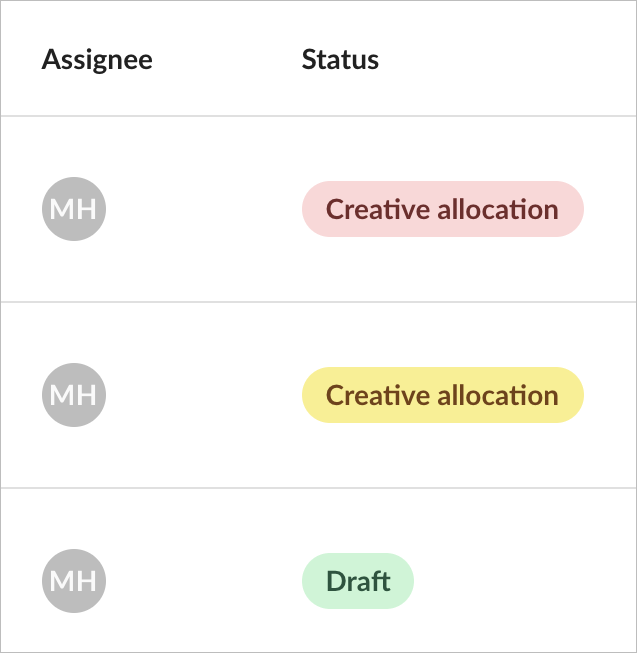
Red if it is within 7 days of the due date
Amber if it is between 7 and 14 days of the due date
Green if it is more than 14 days before the due date